Lesson 4. Configure the PLC via MQTT and EEPROM
#4 How to configure your Industrial Shields PLC through MQTT
In the chapter #4 is explained how to configure our PLC. Industrial Shields PLC's have an EEPROM where you can set and save some important values that are very relevant for your application.
In this chapter we will follow an imaginary application. Imagine an HVAC (Heating, Ventilating and Air Conditioning) application where you have a value of humidity and temperature that are your reference point for the system. These values shall be in your EEPROM to not lose it during a power cut and when the PLC restarts again just take the last value of the EEPROM to continue with their functionality.
So, in the post we will learn how to use our EEPROM, how to send from the Node-RED values well interpreted by the PLC and how to get values properly interpreted from the PLC to the Node-RED application.
Requirements
The requirements for this chapter are:
- Mosquitto or other MQTT broker running
- Node-RED installed and running
- M-Duino family PLC
- Ethernet Network
- Arduino IDE installed with the proper MQTT Library
*Follow the previous chapters to see these steps.
Let's begin with the practical part. At the beginning we will start with the Node-RED application. Our Node-RED app will consist of an Edit Numeric Node where the user will be able to introduce the desired value of our system. So, add two numeric nodes from the dashboard functions.
Our temperature range will be between 15-35ºC (step 0.1 ) and our humidity will be between 0-100% (step 1).
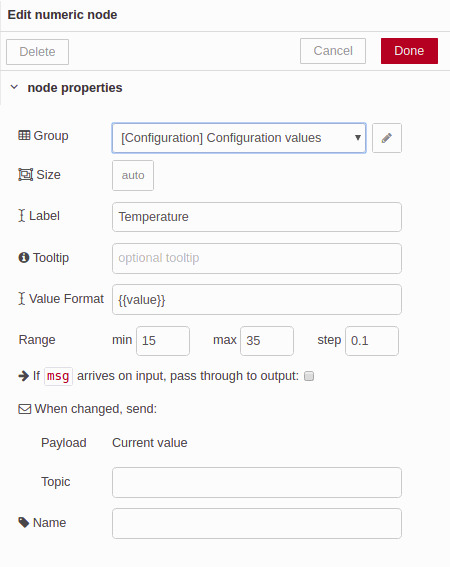
Once the two Edit Numeric Nodes are placed, just configure them to show in the third tab of our dashboard as a configuration tab.

Now, our dashboard looks good. Just let's attend to the logic of the application. We want to send this value directly to our MQTT broker. Before we do that, we will have to make some changes on this variable to make it easier to understand the data in our controller. All Javascript variables are 64 bits. This is a problem for us because Arduino Mega or Leonardo, used in Industrial Shields PLCs, just accept a maximum of 32 bits.
In order to change this value, we will have to create a new function in our Node-RED workflow.
Add an empty function and configure it as follows:
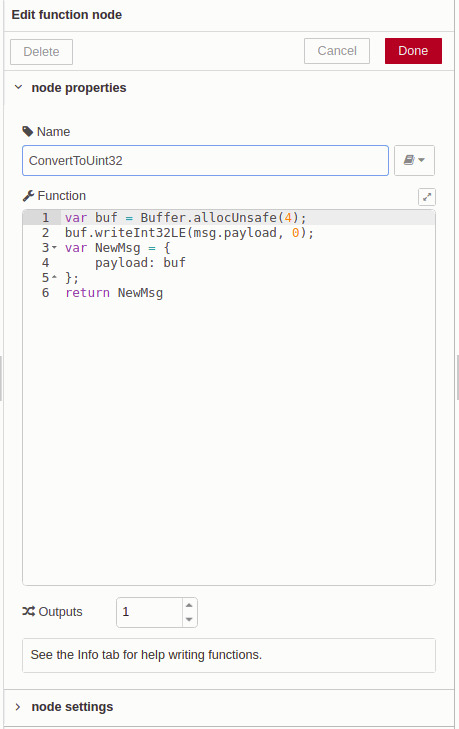
Buffer.allocUnsafe() function returns a new uninitialized buffer of the specified size. In our case, we want a 4 bytes buffer, take a look on this link to know more about the NodeJS libraries NodeJS buffer information .
Once the buffer is initialized, we can proceed to transform our value to a int32_t little endian as our controller can read with any problem. To do that, we are using the writeInt32LE(value, offset) function. Read more about it:
To give more resolution to our system, we have decided to multiply the temperature value by 10 in order to treat with centenary numbers in our PLC or controller. So add a short function like that:
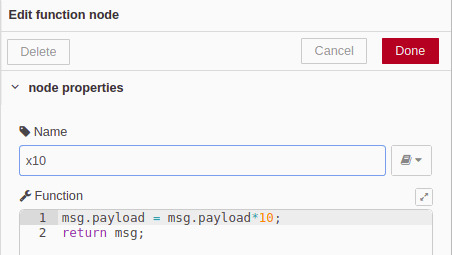
After that, our value is ready to be sent. Add the MQTT send function with the desired topic. At the moment, our workflow shall looks like:
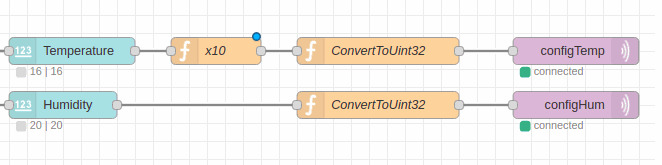
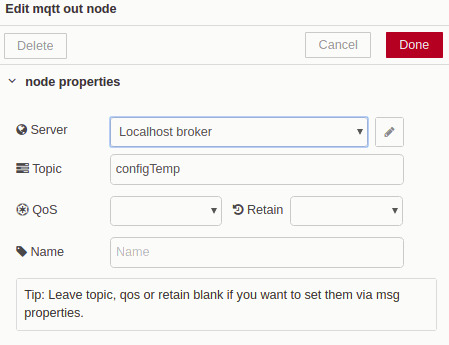
Half of the Node-Red is done. As you already know, NodeRED nodes actuate when the node suffer a change. Then, imagine that for some reason you have power cut in your system. The PLC will be working as expected because it has the configured value in their EEPROM, but the system will not know in which value the PLC is working. To solve this issue, we will send through the same topic the configured value saved into the PLC EEPROM when the PLC restarts their functionality.
How we relate this to our Edit Numeric Node? It just the same as before but in the other way:
- Add a MQTT function
- Subscribe to the same topic
- Add an editable function
Configure the function as follows:
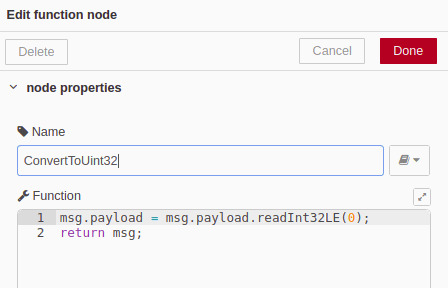
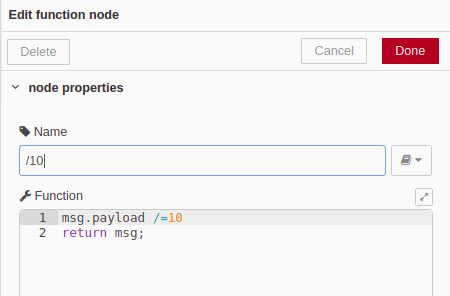
As you can see, we just use one function here. Take a look at the previous NodeJS links to look at how this function works. Basically, the function will read a value of 32 bits in little endian and change it to a JavaScript value. The value is properly treated for our Node-RED application. Just add a new function to divide the temperature value by 10.
Our workflow shall look like this:

PLC Software
Following the Node-RED application we will need a controller that can interact with it. In this second part of the chapter it is shown an example code. The code is a simple example of how to use our EEPROM, structures and MQTT communication protocol.
In our Arduino based PLC we will have a structure made of two int32_t, one for temperature and another for humidity. These values will be system values to set the behavior of the system.
//Configuration structure
typedef struct {
  int32_t temperature;
  int32_t humidity;
} actualConfig_t;
actualConfig_t actualConfig;
In order to get and put values to the EEPROM we will use the EEPROM.h library. The code uses two main functions of this library, one is EEPROM.get (address, variable); to get values and EEPROM.put (address, variable) to safe values.
The other part of the code that is very important is how to read the values from the MQTT. To do that, we use the setCallBack function.
mqtt.setCallback(receiveMqttMsg);This function will be called every time that we receive an MQTT message.
void receiveMqttMsg(char* topic, uint8_t* payload, unsigned int len){
    if (strcmp(topic, "configTemp") == 0){
        //Set config to variable
        memcpy(&actualConfig.temperature, payload, len);
        //Print to debug
        Serial.print("Temperature set to: ");
        Serial.println(actualConfig.temperature);
        //Set config to EEPROM
        EEPROM.put(eeAdressTEMP, actualConfig.temperature);
    }
    if (strcmp(topic, "configHum") == 0){
        //Set config to EEPROM
        memcpy(&actualConfig.humidity, payload, len);
        //Print to debug
        Serial.print("Humidity set to: ");
        Serial.println(actualConfig.humidity);
        //Set config to EPROM
        EEPROM.put(eeAdressHUM, actualConfig.humidity);
    }
}
This function will compare the topic to know if the value is a temperature or a humidity using strcmp(topic, "configTemp") == 0
Then, we will use the memcpy(&address, data, datalen) to store the data from the MQTT callBack function to our working variable. If in the NodeRED application we didn't modify the data, this process would be much more complicated. Now, we have a little endian int32_t data that is very easy to treat.
Once the data is in our RAM, it is very easy to store information in the EEPROM just using the EEPROM.put() function.
Apart from the code, it is created a debug function that you can use to know the state of our variables during the workflow.
Below it is showed the complete code:
////////////////////////////////////////////////////////////////////////////////////////////////////
//Configuration structure
typedef struct {
  int32_t temperature;
  int32_t humidity;
} actualConfig_t;
#define MQTT_ID "demo"
//including library for MQTT
#include <PubSubClient.h>
//including EEPROM library
#include <EEPROM.h>
//including Ethernet library depending of M-Duino version
#ifdef MDUINO_PLUS
#include <Ethernet2.h>
#else
#include <Ethernet.h>
#endif
actualConfig_t actualConfig;
const byte eeAdressTEMP = 0;
const byte eeAdressHUM = 4;
byte mac[] = { 0xDE, 0xED, 0xBA, 0xFE, 0xFE, 0xAE };
IPAddress ip(10, 10, 11, 2);
IPAddress broker(10, 10, 11, 1);
unsigned port = 1883;
EthernetClient ethClient;
PubSubClient mqtt(ethClient);
void setup(){
    Serial.begin(9600);
    //Set up Ethernet
    Ethernet.begin(mac, ip);
    Serial.print("Local IP: ");
    Serial.println(Ethernet.localIP());
    //Set up MQTT
    mqtt.setServer(broker, port);
    mqtt.setCallback(receiveMqttMsg);
    updateFromEEPROM();
}
////////////////////////////////////////////////////////////////////////////////////////////////////
void loop(){
    if (!mqtt.connected()){
        reconnect();
        if (mqtt.connected()){
            mqtt.publish("actualConfigTemp", (uint8_t*) &actualConfig.temperature);
            mqtt.publish("actualConfigHum", (uint8_t*) &actualConfig.humidity);
        }
    }else{
        mqtt.loop();
    }
//Rest of the logic
}
////////////////////////////////////////////////////////////////////////////////////////////////////
void reconnect(){
    if (mqtt.connect(MQTT_ID)){
        mqtt.subscribe("configTemp");
        mqtt.subscribe("configHum");
    }else{
        //connection fail
        ethClient.stop();
    }
}
////////////////////////////////////////////////////////////////////////////////////////////////////
void receiveMqttMsg(char* topic, uint8_t* payload, unsigned int len){
    if (strcmp(topic, "configTemp") == 0){
        //Set config to variable
        memcpy(&actualConfig.temperature, payload, len);
        //Print to debug
        Serial.print("Temperature set to: ");
        Serial.println(actualConfig.temperature);
        //Set config to EEPROM
        EEPROM.put(eeAdressTEMP, actualConfig.temperature);
    }
    if (strcmp(topic, "configHum") == 0){
        //Set config to EEPROM
        memcpy(&actualConfig.humidity, payload, len);
        //Print to debug
        Serial.print("Humidity set to: ");
        Serial.println(actualConfig.humidity);
        //Set config to EPROM
        EEPROM.put(eeAdressHUM, actualConfig.humidity);
    }
}
////////////////////////////////////////////////////////////////////////////////////////////////////
void updateFromEEPROM(){
    EEPROM.get(eeAdressTEMP, actualConfig.temperature);
    EEPROM.get(eeAdressHUM, actualConfig.humidity);
}
void debug(){
    Serial.println("------------------Debug:-------------------");
    Serial.print("Temp Value:");
    Serial.println(actualConfig.temperature);
    Serial.print("Hum Value:");
    Serial.println(actualConfig.humidity);
}
Below there is attached a video, where it is shown the functionality of the system. On one side, we have the Node-RED dashboard and on the other side, we have the serial monitor of Arduino IDE to see how we receive the data. Remember that Node-RED and Mosquitto are running and M-Duino PLC is connected to the same network of the MQTT broker and Node-RED service:
Commenting is not enabled on this course.