Index
1. Introduction
2. Requirements
3. Screen configuration
3.1 HMI interface configuration
4. PLC configuration
5. Videos
Introduction
HMI displays are quite common in the industrial sector to control and monitor processes. In this post, you will see how to configure and control a Kinco touch screen as a slave and how to make communicate with the PLC through the ModBus TCP/IP protocol. At the end of the blog, you can see a video of how all the configuration is done.
Related Links
- Modbus TCP Master with Industrial Arduino based PLCs Read >>>
- How to use Modbus TCP Slave library with a plc controller Arduino Read >>>
- Modbus RTU Master library for industrial automation Read >>>
Requirements
First of all, it is necessary to install Kinco DTools in order to work and program the graphic interface and internal screen settings. On the other hand, it would be necessary to download and install Industrial Shields boards to work easily with the industrial PLCs. For this example, we are using an Industrial Shields M-Duino 21+ and the Kinco G100E screen.
- Kinco DTools Software
- Industrial Shields Boards
- Industrial Shiedls Modbus library
- Industrial Shields M-Duino 21+
- Kinco G100E screen
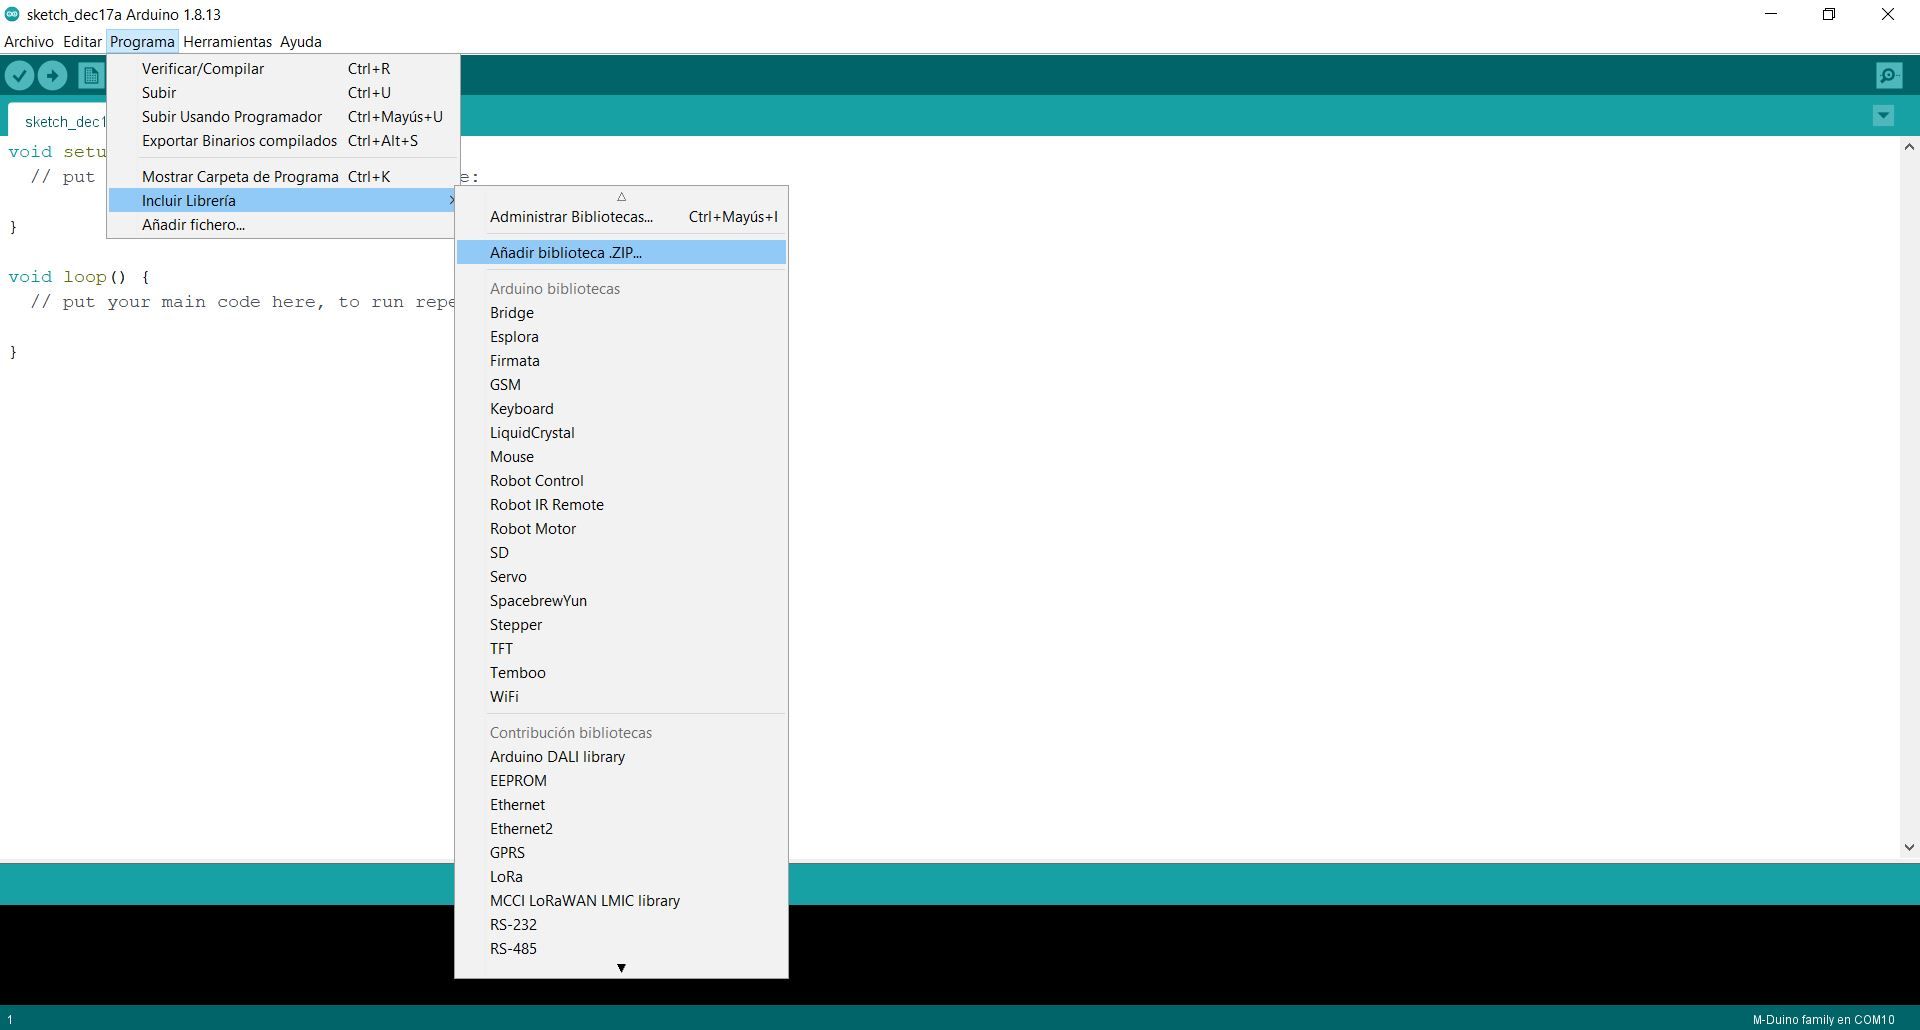
To install the Modbus library, download the ZIP version of the code and include it to the Arduino IDE as it is shown on the image (if the changes are not applied immediately, restart Arduino IDE to apply them).
As far as the hardware configuration is concerned, the screen must be powered using a 24Vdc power supply while the PLC will be fed using a 12Vdc. Connect the computer to the PLCS using an A-B type USB wire and a micro-USB wire for the connection with the screen. An Ethernet cable will be used for communication between the PLC and the HMI display.
Screen Configuration
First of all, run the Kinco DTools program and create a new project. A drop-down menu will open where you can pass the different parameters to be configured from our screen as you can see in Figure 1. In the "HMI Model" section, select the model to use (in our case G100E). After pressing <Next>, a new drop-down menu will open; ignore it, and press the "Finish" button to complete the initial setup. A new box referring to our screen will have appeared in the center of our project as shown in Figure 2.
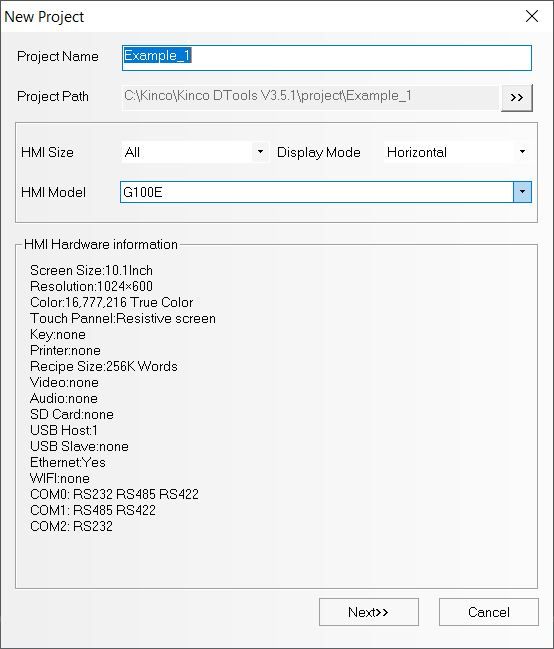
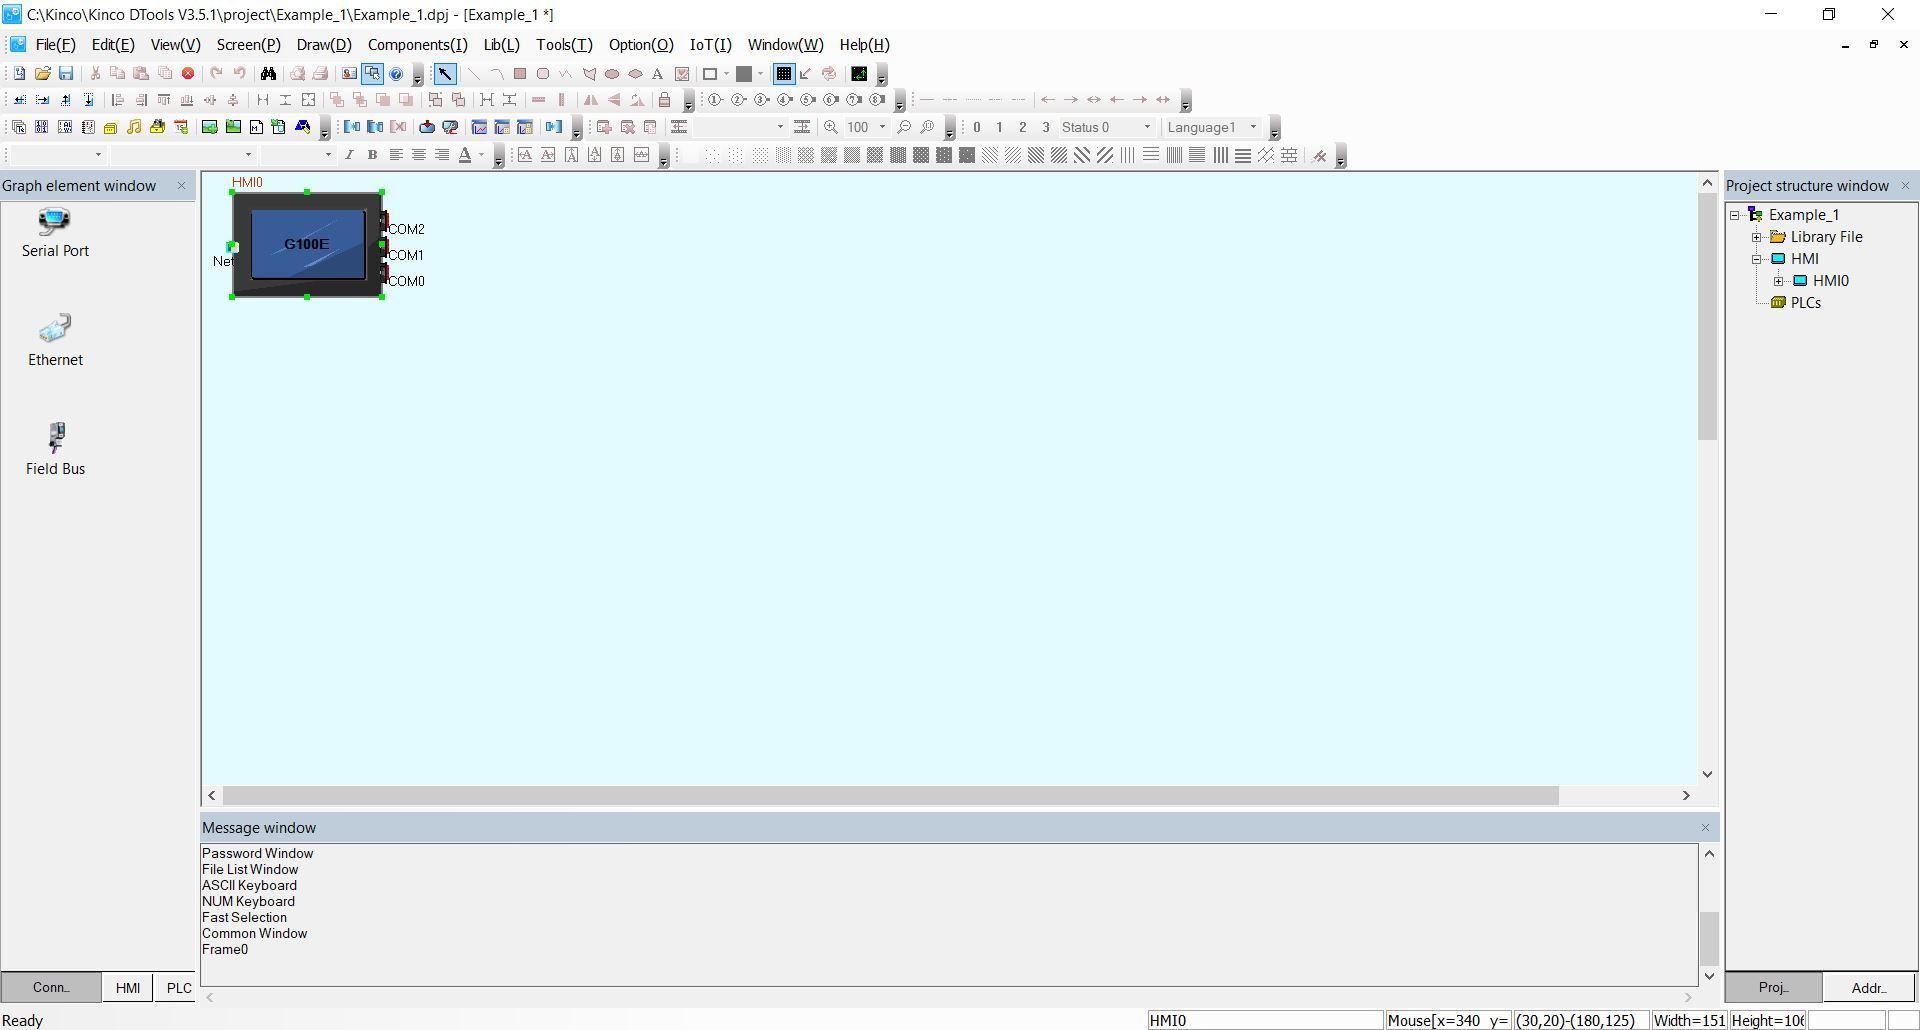
Figure 1
Figure 2
Then double-click on the screen or right-click on it and select the "Attribute (P)" option. Click again on the "Network Device Setting" section (Figure 3) and on the screen that will open, configure a new device by pressing the "Add" option and configure as shown in Figure 4.
Once these steps have been completed, the screen will be set up correctly to make the Modbus TCP connection as a slave.
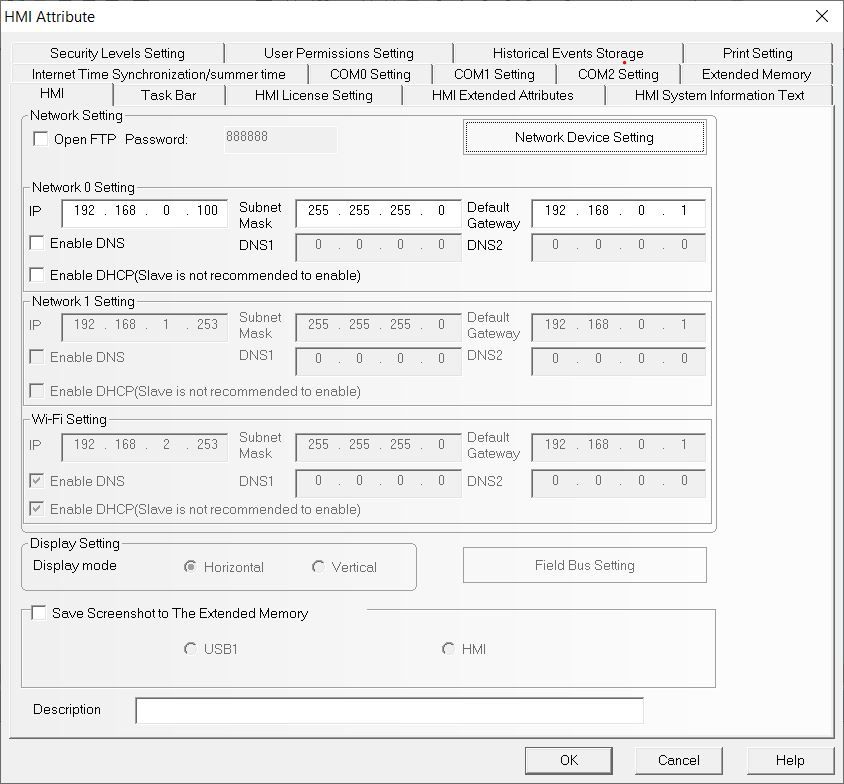
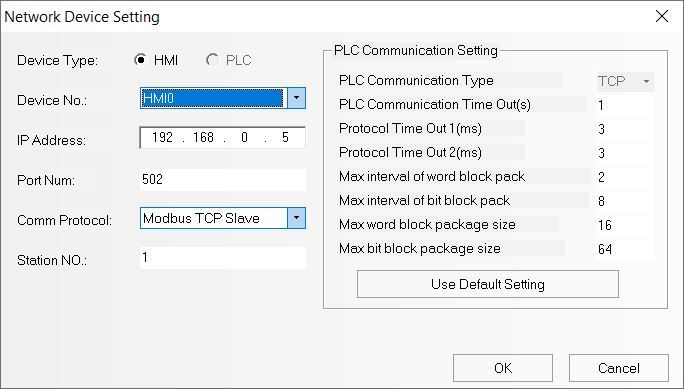
Figure 3
Figure 4
HMI Interface configuration
To configure the screen, in the Kinco DTools application right-click on the screen icon and select the "edit" option. A new screen will appear representing the screen display. On the left side, you have all the options that can work with the Kinco screen. To add elements, choose from the options on the left in the "Graph element window" section. In the case of using digital switches, select “Bit State Lamp”, drag it to the center screen and configure it with the following parameters:
- Addr Type: LB
- Address: 0
Do not change the default values, as we are working with a digital value and the LB (el Bi) option must be set. If you want to add another switch, change the address number. In the bit state option, you can choose how the switch will work, in our case we will select the toggle option.
If you use an analog value, choose the LW address type, as it is the option to work with these types of values. Depending on the word length that you want, increase the Word length value. Also, more aesthetic values can be changed like the font size.
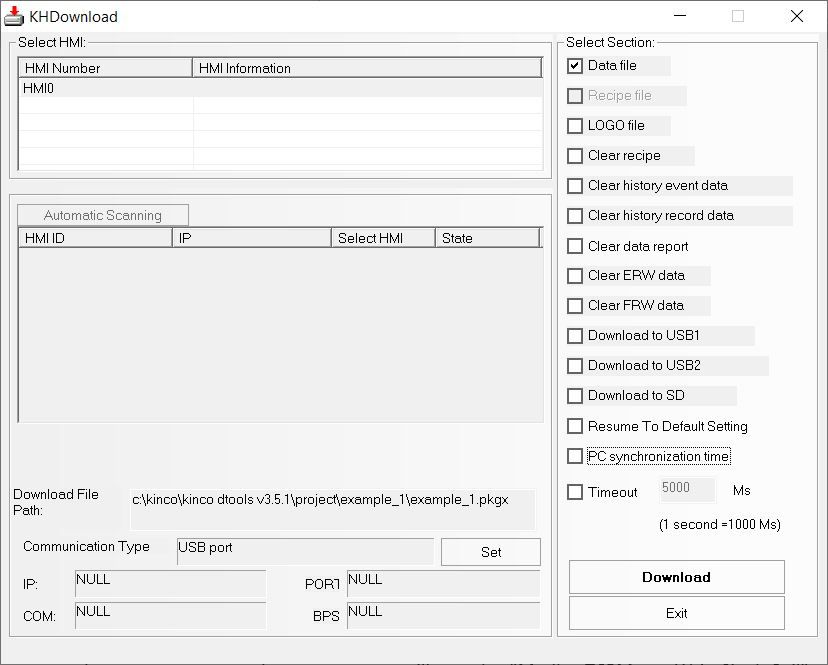
Once this is done, compile the program in the Tools -> Compile option located on the top tabs. If everything is set up correctly, a confirmation signal will appear. To upload the program to the physical screen, press the Tools -> Download option. Set up the screen that appears with the USB option and presses the "Download" button.
PLC Configuration
Once the Industrial Shields Modbus bookcase and library have been installed, select the PLC model being used and the USB port where the device is connected. Examples from the Modbus library will appear in the File -> Examples section. Select Modbus and choose the example you want to use. In our case, we will use the "ModbusTCPMasterWriteSingleCoil" program to perform the example.
At the beginning of the program, you will find the following lines, where we will have to configure the IP addresses we are working with. The IP 192.168.0.5 has been previously set on the screen, so we will need to change the IP of the PLC in order to be in the same range of addresses. In our case, we will put IP 192.168.0.4 in the variable IPAddress ip. In the IPAddress slaveIp section, we will put the screen address, 192.168.0.5. Finally, we will modify the port where the slave is located, we have defined the 502.
IPAddress ip(192, 168, 0, 4);
IPAddress slaveIp(192, 168, 0, 5); //must be the same as the slave
uint16_t slavePort = 502; //must be the same as the slave
The rest of the functions that run in the setup are internal configurations. The next part of the code to be modified will be the function responsible for communication between the PLC and the screen. The modbus.writeSingleCoil function will be executed every second to alternate the value of the address that has been defined. On the screen, we will have defined a button that will alternate its color. The following blog explains the library in more detail: Modbus TCP Master with Industrial Arduino based PLC . In our case, we will have to change the address of the screen to 1, as it will be the one we are using.
      if (!modbus.writeSingleCoil(slave, 1, 0, value)) {
        // Failure treatment
        Serial.println("Request fail");
      }
      if (!modbus.writeSingleRegister(slave, 1, 0, value)) {
        // Failure treatment
        Serial.println("Request fail");
      }
Once the modifications are finished, upload the program to the PLC.Video
In the following video, you can see how to configure the HMI Screen and how the communication between the PLC and the Screen should work. All steps that are done, are previously explained on the blog.
How to connect an HMI Screen using Arduino PLC