Introduction
E-Paper, or electronic papers, are display devices that copy the appearance of ordinary ink on paper. Unlike conventional flat panel displays that emit light, electronic paper displays reflect light like paper. This may make them more comfortable to read and provide a wider viewing angle than most light-emitting displays.
In this post, we are going to download the GxEPD Library, wire the E-Paper with the ESP32, and finally test some examples for industrial automation using the Arduino IDE!
Related links
Requirements
- 7.5 inch e-Paper Display (800×400 resolution, SPI interface, B/W)
- ESP32 devkit board
- WaveShare e-Paper adapter
- WaveShare e-Paper Driver HAT with connector for SPI interface
- USB micro to program ESP32
- Arduino IDE
Explanation
Requirements
- 7.5 inch e-Paper Display (800×400 resolution, SPI interface, B/W)
- ESP32 devkit board
- WaveShare e-Paper adapter
- WaveShare e-Paper Driver HAT with connector for SPI interface
- USB micro to program ESP32
- Arduino IDE
Explanation
GxEPD
In this tutorial, we are going to download the GxEPD Library, whose author and maintainer is Jean-Marc Zingg. The GxEPD Library is a simple E-Paper display library with a common base class and separate IO class for Arduino.
- For SPI e-paper displays from Dalian Good Display
- SPI e-paper boards from Waveshare
- GxEPD2 is better suited for new users or new projects!
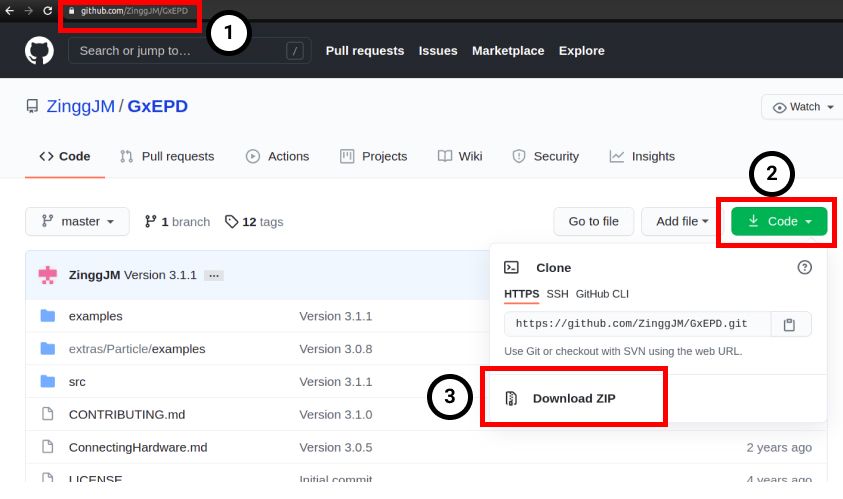
So, first of all, click here to get the library from GitHub as follows:

Arduino IDE
After the library is downloaded, there are at least two ways of installing the GxEPD Library.
1. Open the Arduino IDE, click on the top menu Sketch >> Include Library >> Add .ZIP Library... and import the GxEPD library you just downloaded.
2. Open the Arduino IDE, go to Sketch >> Include Library >> Manage Libraries >> type "GxEPD" >> Install.
Once the Library is installed, you will be able to test some examples from the Library for industrial control!
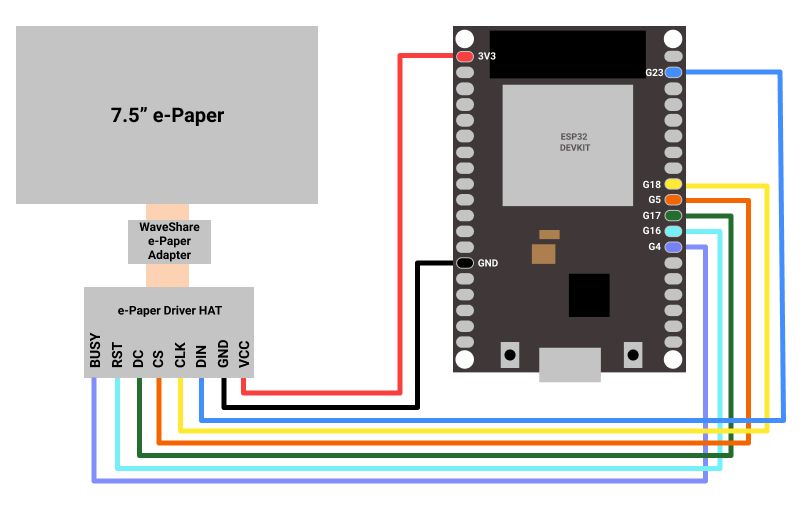
If we go to File >> Examples >> GxEPD and click on the first GxEPD-Example, a new window will be displayed. If you take a look at the example, you will see that there is a different mapping for some hardware. Just find out your board and wire it to your e-Paper from WaveShare. In our case, we are going to do it like this line of the example:

7.5" e-Paper and ESP32 pinout

7.5inch e-Paper Display
Under the mapping section of the example in the Arduino IDE, you will see an include section. You must uncomment the one that fits your e-Paper screen. In our case, we are going to remove the // to uncomment the include:
#include <GxGDEW075T7/GxGDEW075T7.h> // 7.5" b/w 800x480
After that, you will be ready to test the example!:
Go to Tools >> Board >> Select the ESP32.
And Tools >> Port >> Select the port where you connect your ESP32.
Upload your sketch and enjoy the testing!
It is your turn!
Now it is your turn! Try with some other examples from the GxEPD library, and get the most out of it!
How to connect 7.5" E-Paper Display & ESP32