

Introduction
Do you have a SCT010T-D and want to read current from a wire?
In this post you are going to learn how to:
- connect it to your Raspberry PLC industrial controller,
- read values from an analog input and
- make a simple flow in Node-RED.
Requirements


HDMI >> or
to the Raspberry PLC

Preparing the work environtment
The first thing you have to do is to connect the sensor to your industrial PLC on any analogue input you want. It is important to connect the -L wire to GND and the +K to the input itself.
Next, connect to the Raspberry PLC controller. To be able to read the sensor correctly, install the Industrial Shields library to be able to use our custom nodes.
cd /.node-rednpm i node-red-contrib-rpiplc-node
Open Node-RED and go to the URL: http://10.10.10.20:1880/
node-red
Taking the project step by step
1) The first node is going to be an injection node. Then, put an analogue reading node and select the Raspberry model you have and the input you are going to use to connect the sensor.
2) Then, create a function node with the following code:
var resolution = 5 / (Math.pow(2, 12) - 1); // 0,001221001221msg.payload = msg.payload * resolution * 5 / 5;return msg;
The resolution is the minimum voltage that the sensor can send to the Raspberry, being 5V the maximum and 12 the range bits of the analogue input. So, by multiplying the sensor value by the resolution, we get the voltage that the sensor measures. Then we just multiply that value with the sensor ratio, 5A / 5V for the SCT010T-D, to get the Amps correctly with the conversion factor. If you have a different sensor, check its documentation for the conversion formula.
3) Finally, after adding some debug nodes, your flow should look like this:
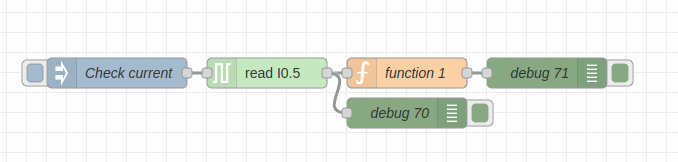
4) Now just press the inject node button and you will receive the current in your Node-RED debug window. If you notice, the number you are reading in the first debug node is the value the sensor is reading, and the second is the value converted to Amps.
👉🏼 To make the program send the current every 1 second, you can add some nodes like this
1) Create another function node, connect it just after the injection node and copy the code below. It will act as an automatic injection every 1 second:
var DELAY = 1000; // 1 secondvar sendCurrent = setInterval(send, DELAY);global.set("sendCurrent", sendCurrent);function send() {msg.payload = send;node.send(msg);}return;
The send() function will be called automatically every DELAY ms by setInterval().
2) Add an additional function that will stop setInterval() indefinitely. To do this, drag another injection node and another function node into the stream. The last node should look like this:
clearInterval(global.get("sendCurrent"));return msg;
3) If everything has been done correctly, your stream should look like this:


So that's all!
A very simple way to read current values from SCT010T-D with your Raspberry PLC industrial controller for industrial automation and Node-RED.