Introduction
I2C stands for Inter-Integrated Circuit. It is a bus interface connection protocol incorporated into devices for serial communication.
As the Raspberry PLCs from Industrial Shields have i2c communication, we are going to test it using an Adafruit accelerometer that works through I2C for Raspberry pi automation.
Related links
Requirements
Adafruit MMA8451 accelerometer >>>
- Either Ethernet cable or external monitor and keyboard to connect to the Raspberry Pi PLC controller.
Connections
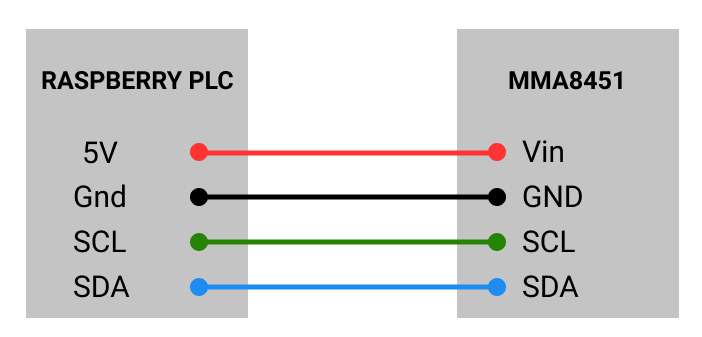
In order to connect the Adafruit MMA8451 accelerometer to our Raspberry Pi based PLC, we are going to connect the cables as shown in the picture below:

Adafruit MMA8451 Library
First of all, we are going to install the Adafruit MMA8451 Library >>> in the industrial Raspberry Pi PLC to be able to use the examples for our accelerometer. Run the following command:
git clone https://github.com/adafruit/Adafruit_CircuitPython_MMA8451.git
Note: You must have internet connection and git installed in your Raspberry PI industrial PLC. Also, if you get any error by copying the command from this post, type the command manually.
Test
Once the library is rightly installed, let's test the accelerometer:
1. In your open source hardware, go to:
~/Adafruit_CircuitPython_MMA8451/examples directory:
cd ~/Adafruit_CircuitPython_MMA8451/examples
2. List files to check that there is the mma8451_simpletest.py file:
ls
3. Now, make sure that Python3 is installed into the open source PLC Raspberry Pi:
python3 --version
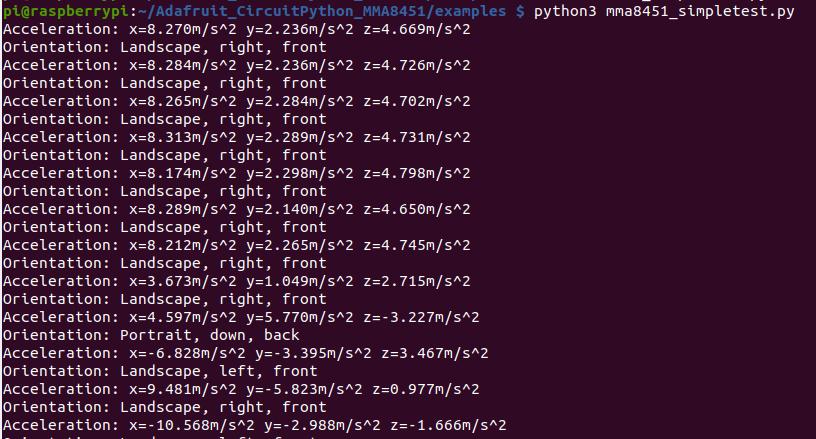
4. Finally, run the Python file and enjoy your app!
python3 mma8451_simpletest.py

Troubleshooting
If you get "OSError: [Errno 121] Remote I/O error", open the python file:
nano mma8451_simpletest.py
import timeimport boardimport adafruit_mma8451i2c = board.I2C() # uses board.SCL and board.SDAtime.sleep(1.0)# Initialize MMa8451 module.sensor = adafruit_mma8451.MMa8451(i2C)
Finally, save and exit. Run again your application to enjoy the accelerometer using I2C communication!
How to test external I2C communication on Raspberry PLC