Index
· Enable SPI interface
· Install BCM2835 Libraries
· Install Wiring Pi Libraries
· Install Python Libraries
· Install Git
· Download demo examples
· C examples
· Python examples
Introduction
Electronic ink, electronic paper or e-Paper is a technology that allows you to create flat screens, as thin as paper, and with a flexibility that allows them to be rolled up. These screens represent information, usually in black and white and have recently been used to display moving images.
In this post, we will learn how to use it using a Raspberry Pi for industrial monitoring!
Related Links
Requirements
- 7.5inch e-Paper Display
- Waveshare e-Paper Adapter
- Raspberry Pi 4 Model B
- USB-C type cable as power supply.
- Either Ethernet cable or micro HDMI cable to connect to a monitor.
Connections
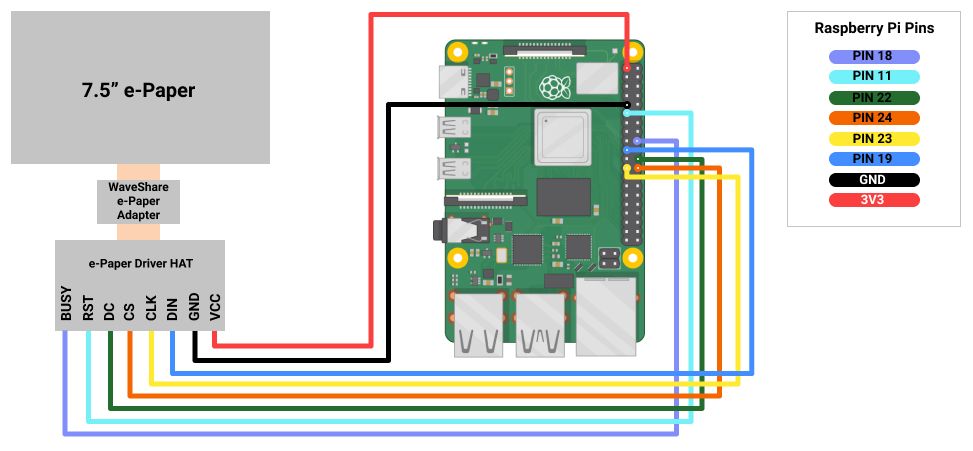
First of all, connect your 7.5inch e-Paper Display to your industrial Raspberry Pi, as shown in the picture below.

Tutorial
Enable SPI interface
The 5.83inch e-Paper HAT works with SPI bus, so the first step we are going to do is to enable the SPI.
1. Power up your Raspberry Pi and connect through SSH or HDMI to your Raspberry Pi. Then, go to raspi-config, which is a configuration tool in Raspbian that enables you to configure various settings of your Raspbian installation, such as the keyboard layout, the timezone, the password for the pi user, the SSH access, etc.
sudo raspi-config
2. Enable SPI interface by going to:
Interfacing Options > SPI > Yes
3. Make sure your SPI is not being used by other devices, and reboot your Raspberry Pi to apply changes.
sudo reboot
Install BCM2835 Libraries
4. Get the sources from the server.
wget http://www.airspayce.com/mikem/bcm2835/bcm2835-1.60.tar.gz
5. Extract the files.
tar zxvf bcm2835-1.60.tar.gz
6. Move to the BCM2585 directory.
cd bcm2835-1.60/
7. Run the configured script.
sudo ./configure
8. Compile and install.
sudo make
sudo make check
sudo make install
For more details, please refer to this page .
Install Wiring Pi Libraries
9. Install Wiring pi Libraries.
sudo apt-get install wiringpi
10. Go to the /tmp directory.
cd /tmp
11. Get the sources.
wget https://project-downloads.drogon.net/wiringpi-latest.deb
12. Unpack the sources.
sudo dpkg -i wiringpi-latest.deb
13. Print the version of GPIO to know if you installed correctly.
gpio -v
Install Python Libraries
14.
- In the case of Python 2
sudo apt-get update
sudo apt-get install python-pip
sudo apt-get install python-pil
sudo apt-get install python-numpy
sudo pip install RPi.GPIO
sudo pip install spidev
- In the case of Python 3
sudo apt-get update
Install Git
sudo apt-get install git -y
Download demo examples
sudo git clone https://github.com/waveshare/e-Paper
cd e-Paper/RaspberryPi_&JetsonNano
cd c
C examples
sudo nano examples/main.c
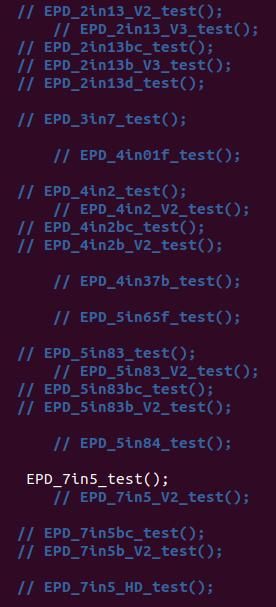
19. Uncomment the line related to your screen, in our case: EPD_7in5_test();

sudo make clean
sudo make
sudo ./epd
Python examples
22. Go to the Python directory where you will find the examples, and list the files to find yours.
cd /home/pi/e-Paper/RaspberryPi_JetsonNano/python
ls
sudo python epd_XXX_test.py
If you got to here, that means that you managed to print the demo pictures on your screen!
How to test 7.5" e-Paper Display with Raspberry Pi