How to take a picture when a load cell value is detected

Industrial Raspberry PLC and Node-RED applications
May 4, 2021 by
How to take a picture when a load cell value is detected
Boot & Work Corp. S.L., Fernandez Queralt Martinez

Introduction

Wearable sensors are an emerging market that is rapidly gaining recognition in the global market, especially in the industrial sector.

Raspberry Pi based PLC family offers a wide range of possibilities to control and monitor this innovative technology.

In this post, you will learn how to take a picture using a USB camera when a load cell detects a specific value, controlled by an industrial Raspberry Pi PLC and monitoring it using Node-RED.
How to take a picture when a load cell value is detected

Related Links


How to find your
perfect industrial PLC


Read >>


TouchBerry Pi
family products


Read >>

How to program Raspberry PLC
interrupt inputs with Python


Read >>


Raspberry PLC
family products


Read >>


How to connect 
Raspberry PLC to Wi-Fi


Read >>

Basics about Raspberry Pi PLC
analog outputs


Read >>

Requirements

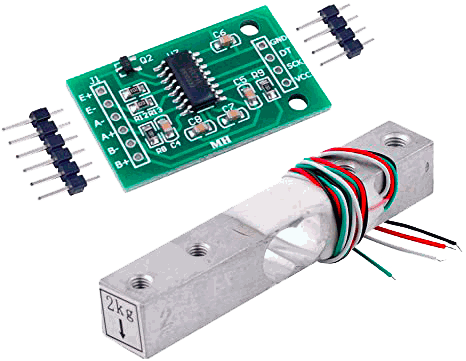
  •  1x Weight Sensor
  • 1x HX711 Load Cell Transmitter Module
  • 4x cables
  • 1x USB camera
  • 1x Raspberry Pi industrial PLC   See the product >>

Connecting hardware

Connect the hardware as shown below to proceed with the software:
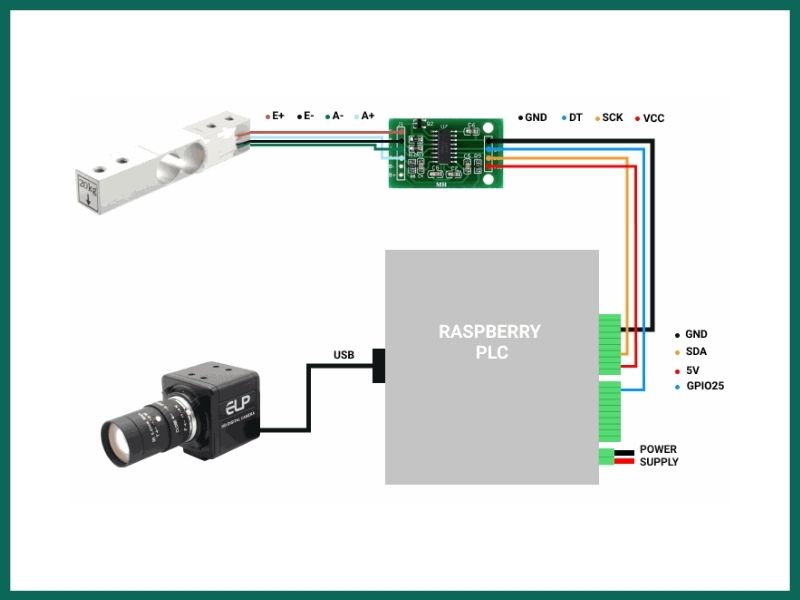
Connecting hardware
Connecting hardware table weighting value

Weight sensor setup

1.  First, let's  clone a project that contains an example file which shows a function of the library. So, open up a terminal window in your Raspberry Pi PLC controller and type the following:

git clone https://github.com/tatobari/hx711py


2. Once the repository was cloned, a directory named hx711py will appear with the file named example.py. So, go to that file to adjust some changes:

cd hx711py
sudo nano example.py


3. Inside the file, let's modify some lines, so that the code looks as follows:

#! /usr/bin/python2
 
import time
import sys

EMULATE_HX711=False

referenceUnit = -1

if not EMULATE_HX711:
    import RPi.GPIO as GPIO
    from hx711 import HX711
else:
    from emulated_hx711 import HX711

def cleanAndExit():
    print("Cleaning...")

    if not EMULATE_HX711:
        GPIO.cleanup()

    print("Bye!")
    sys.exit()

hx = HX711(25, 2)
hx.set_reference_unit(referenceUnit)
hx.reset()

hx.tare()

print("Tare done! Add weight now...")

def func(): while True: try:                         val = hx.get_weight(5)
                        yield val
                        hx.power_down() hx.power_up() time.sleep(0.1) except (KeyboardInterrupt, SystemExit): cleanAndExit() function = func() for i in function: print(i)


4. Once the code was modified, exit with Ctrl + X, type 'Y' to save the file with the same name and Enter. 

Test the Raspberry scale

1. For a correct calibration and to be able to get the right weight, you need a comparison object whose weight you know. It is recommended to choose an average value of the maximum the load cell can get. For example, if your weight scale can get up to 20 kgs, then it is recommended to choose an object whose weight is 10 kgs.


2. First of all, you need to comment the next line as follows:

#hx.set_reference_unit(referenceUnit)


3. And then, place the object on the scale and run it with the following command:

sudo python example.py


4. Your will see that the displayed values will be both positive and negative. In this case, they are displayed at 24500 values around -22200. So we referenced the values like:

−22200 ÷ 24500 = -0.9

5. After getting that value, go back to the line we commented on earlier, and uncommented it removing the hashtag, and typing the value you got as a reference unit like:

hx.set_reference_unit(referenceUnit)
referenceUnit = -1


If you have achieved a successful calibration,  you will see that the value of the weight scale will be around 0. Otherwise, you can modify the referenceUnit variable to get the right calibration.

Getting the values with Node-RED

1.  By default, our Raspberry PLC images have Node-RED already installed. If you do not have the Node-RED installed in your device, first go to the following URL to proceed with the installation: https://nodered.org/docs/getting-started/raspberrypi

2. Once Node-RED is ready, from your computer go to your browser and type: http://10.10.10.20:1880/  if you are connected through Ethernet, or http://wlan0-pi-address:1880/  if you want to connected though the WiFi.

3. After opening up a new Node-RED window, go to the right menu, click on Manage palette > Install > Type: node-red-contrib-ui-media and install it.

4. After that, click on Import, and paste the following flows.json and click on the Deploy button:

 [{"id":"2826c4af.400f9c","type":"tab","label":"Flow 1","disabled":false,"info":""},{"id":"9b234a13.0256e8","type":"exec","z":"2826c4af.400f9c","command":"","addpay":"payload","append":"","useSpawn":"false","timer":"","oldrc":false,"name":"","x":510,"y":260,"wires":[[],[],["3f27e8b4.d02378"]]},{"id":"ec5481a.4fbf28","type":"exec","z":"2826c4af.400f9c","command":"","addpay":"payload","append":"","useSpawn":"true","timer":"","oldrc":false,"name":"","x":870,"y":60,"wires":[["36307784.3144e8","372e8f7b.f9752","d4e34cd5.f423e"],[],[]]},{"id":"36307784.3144e8","type":"switch","z":"2826c4af.400f9c","name":"if value is between 50 and 100","property":"payload","propertyType":"msg","rules":[{"t":"btwn","v":"50","vt":"num","v2":"100","v2t":"num"}],"checkall":"true","repair":false,"outputs":1,"x":990,"y":160,"wires":[["fb666c7f.c2ff9"]]},{"id":"3f27e8b4.d02378","type":"switch","z":"2826c4af.400f9c","name":"if picture was taken","property":"payload.code","propertyType":"msg","rules":[{"t":"eq","v":"0","vt":"num"}],"checkall":"true","repair":false,"outputs":1,"x":1030,"y":260,"wires":[["7646b60e.83a318"]]},{"id":"7646b60e.83a318","type":"function","z":"2826c4af.400f9c","name":"set path","func":"let count = flow.get('count');\nmsg.payload = \"/image\" + count + \".jpg\";\nreturn msg;","outputs":1,"noerr":0,"initialize":"","finalize":"","libs":[],"x":140,"y":360,"wires":[["a4078c82.e803a"]]},{"id":"a4078c82.e803a","type":"change","z":"2826c4af.400f9c","name":"move payload to src","rules":[{"t":"move","p":"payload","pt":"msg","to":"src","tot":"msg"}],"action":"","property":"","from":"","to":"","reg":false,"x":560,"y":360,"wires":[["3385b59c.06c81a"]]},{"id":"8771f8be.e44f68","type":"ui_button","z":"2826c4af.400f9c","name":"","group":"c4c1bcc1.49c24","order":5,"width":7,"height":2,"passthru":false,"label":"STOP LOAD CELL","tooltip":"","color":"","bgcolor":"","icon":"","payload":"0","payloadType":"num","topic":"","topicType":"str","x":170,"y":160,"wires":[["e053ecae.bca31","d4e34cd5.f423e"]]},{"id":"d4e34cd5.f423e","type":"ui_gauge","z":"2826c4af.400f9c","name":"","group":"c4c1bcc1.49c24","order":13,"width":6,"height":4,"gtype":"gage","title":"Weight","label":"g","format":"{{value}}","min":"-2000","max":"2000","colors":["#00b500","#e6e600","#ca3838"],"seg1":"","seg2":"","x":1070,"y":100,"wires":[]},{"id":"372e8f7b.f9752","type":"ui_chart","z":"2826c4af.400f9c","name":"","group":"c4c1bcc1.49c24","order":11,"width":6,"height":4,"label":"","chartType":"line","legend":"false","xformat":"HH:mm:ss","interpolate":"linear","nodata":"","dot":false,"ymin":"","ymax":"","removeOlder":1,"removeOlderPoints":"","removeOlderUnit":"3600","cutout":0,"useOneColor":false,"useUTC":false,"colors":["#1f77b4","#aec7e8","#ff7f0e","#2ca02c","#98df8a","#d62728","#ff9896","#9467bd","#c5b0d5"],"outputs":1,"useDifferentColor":false,"x":1070,"y":60,"wires":[[]]},{"id":"99be7e29.78696","type":"ui_button","z":"2826c4af.400f9c","name":"","group":"c4c1bcc1.49c24","order":3,"width":7,"height":2,"passthru":false,"label":"START LOAD CELL","tooltip":"","color":"","bgcolor":"","icon":"","payload":"","payloadType":"str","topic":"","topicType":"str","x":180,"y":60,"wires":[["615b1ef6.53963"]]},{"id":"615b1ef6.53963","type":"function","z":"2826c4af.400f9c","name":"start flow.count and send python cmd","func":"var count = flow.get('count')||0;\nflow.set('count', count);\n\nvar newMsg = {payload: \"sudo python -u /home/pi/hx711py/example.py\"};\nreturn newMsg;","outputs":1,"noerr":0,"initialize":"","finalize":"","libs":[],"x":610,"y":60,"wires":[["ec5481a.4fbf28"]]},{"id":"3385b59c.06c81a","type":"ui_media","z":"2826c4af.400f9c","group":"c4c1bcc1.49c24","name":"","width":6,"height":4,"order":15,"category":"","file":"","layout":"expand","showcontrols":true,"loop":true,"onstart":false,"scope":"local","tooltip":"","x":1070,"y":360,"wires":[[]]},{"id":"16de31a2.e4a6de","type":"status","z":"2826c4af.400f9c","name":"get the exec node status","scope":["ec5481a.4fbf28"],"x":190,"y":600,"wires":[["9bb820b3.87fbe"]]},{"id":"9bb820b3.87fbe","type":"change","z":"2826c4af.400f9c","name":"set flow.pid","rules":[{"t":"set","p":"pid","pt":"flow","to":"$number($split(status.text, ':')[1])","tot":"jsonata"}],"action":"","property":"","from":"","to":"","reg":false,"x":410,"y":600,"wires":[["b99c988c.86bf98"]]},{"id":"b99c988c.86bf98","type":"function","z":"2826c4af.400f9c","name":"set kill cmd","func":"let pid = flow.get('pid');\nvar kill = \"kill -9 \" + pid;\nflow.set('kill', kill);\nreturn msg;","outputs":1,"noerr":0,"initialize":"","finalize":"","libs":[],"x":590,"y":600,"wires":[[]]},{"id":"e053ecae.bca31","type":"function","z":"2826c4af.400f9c","name":"killall python","func":"msg.payload = \"sudo killall python\";\nreturn msg;","outputs":1,"noerr":0,"initialize":"","finalize":"","libs":[],"x":530,"y":160,"wires":[["ec5481a.4fbf28"]]},{"id":"fb666c7f.c2ff9","type":"function","z":"2826c4af.400f9c","name":"start flow.get and send fswebcam cmd","func":"var count = flow.get('count');\ncount++;\n\nmsg.payload = \"fswebcam -r 1280x720 --no-banner /home/pi/images/image\" + count + \".jpg\";\n\nflow.set('count', count);\n\nreturn msg;\n\n","outputs":1,"noerr":0,"initialize":"","finalize":"","libs":[],"x":230,"y":260,"wires":[["9b234a13.0256e8"]]},{"id":"5771d86a.220b58","type":"comment","z":"2826c4af.400f9c","name":"In case you want to kill the flow pid and not the python processes, replace the \"killall python\" function node, for the \"killall pid\" function node -->","info":"","x":550,"y":540,"wires":[]},{"id":"b88b67eb.03f068","type":"function","z":"2826c4af.400f9c","name":"killall pid","func":"msg.payload = flow.get('kill');\nreturn msg;","outputs":1,"noerr":0,"initialize":"","finalize":"","libs":[],"x":1100,"y":540,"wires":[[]]},{"id":"c4c1bcc1.49c24","type":"ui_group","name":"","tab":"cbda5f28.c75ad","order":1,"disp":true,"width":"20","collapse":false},{"id":"cbda5f28.c75ad","type":"ui_tab","name":"Home","icon":"dashboard","disabled":false,"hidden":false}]

5. Go to your Raspberry terminal again, and type:

cd
mkdir images
sudo nano /home/pi/.node-red/settings.js

cd: It leads to the /home/pi directory.

mkdir images : This command makes a new directory called 'images' in the current directory. This directory will store all the images taken by the camera.
Finally, we are going to modify a line to be able to get the images from a source.

6. FInd the line with the httpStatic parameter and do the following:

//httpStatic: '/home/nol/node-red-static/', ------------> Replace this
httpStatic: '/home/pi/images',              ------------> For this

7. Reboot your open source PLC Raspberry Pi.

8. After rebooting, go again to your browser and type http://10.10.10.20:1880/ui  

9. If everything went right, you can to test and enjoy you application!


Do you want to solve technical questions?

Follow our blog to solve doubts or learn new functionalities.

​Search in our Blog

How to take a picture when a load cell value is detected
Boot & Work Corp. S.L., Fernandez Queralt Martinez May 4, 2021
Share this post

Looking for your ideal Programmable Logic Controller?

Take a look at this product comparison with other industrial controllers Arduino-based. 

We are comparing inputs, outputs, communications and other features with the ones of the relevant brands.


Industrial PLC comparison >>>