
In the series of tutorials about connecting Arduino cloud with Industrial Sheilds PLC, this tutorial covers using a temperature sensor with an ESP32 Industrial shields PLC and visualizing its reading on Arduino cloud's Dashboard.
Prerequisite
It is recommended to go through the following blog posts before trying this one out, they are a prerequisite to this blog:
Industrial Shields with Arduino Cloud Introduction
How to control Digital Outputs with Arduino Cloud
DHT22 / AM2302 temperature and humidity sensor
InshieldsTnH.ino
#include "thingProperties.h"
#include "DHT.h"
#define DHTPIN 2
#define DHTTYPE DHT22
DHT dht(DHTPIN, DHTTYPE);

void setup() {
  // Initialize serial and wait for port to open:
  Serial.begin(9600);
  // This delay gives the chance to wait for a Serial Monitor without blocking if none is found
  delay(1500);
  Serial.println("Temp and Humidity readings");
  // Defined in thingProperties.h
  initProperties();
  // Connect to Arduino IoT Cloud
  ArduinoCloud.begin(ArduinoIoTPreferredConnection);
  /*
     The following function allows you to obtain more information
     related to the state of network and IoT Cloud connection and errors
     the higher number the more granular information you’ll get.
     The default is 0 (only errors).
     Maximum is 4
  */
  setDebugMessageLevel(2);
  ArduinoCloud.printDebugInfo();
  dht.begin();
}
void loop() {
  ArduinoCloud.update();
  // Your code here
  onHumidityChange();
  delay(2000);
}

/*
  Since Humidity is READ_WRITE variable, onHumidityChange() is
  executed every time a new value is received from IoT Cloud.
*/
void onHumidityChange()  {
  temp = dht.readHumidity();
  // Read temperature as Celsius (the default)
  humidity = dht.readTemperature();
  // Check if any reads failed and exit early (to try again).
  if (isnan(humidity) || isnan(temp)) {
    Serial.println(F("Failed to read from DHT sensor!"));
    return;
  }

  Serial.print(F("Humidity: "));
  Serial.print(humidity);
  Serial.print(F("%  Temperature: "));
  Serial.print(temp);
  Serial.print(F("°C "));
   // Add your code here to act upon Humidity change
}
thingsProperty.h
// Code generated by Arduino IoT Cloud, DO NOT EDIT.
#include <ArduinoIoTCloud.h>
#include <Arduino_ConnectionHandler.h>

const char THING_ID[]           = "dc7dc375-53a2-4fa0-9fff-9f9109d2b1ea";
const char DEVICE_LOGIN_NAME[]  = "9947c851-3bdb-4eff-84d7-401788196951";
const char SSID[]               = "Your-SSID";    // Network SSID (name)
const char PASS[]               = "PASSWORD";    // Network password (use for WPA, or use as key for WEP)
const char DEVICE_KEY[]  = "YOUR DEVICE_KEY";    // Secret device password
void onHumidityChange();
CloudTemperatureSensor temp;
CloudRelativeHumidity humidity;
void initProperties(){
  ArduinoCloud.setBoardId(DEVICE_LOGIN_NAME);
  ArduinoCloud.setSecretDeviceKey(DEVICE_KEY);
  ArduinoCloud.setThingId(THING_ID);
  ArduinoCloud.addProperty(temp, READ, 15 * SECONDS, NULL);
  ArduinoCloud.addProperty(humidity, READWRITE, 15 * SECONDS, onHumidityChange);
}
WiFiConnectionHandler ArduinoIoTPreferredConnection(SSID, PASS);
Arduino Dashboard
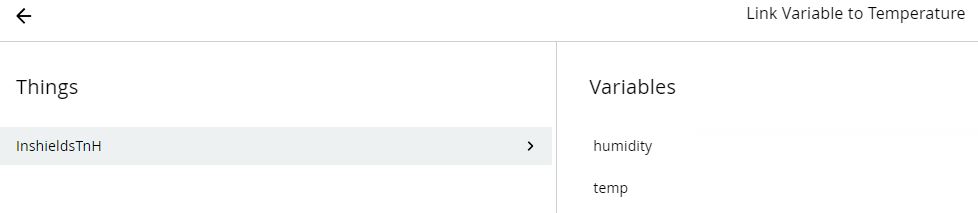
For initializing the chart widget you have to follow the following steps:
Select the chart from the drop down menu as shown

Click link variable

Choose one of Temperature or humidity variable to connect with your chart
Once linked, your chart should be ready.
Repeat the steps for the second variable.
If your PLC is transmitting the data, the charts should be showing you some data.

And that is it, you have successfully visualized your temperature and humidity data on Arduino cloud's dashboard.