Index
1. Introduction
2. Previous reading
3. Requirements
4. One wire protocol
5. Hardware
6. Software
Introduction
In this post you are going to learn how to connect the Dallas temperature sensor to any of our PLCs, read the temperatures from it and store them into an SD card. The code of the temperatures and the SD card is done with the Arduino Software and you can see it in the Software section.
Previous readings
In order to work with the Dallas temperature sensor and the SD card, you will need any of our industrial controllers for industrial automation:
Industrial Shields controllers: Wifi & Bluetooth Controller Family, Ethernet Controller Family, GPRS / GSM Controller Family or 20IOs Controller Arduino Family
One Wire protocol
One of the main advantages of the Dallas sensor (DS18B20) is its 1-Wire communication bus which allows it to communicate with the PLC Arduino using only one data cable. 1-Wire is based on a complex timing system in the signal between the sending and the receiver devices.
The major disadvantage of the 1-Wire system is that it requires a complex code and at the same time it is a big load for the processor to consult the state of the sensors. The total acquisition time of a measurement is 750ms.
1-Wire allows the devices connceted to the bus to get the power supply through the data line. To make this possible, they have a capacitor that stores energy while the data line is in HIGH. This is the "parasite mode". If this mode is not used, the devices will have to be connected to a voltage between 3.0V and 5.5V.
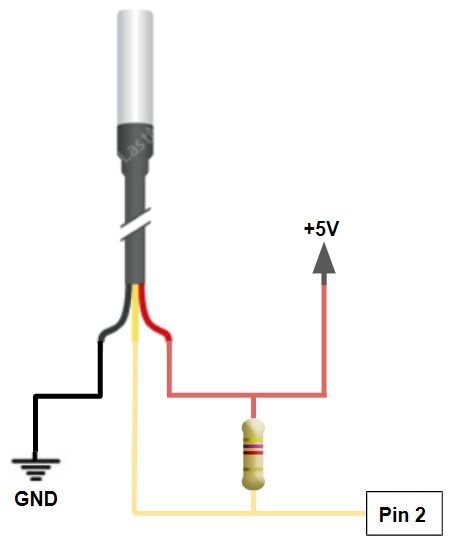
In any of the cases, the 1-Wire bus needs a pull-up resistance of 4k7Ω between VDD (power supply line) and DQ (data line) cables to work properly.

Hardware
Configuration of the switches:
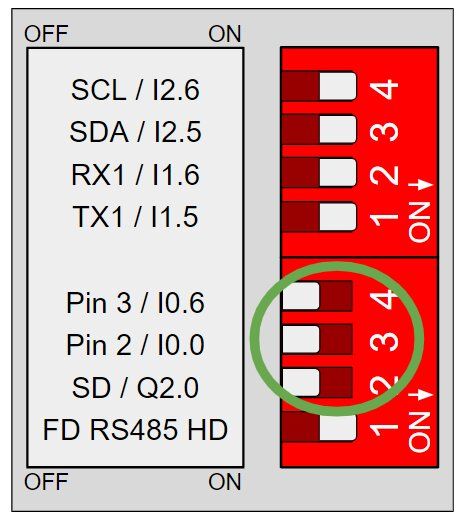
Most of the inputs and the outputs are connected to the internal Arduino, but in few cases, the user can choose between a special peripheral configuration or a GPIO by changing the position of the Dip Switches.
Each switch can select only one of the two possible configurations at the same time. For example, in this case we are watching the configuration of an M-Duino 58+ Ethernet controlled. If we put the switch to the right position (ON), the input I0.6 will be activated, but if the switch is in the left position (OFF) we will activate Pin 2, which is a digital pin.
Keep in mind that each switch has two different configurations: you must select the right (ON) or the left (OFF) option.
Pin 3, Pin 2 & SD enabled - I0.6, I0.0 & Q2.0 disabled
Connection:
The connection of the sensor to the PLC has to be the one shown in the One Wire Protocol section.
More than one Dallas temperature sensor:
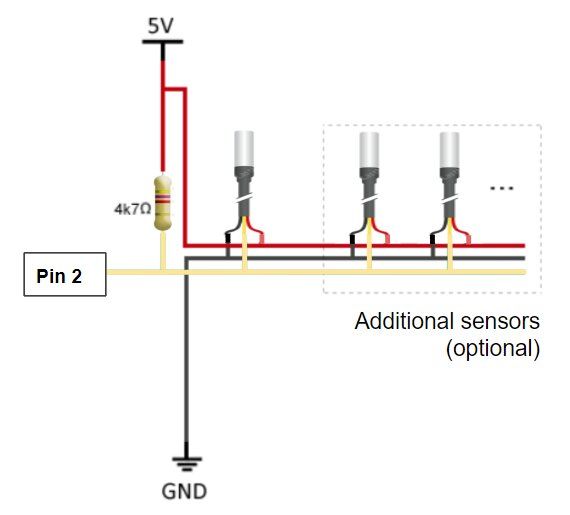
There can be more than one Dallas sensor connected, using the same data line (DQ). Their connection would be like the following image.

Pull-up resistance: (product web)
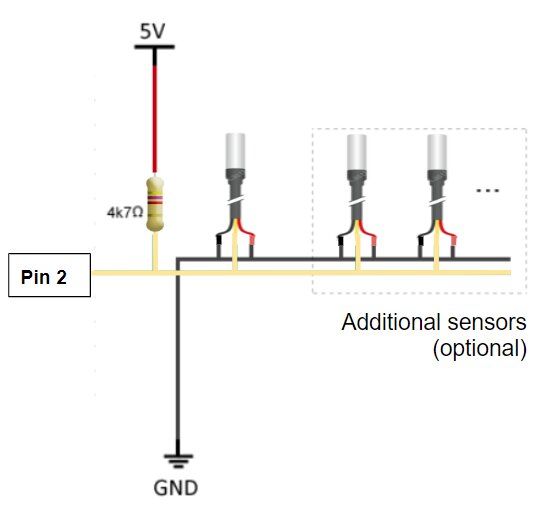
The 4k7 Ohm resistance that has been appearing in the hardware assemblies is needed to set the data line (DQ) to HIGH. This allows the sensor to work with the One Wire Arduino library and to operate without an external power supply because it's taken through the 1-Wire pull-up resistance through the DQ pin when the bus is high. The high bus signal also charges an internal capacitor, which supplies power to the device/s when the bus is low. This assembly is known as a "parasite". Its hardware disposition is the following one.

Software
Reading one Dallas sensor located in the digital pin 2:
#include <OneWire.h> #include <DallasTemperature.h>
const int oneWirePin = 2;
OneWire oneWireBus(oneWirePin); DallasTemperature sensor(&oneWireBus);
void setup() { Serial.begin(9600); sensor.begin();
}
void loop() {
Serial.println("Reading temperatures: ");
sensor.requestTemperatures();
Serial.print("Temperature in sensor: ");
Serial.print(sensor.getTempCByIndex(0));Serial.println(" ºC");
delay(1000); //waits for 1 second}
Reading one Dallas sensor located in the digital pin 2 and datalog into a µSD card:
#include <OneWire.h> #include <DallasTemperature.h> #include <SPI.h> #include <SD.h> File myFile; const int oneWirePin = 2; OneWire oneWireBus(oneWirePin); DallasTemperature sensor(&oneWireBus); void setup() { Serial.begin(9600); sensor.begin(); discoverOneWireDevices(); while (!Serial) { ; // wait for serial port to connect. Needed for native USB port only } Serial.print("Initializing SD card..."); if (!SD.begin(53)) { Serial.println("initialization failed!"); while (1); } Serial.println("initialization done."); } void discoverOneWireDevices(void) { byte i; byte present = 0; byte data[12]; byte addr[8]; myFile = SD.open("test.txt", FILE_WRITE); Serial.println("Looking for 1-Wire devices"); myFile.println("Looking for 1-Wire devices"); while(oneWireBus.search(addr)) { Serial.println("1-Wire device found in this direcion"); myFile.println("1-Wire device found in this direcion");for( i = 0; i < 8; i++) { Serial.print("0x"); if (addr[i] < 16) { Serial.print('0'); } Serial.print(addr[i], HEX); if (i < 7) { Serial.print(", "); } } if ( OneWire::crc8( addr, 7) != addr[7]) { Serial.println("Device error."); myFile.println("Device error.");return; } } Serial.println("Search completed."); myFile.println("Search completed.");oneWireBus.reset_search(); myFile.close(); return; } void loop() { myFile = SD.open("test.txt", FILE_WRITE); Serial.println("Reading temperatures: "); myFile.println("Reading temperatures: "); sensor.requestTemperatures(); Serial.print("Temperature in sensor: "); Serial.print(sensor.getTempCByIndex(0)); Serial.println(" ºC"); myFile.print("Temperature in sensor: ");myFile.print(sensor.getTempCByIndex(0)); myFile.println(" ºC"); myFile.close(); delay(1000); }
Finding the direction and reading two Dallas sensors, both located in the digital pin 2:
#include <OneWire.h>const int oneWirePin = 2;OneWire oneWireBus(oneWirePin);void setup() {Serial.begin(9600);discoverOneWireDevices();}void discoverOneWireDevices() {byte i;byte present = 0;byte data[12];byte addr[8];Serial.println("Looking for 1-Wire devices");while(oneWireBus.search(addr)) {Serial.println("1-Wire device foun in this direction:");for( i = 0; i < 8; i++) {Serial.print("0x");if (addr[i] < 16) {Serial.print('0');}Serial.print(addr[i], HEX);if (i < 7) {Serial.print(", ");}}if ( OneWire::crc8( addr, 7) != addr[7]) {Serial.println("Devicce error");return;}}Serial.println("Search completed!");oneWireBus.reset_search();return;}void loop() {// nothing to do in here}
Reading two Dallas sensors with their direction, both located in the digital pin 2:
#include <OneWire.h>#include <DallasTemperature.h>

const int oneWirePin = 2;

OneWire oneWireBus(oneWirePin);
DallasTemperature sensors(&oneWireBus);

DeviceAddress indoorThermometer = { 0x28, 0x94, 0xE2, 0xDF, 0x02, 0x00, 0x00, 0xFE };
DeviceAddress outdoorThermometer = { 0x28, 0x6B, 0xDF, 0xDF, 0x02, 0x00, 0x00, 0xC0 };

void setup()
{
  Serial.begin(9600);
  sensors.begin();
  sensors.setResolution(indoorThermometer, 10);
  sensors.setResolution(outdoorThermometer, 10);
}

void printTemperature(DeviceAddress deviceAddress)
{
  float tempC = sensors.getTempC(deviceAddress);
  if (tempC == -127.00) {
    Serial.print("Error getting temperature");
  } else {
    Serial.print(tempC);
	Serial.println(" ºC");
  }
}

void loop()
{

  Serial.println("Reading temperatures");
  sensors.requestTemperatures();

  Serial.print("Indoor temperature: ");
  printTemperature(indoorThermometer);
  Serial.print("Outdoor temperature: ");
  printTemperature(outdoorThermometer);
  Serial.println();

  delay(2000);
}

How to read Dallas temperature sensor and datalog in µSD Card