Industrial monitoring: how to get the most out of it
Take advantage of Open Source Hardware
Like sand between your fingers
Do you remember the feeling of the sand slipping through your fingers?
For a beach day, it is perfect. But if what you are missing is concrete data of your company, you are missing out on all sorts of opportunities.
Even losing money.

Big challenges
Adapt your company to technology
One of the great challenges that companies face, as if it were a long-distance career, is the adoption of new technologies that appear. Although it is physically impossible to be up to date on everything, it is necessary to have a global vision of the company, and to know what technologies you can implement to obtain all kinds of benefits such as:
-
greater safety for operators,
-
improvement of production rates,
-
savings in materials or
-
Preventive Maintenance,
to name a few.

Uses and benefits of industrial monitoring
You have two clear options, among others, to improve or implement monitoring in your company.
-
With an external partner.
-
Using Open Source solutions.
If you work with an external, then you'll always be dependant. If you choose Open Source, you will own the whole solution, from hardware to software.
You will have control of:
-
what do you want to monitor
-
How often,
-
where to send or store the data, etc.
Open Source also offers you much lower acquisition cost, due to savings in licenses and savings in consulting and programming by a third party.
Below a short examples of some implementations of monitoring elements.
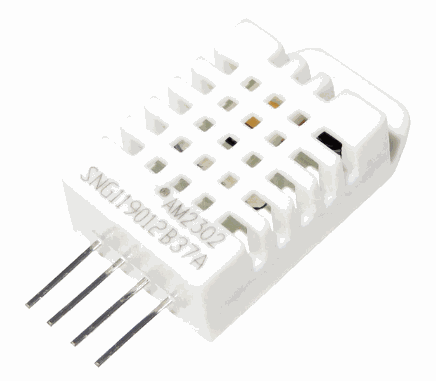
Program a DHT22 humidity and temperature sensor
- 2.5mA current consumption.
- Output - Digital signal.
- Temperature measurement between -40 and 125ºC, with an accuracy of 0.5ºC to 25ºC.
- Temperature measurement resolution: 8-bit, 0.1ºC
- Humidity measurement between 0 and 100%, with an accuracy of 2-5% for temperatures between 0 and 50ºC.
- Temperature measurement resolution: 8-bit, 0.1%
- Sample rate of 2 samples / s: 2Hz.
- Resistance connection with a value between 4.7K and 10K.

Easy programming with Arduino DHT library. In this case we are using the Adafruit library that you can download for free (link below).
(https://github.com/adafruit/DHT-sensor-library)
With this library, you can easily read both sensors and not worry about the communication protocol between the Arduino based industrial PLC and those sensors.
With the already imported library we can start programming.
This example show you how to read humidity and temperature (Celsius and Fahrenheit).
#include "DHT.h" #define DHTPIN 2     //Pin where is the sensor connecte

#define DHTTYPE DHT22   // Sensor DHT22

DHT dht(DHTPIN, DHTTYPE);

void setup() {
Serial.begin(9600);
Serial.println("Loading...");
dht.begin();
}

void loop() {
delay(2000);
float h = dht.readHumidity(); //Reading the humidity
float t = dht.readTemperature(); //Reading the temperature in Celsius degree
float f = dht.readTemperature(true); //Reading the temperature in Fahrenheit degrees

//--------Sending the reading through Serial port-------------

Serial.print("Humidity ");
Serial.print(h);
Serial.print(" %t");
Serial.print("Temperature: ");
Serial.print(t);
Serial.print(" *C ");
Serial.print(f);
Serial.println(" *F");
}

Using RS-485 between two Arduino PLCs
Take a look to another easy and fast option of communicate with this standard like RS-485.
For use between Arduino-based PLCs use the code below.
Keep in mind the characteristics of the Modbus RTU protocol, which allows communication between controllers, in case your project requires that type of communication.
The following code has the function of communicating the Master and the Slave sending the instruction to activate the relay to turn on a water pump.
An example of Simplecomm Master communication:
#include <RS485.h>
#include <SimpleComm.h>

// Create SimplePacket for sending and receiving data
SimplePacket packet;

// Define master address
uint8_t masterAddress = 0;

// Define slave address to communicate with
uint8_t slaveAddress = 1;

// Value to send as packet data
int value = 5;

////////////////////////////////////////////////////////////////////////////////////////////////////
void setup() {
	Serial.begin(9600L);

  // Start RS485
  RS485.begin(19200L);
  RS485.setTimeout(20);

  // Start SimpleComm
  SimpleComm.begin(masterAddress);
}

////////////////////////////////////////////////////////////////////////////////////////////////////
void loop() {
  static unsigned long lastSent = millis();

  // Send packet periodically: once per second
  if (millis() - lastSent >= 10000) {
    // Set request packet data
    packet.setData(value);

    // Send request to slave
    if (SimpleComm.send(RS485, packet, slaveAddress)) {
      lastSent = millis();

      Serial.print("Sent value: ");
      Serial.println(value);
    }
  }

  // Get responses
  if (SimpleComm.receive(RS485, packet)) {
    // Update value from the response
    value = packet.getInt();

    Serial.print("Received value: ");
    Serial.println(value);
  }
}
An example of Simplecomm Slave communication:
#include <RS485.h>
#include <SimpleComm.h>

// Create SimplePacket for sending and receiving data
SimplePacket request;
SimplePacket response;

// Define slave address to communicate with
uint8_t slaveAddress = 1;

////////////////////////////////////////////////////////////////////////////////////////////////////
void setup() {
	Serial.begin(9600L);

  // Start RS485
  RS485.begin(19200L);
  RS485.setTimeout(20);

  // Start SimpleComm
  SimpleComm.begin(slaveAddress);
}

////////////////////////////////////////////////////////////////////////////////////////////////////
void loop() {
  // Get requests
  if (SimpleComm.receive(RS485, request)) {
    int value = request.getInt();

    Serial.print("Received value: ");
    Serial.println(value);
if ( value==5){
  digitalWrite(R0_8,HIGH);
  delay(5000);
  digitalWrite(R0_8,LOW);

}
    // Process value
    //value++;

    // Send response to the request packet source
    response.setData(value);
    if (SimpleComm.send(RS485, response, request.getSource())) {
      Serial.print("Sent value: ");
      Serial.println(value);
    }
  }
}

Improve and implement your monitoring
If you bet on industrial automation, and you want to be the owner of your equipment avoiding the payment of licenses and saving on consulting, contact us.
Our technical-commercial team will help you determine which solution best suits your needs. Control of your company, just one click away.
We are waiting for you.
Do you want to receive more information about Arduino Industrial Monitoring Solutions?
Open Source technology allows you to develop your Monitor applications.