
Introduction
The best programming interface to work with Raspberry PLC is Node-RED, but it can be difficult to get used to it because the function node (one of the most used nodes) must be programmed in JavaScript, and without the right amount of knowledge can be tricky to get used to it.
Luckily, there is a node called "exec node" that can execute commands simulating a CLI. In this post we will build a simple flow in Node-RED with the help of a python script to control some outputs based on an analog input.
Requirements
Objective of the program
The function of the program will be to read an analog input from the PLC and compare it with a threshold value. Depending on the result, the low will keep requesting the input value until it reaches the limit. Then, a digital pin will turn on in order to notify the user.
While the program is running and the comparison has not become true yet, the flow will also keep the count on how many tries have been done since the start and will turn some digital outputs on to make the program more dynamic. simulating a custom loading display.
The objective, as mentioned before, is to show how easy it can be to use any programming language in Node-RED and avoid as much as possible the use of JavaScript, which can be difficult to learn for new users.
Building the flow
After connecting yourself to the Raspberry PLC through SSH or similar, open Node-RED with
$ node-red-start
And point a browser at https://localhost:1880/
Executing the python script
Start dragging an inject node. Connect it to a function node, then to an analog read node from Industrial Shields and finally to an exec node:

The exec node will be set like so:

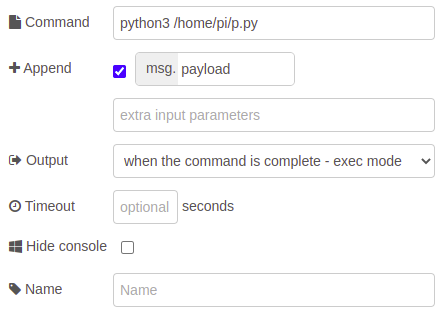
Now, every time we click the inject node, the python script will be executed with an additional argument, which will be the value of the analog input.
Python script
The python script will be very simple, as this part of the post is for only demonstration purposes of the exec node.
#!/usr/bin/env python3
import sys
print(int(sys.argv[1]))
After adding a debug node connected to the stdout output from the exec node and clicking the inject node, you will see how the value of the input is printed in the debug screen:
The value may fluctuate a bit, but as the input is not connected, it stays at 0.

Counting the tries
To count how many tries have been done, we will need a variable to remember the number. As the counter needs to be updated every time we execute the script, connect a function node after the exec node, replacing the old debug node.
Note: The objective of the post was to avoid the usage of the JavaScript language, but, as it is required to remember old variables, this job cannot be done in the same python script or with a new one without creating an additional file to save the variable.
The code in the function node will be the following:
var tries = flow.get('tries') || 0;
flow.set('tries', tries + 1);
node.warn("Number of tries: " + (tries + 1));
if (parseInt(msg.payload) == 0) {
    return msg;
}
else {
    node.warn("Threshold surpassed with a total of tries: " + (tries + 1));
}
Here, we initialize a variable called "tries", that will keep the count on the total tries until the input value surpasses a threshold (we will get to that later). Then, we save the variable again but adding 1 and we print in the debug window the total number of tries. Finally, we check if the python script returned 0 or 1, depending on the comparison result.
To reset this variable, the first function node will be used:
flow.set('tries', 0);
return msg;
With this modification, by clicking the inject node the variable "tries" will get resetted. Finally, let's add a threshold value in the python script. The script will get executed infinitely every second until the input value gets to the limit we established.
#!/usr/bin/env python3
import sys
import time
i = int(sys.argv[1])
threshold = 1000
if (i < threshold):
    print("0")
    time.sleep(1)
else:
    print("1")
After clicking the inject node, you should get something like this:

With this step, we have been able to read an analog input, send the value to a python script, do a comparison between it and a threshold, return the value to the Node-RED flow and loop again and again if necessary while keeping the count of the total tries.
This could be the end of the post, but let's take it a step further by playing with the digital output pins. THis step is only for aesthetic reasons, but it can be useful for projects that require an output configuration based on the input pins.
Extra features
To start, let's modify the last function node. What we want to do is to simulate a loading symbol using the output LEDs from the Raspberry PLC:
var tries = flow.get('tries') || 0;
flow.set('tries', tries + 1);
node.warn("Number of tries: " + (tries + 1));
if (parseInt(msg.payload) == 0) {
    msg.payload = tries % 6;
    return msg;
}
else {
    node.warn("Threshold surpassed with a total of tries: " + (tries + 1));
}
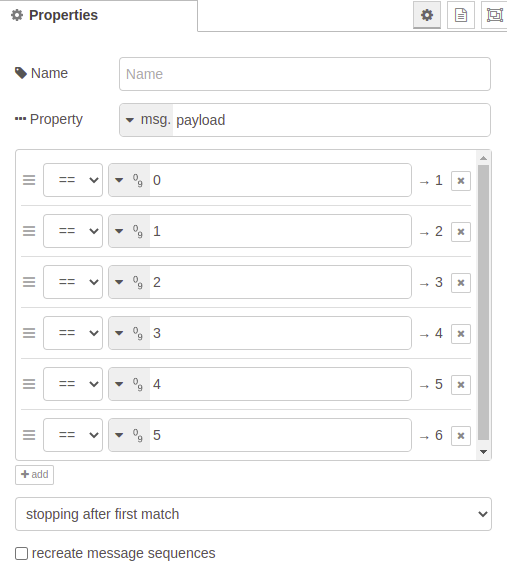
Now, msg.payload will take values from 0 to 5. With every number (0-4), the specific LED of the PLC will turn on. When the number is 5, all the LEDs will turn off and the process will repeat. This task will be done using a switch node connected right after the second function node.
The switch will have 6 different outputs. Outputs number 1 to 5 will be for every digital output in HIGH, and number 6 for all of them but in LOW mode. Take a look at the image below:
And the switch node:

Complete flow code:
[{"id":"1ca9cbdb7a453a30","type":"inject","z":"0727cd3d0291c3a3","name":"","props":[{"p":"payload"},{"p":"topic","vt":"str"}],"repeat":"","crontab":"","once":false,"onceDelay":0.1,"topic":"","payload":"","payloadType":"date","x":140,"y":100,"wires":[["a79d112cd32173ad"]]},{"id":"a79d112cd32173ad","type":"function","z":"0727cd3d0291c3a3","name":"function 1","func":"flow.set('tries', 0);\nreturn msg;","outputs":1,"noerr":0,"initialize":"","finalize":"","libs":[],"x":280,"y":100,"wires":[["208173a4226f1ecd"]]},{"id":"208173a4226f1ecd","type":"rpiplc-analog-read","z":"0727cd3d0291c3a3","rpiplc":"ac1bec80d88e6db9","pin":"I0.7","name":"","x":420,"y":100,"wires":[["7fea86886d62f14a","f7e313cfb4659f79"]]},{"id":"40d74a62cbe0aadc","type":"debug","z":"0727cd3d0291c3a3","name":"debug 2","active":false,"tosidebar":true,"console":false,"tostatus":false,"complete":"false","statusVal":"","statusType":"auto","x":400,"y":220,"wires":[]},{"id":"5f98e491e9b75172","type":"function","z":"0727cd3d0291c3a3","name":"function 3","func":"var tries = flow.get('tries') || 0;\n\nflow.set('tries', tries + 1);\n\nnode.warn(\"Number of tries: \" + (tries + 1));\n\nif (parseInt(msg.payload) == 0) {\n msg.payload = tries % 6;\n return msg;\n}\nelse {\n node.warn(\"Threshold surpassed with a total of tries: \" + (tries + 1));\n}\n","outputs":1,"noerr":0,"initialize":"","finalize":"","libs":[],"x":400,"y":180,"wires":[["208173a4226f1ecd","75ede61acb554e43"]]},{"id":"7fea86886d62f14a","type":"exec","z":"0727cd3d0291c3a3","command":"python3 /home/pi/p.py","addpay":"payload","append":"","useSpawn":"false","timer":"","winHide":false,"oldrc":false,"name":"","x":200,"y":180,"wires":[["40d74a62cbe0aadc","5f98e491e9b75172"],[],[]]},{"id":"f7e313cfb4659f79","type":"debug","z":"0727cd3d0291c3a3","name":"debug 3","active":false,"tosidebar":true,"console":false,"tostatus":false,"complete":"false","statusVal":"","statusType":"auto","x":580,"y":80,"wires":[]},{"id":"75ede61acb554e43","type":"switch","z":"0727cd3d0291c3a3","name":"","property":"payload","propertyType":"msg","rules":[{"t":"eq","v":"0","vt":"num"},{"t":"eq","v":"1","vt":"num"},{"t":"eq","v":"2","vt":"num"},{"t":"eq","v":"3","vt":"num"},{"t":"eq","v":"4","vt":"num"},{"t":"eq","v":"5","vt":"num"}],"checkall":"false","repair":false,"outputs":6,"x":550,"y":180,"wires":[["82d25edaf09c9043"],["426f1490b7fa34ad"],["c2faa787cf4e0e7c"],["1c0f19f76a739b67"],["6882cb9a974e6f53"],["cd9e0a7da9b87c08","5f0bf1b5e0065206","f049f4a7930543b7","54b2e4aca2d3aee5","c0563b371f6f81af"]]},{"id":"426f1490b7fa34ad","type":"rpiplc-digital-write","z":"0727cd3d0291c3a3","rpiplc":"ac1bec80d88e6db9","pin":"Q0.1","value":"1","name":"","x":770,"y":140,"wires":[]},{"id":"c2faa787cf4e0e7c","type":"rpiplc-digital-write","z":"0727cd3d0291c3a3","rpiplc":"ac1bec80d88e6db9","pin":"Q0.2","value":"1","name":"","x":770,"y":180,"wires":[]},{"id":"1c0f19f76a739b67","type":"rpiplc-digital-write","z":"0727cd3d0291c3a3","rpiplc":"ac1bec80d88e6db9","pin":"Q0.3","value":"1","name":"","x":770,"y":220,"wires":[]},{"id":"6882cb9a974e6f53","type":"rpiplc-digital-write","z":"0727cd3d0291c3a3","rpiplc":"ac1bec80d88e6db9","pin":"Q0.4","value":"1","name":"","x":770,"y":260,"wires":[]},{"id":"82d25edaf09c9043","type":"rpiplc-digital-write","z":"0727cd3d0291c3a3","rpiplc":"ac1bec80d88e6db9","pin":"Q0.0","value":"1","name":"","x":770,"y":100,"wires":[]},{"id":"cd9e0a7da9b87c08","type":"rpiplc-digital-write","z":"0727cd3d0291c3a3","rpiplc":"ac1bec80d88e6db9","pin":"Q0.0","value":"0","name":"","x":760,"y":300,"wires":[]},{"id":"5f0bf1b5e0065206","type":"rpiplc-digital-write","z":"0727cd3d0291c3a3","rpiplc":"ac1bec80d88e6db9","pin":"Q0.1","value":"0","name":"","x":760,"y":340,"wires":[]},{"id":"f049f4a7930543b7","type":"rpiplc-digital-write","z":"0727cd3d0291c3a3","rpiplc":"ac1bec80d88e6db9","pin":"Q0.2","value":"0","name":"","x":760,"y":380,"wires":[]},{"id":"54b2e4aca2d3aee5","type":"rpiplc-digital-write","z":"0727cd3d0291c3a3","rpiplc":"ac1bec80d88e6db9","pin":"Q0.3","value":"0","name":"","x":760,"y":420,"wires":[]},{"id":"c0563b371f6f81af","type":"rpiplc-digital-write","z":"0727cd3d0291c3a3","rpiplc":"ac1bec80d88e6db9","pin":"Q0.4","value":"0","name":"","x":760,"y":460,"wires":[]},{"id":"ac1bec80d88e6db9","type":"rpiplc-config","model":"RPIPLC_58","name":""}]
Conclusions
As we have seen, it is not necessary to use different programming languages such as Python to work with Node-RED, but it is possible. Also, it is very simple both calling the script and reading the output of it.