
Getting Started with Raspberry Pi OS Installation
Raspberry Pi is a versatile tool used by a global community of enthusiasts and professionals, each with their own preferences for working with this compact computer. One of the most crucial decisions in setting up a Raspberry Pi is selecting the right operating system, a process that can be both critical and complex.
In this guide, you will learn how to install and configure your preferred OS on a Raspberry Pi, as well as how to install the Industrial Shields packages to maximize the functionality of your Raspberry PLC. Whether you’re a beginner or an experienced user, this post will provide you with the steps needed to get your Raspberry Pi up and running efficiently.
Requirements
- Raspberry PLC
- PC to download and install the image
- Micro SD card
Setting up Raspberry Pi Imager
To begin, install the desired Operating System (OS) onto the micro SD card. This requires downloading and installing the Raspberry Pi Imager application, available from this link.
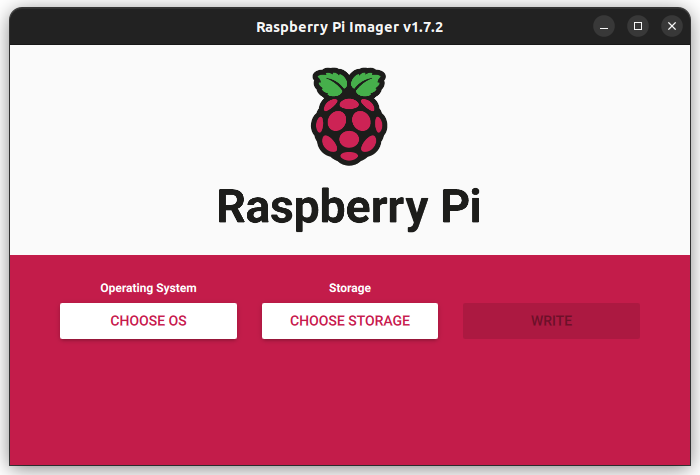
After installing Raspberry Pi Imager, a window will appear with options for selecting an OS, choosing storage, and writing to the micro SD card.
Under the "Storage" option, select the micro SD card. For the "Operating System" option, choose the appropriate OS based on one of the methods outlined below, either Method 1: Installing a Custom Image or Method 2: Using the install.sh Script.
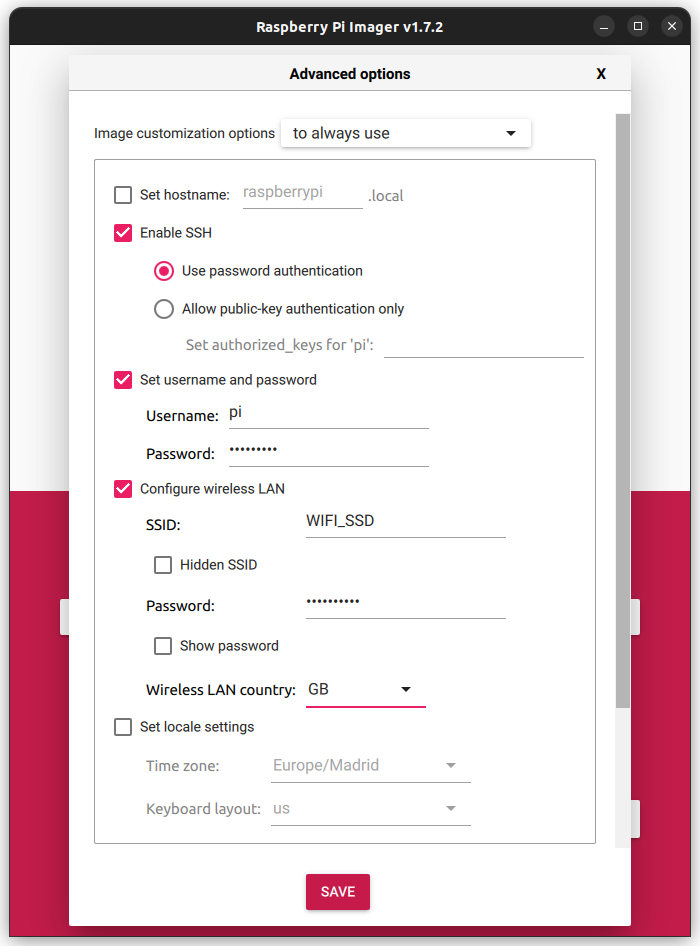
Once the OS and storage are selected, access advanced options by clicking the wheel symbol.
Enable SSH and set a username and password. Typically, the default username is "pi" and the password is "raspberry" (these are also the default credentials for the PLCs), but custom credentials can be specified if preferred. This will allow SSH access to the Raspberry Pi.
Additionally, the Wi-Fi connection for the PLC can be configured by entering the SSID, password, and country fields. This step is optional, as the PLC can connect to the internet via Ethernet, but setting up Wi-Fi may be convenient.
Method 1: Installing a Custom Image
1. Downloading the Custom Image
The first step is to download the appropriate custom image tailored for the specific Raspberry Pi-based PLC in use. The repository provides images with all essential installations pre-configured, reducing setup time and ensuring compatibility with the following devices:
- Raspberry Pi PLC: There are two supported versions, V4 and V6. Each version has two available images based on the Debian releases:
- Raspberry Pi PLC V4
- Raspberry Pi PLC V6
- Raspberry Pi PLC V4
- Touchberry Pi Panel: This device is compatible with two custom images, also based on the Debian releases:
Choose the appropriate image based on the PLC model and the preferred OS version, and download it to your computer. The downloaded file will be in a compressed ZIP format. It is necessary to extract this ZIP file to obtain the .img file, which will be used for the installation.
2. Installing the Image in the Micro SD Card
After extracting the .img file from the downloaded ZIP archive, it needs to be installed onto the micro SD card. This process can be done using the Raspberry Pi Imager application:
- Open Raspberry Pi Imager: Start the application and click the "Choose OS" button.
- Select the Custom Image: Click on the "Use custom" option and navigate to the extracted .img file on your computer. Select the file to proceed.
- Choose the Micro SD Card: For selecting the micro SD card, refer to the instructions provided in the first section (Setting up Raspberry Pi Imager).
- Write the Image: Click the "Write" button to begin the installation process. The application will now format the micro SD card and copy the custom image onto it.
This process may take several minutes. Once completed, the micro SD card will be ready with a fully configured operating system tailored to the selected PLC model and OS version. Simply insert the card into the device, and it will be ready for immediate use.
Using custom images simplifies the setup process, ensuring that all necessary configurations and installations are already in place, making it an efficient method for deploying Raspberry Pi-based PLCs.
Method 2: Using the install.sh Script
1. Installing the image in the micro SD card
Begin by installing an operating system on the micro SD card. While Raspberry Pi OS (32-bit) is recommended, other compatible operating systems can also be used.
For details on how to select and write the image to the micro SD card, refer to the instructions provided in Setting up Raspberry Pi Imager. Once the OS is installed, the micro SD card will be ready for the next steps in the setup process.
2. Installing the packages
After the operating system installation is complete, the next step involves preparing the Raspberry PLC for use. Start by inserting the micro SD card into the micro SD slot of the Raspberry PLC. Connect a screen to one of the micro HDMI ports, then connect the PLC to a power supply. It's crucial to ensure that the micro SD card is properly inserted before powering on the device to avoid potential damage. Additionally, connect a mouse and keyboard to any of the 4 USB ports to facilitate interaction with the Raspberry PLC.
Once powered on, the Raspberry PLC should display the OS initial configuration screen. Here, you'll need to configure various parameters including the username, password, time zone, language, and WiFi connection. Completing this setup will give you full control of the device and confirm that the OS installation has been successful.
To fully prepare your Raspberry PLC for use, it's recommended to install the Industrial Shields packages. This will ensure optimal functionality and integration with your projects. First, download the install.sh script suitable for your PLC version (V4 or V6). You can download the script by executing the following command in the terminal:
- For V4:
- For V6:
Make sure to use the correct URL for your specific PLC version. After downloading the script, you need to make it executable. This can be done with the following command:
Finally, run the script with superuser permissions to install the necessary packages and services for the Raspberry PLC:
These steps will install the required packages and services, including those for the UPS system. Remember that separate install.sh scripts are available for the V4 and V6 versions of the Raspberry Pi PLC, so ensure you download and use the appropriate script for your version.
Final checks
To make sure the installation has been done correctly, there are a couple things to check.
1. Two more services have been added
The first one is the rpishutdown.service. It enables UPS system, to avoid unexpected power supply loss and allow the Raspberry to shutdown correctly.
The second one is the hw-config.service. This service is essential while working with the Raspberry IOs.
This services can be checked with:
2. Ethernet's IP
With the command
You can check the IP address for every interface in the Raspberry Pi. After the installation, Ethernet IP addresses should be:
3. C Industrial Shields package
To install the C Industrial Shields package:
Check the available tags to know the numbers to replace vX.X.X.
4. Install Python Industrial Shields package
To install the Python Industrial Shields package:
Check the available tags to know the numbers to replace vX.X.X.
To install the Python Industrial Shields package:
Check the available tags to know the numbers to replace vX.X.X.
5. Node-RED installation
To install the Industrial Shields Node-RED package, start by entering the following command in the terminal:
Once Node-RED is running, open a web browser and go to http://localhost:1880/. The Node-RED dashboard should be visible. To install the Industrial Shields Node-RED package, follow these steps:
- Install the C Industrial Shields Package: Ensure that the C Industrial Shields package is installed.
- Install the Node-RED Package:
- Via Node-RED Environment: In the Node-RED interface, navigate to Menu -> Manage Palette -> Install, and search for node-red-contrib-rpiplc-node.
- Via Terminal: Alternatively, install the package directly from the terminal using the following commands:
If the .node-red folder is not found in the $HOME directory, check the /root directory instead.