Introduction
Sometimes when performing tasks, you want certain actions to take place during a certain time. The traffic lights system would be an example. Also, if you are performing a maintenance task on a conveyor belt and you want it to be activated for 30 seconds to check its correct operation once repaired, you would be interested in setting a countdown to check this action.
In this post, you will learn how to create a basic Dashboard to set a countdown so that an output from your Raspberry Pi based PLC remains active during the countdown, and is deactivated when this countdown is over. Then, thanks to industrial automation, we will get an automated plant.
Related links
Requirements
Prior checking
First, let's do a pre-check to make sure that Node-RED is correctly installed on your industrial Raspberry PLC:
1. Make sure that Node-RED is rightly installed in your Raspberry Pi industrial PLC:
a. If it is a service, type the following at the command line:
sudo systemctl status nodered.service
b. If it is not a service, but is installed, start it:
node-red-start
c. If it is not installed, run the following command to install Node.js, npm and Node-RED on an industrial Raspberry Pi PLC:
bash <(curl -sL https://raw.githubusercontent.com/node-red/linux-installers/master/deb/update-nodejs-and-nodered)
2. Go to the config.txt from your open source PLC Raspberry Pi:
sudo nano /boot/config.txt
And make sure these lines are commented out:
#dtoverlay=mcp23017,noints,mcp23008,addr=0x20
#dtoverlay=mcp23017,noints,mcp23008,addr=0x21
#dtoverlay=i2c-pwm-pca9685a,addr=0x40
#dtoverlay=i2c-pwm-pca9685a,addr=0x41
#dtoverlay=ads1015,addr=0x48
#dtparam=cha_enable=true,cha_gain=1
#dtparam=chb_enable=true,chb_gain=1
#dtparam=chc_enable=true,chc_gain=1
#dtparam=chd_enable=true,chd_gain=1
#dtoverlay=ads1015,addr=0x49
#dtparam=cha_enable=true,cha_gain=1
#dtparam=chb_enable=true,chb_gain=1
#dtparam=chc_enable=true,chc_gain=1
#dtparam=chd_enable=true,chd_gain=1
#dtoverlay=ads1015,addr=0x4a
#dtparam=cha_enable=true,cha_gain=1
#dtparam=chb_enable=true,chb_gain=1
#dtparam=chc_enable=true,chc_gain=1
#dtparam=chd_enable=true,chd_gain=1
#dtoverlay=ads1015,addr=0x4b
#dtparam=cha_enable=true,cha_gain=1
#dtparam=chb_enable=true,chb_gain=1
#dtparam=chc_enable=true,chc_gain=1
#dtparam=chd_enable=true,chd_gain=1
Node-red-contrib-countdown
To have a countdown node to be able to set the timeout, let's download the node-red-contrib-countdown node:
If everything went well, you will be able to see your nodes in the left menu.
Node-RED Flow
Now, let's create the Node-RED flow!
1. First, add a Dashboard switch node with the following configurations:
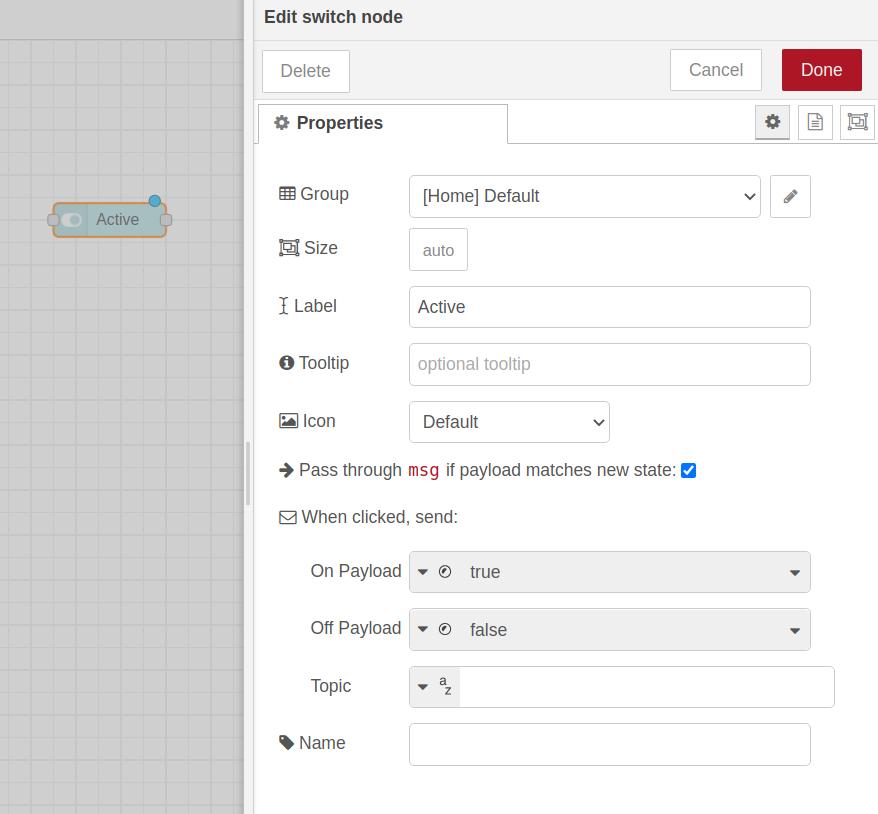
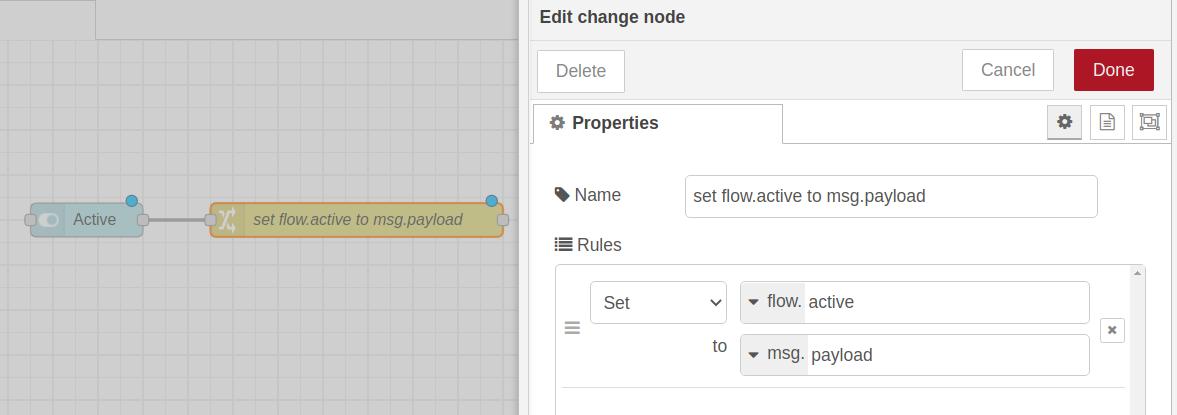
2. Then, add a change node to set flow.active to msg.payload. With this configuration, you will set a flow variable for the numeric value to start the counter or not.
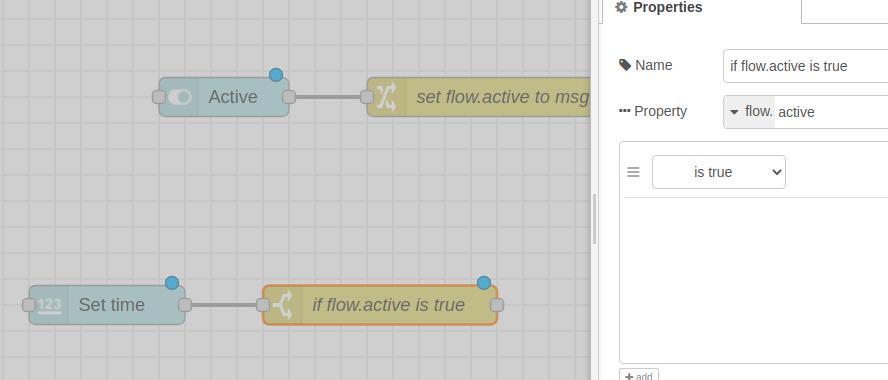
3. Wire a switch node to evaluate the flow.active variable. If it is true, you will be able to activate the countdown. Otherwise, you will not.

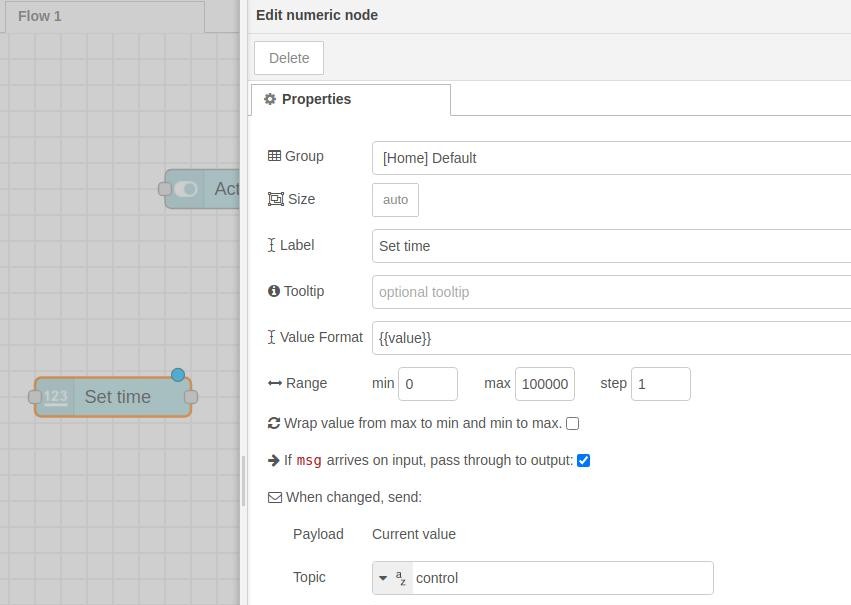
4. As we can see in the node-red-contrib-countdown documentation, you need the topic: “control” to reload the timer. So, now you are going to add a numeric Dashboard node to have a numeric widget to set the counter value, and you will set the msg.topic to “control”.
Also, you will set a range of seconds and type a label to display on the dashboard.
5. Add a switch node and evaluate if the variable flow.active is true.
6. Add the countdown node after the switch node and configure it. Now, connect the first output of the “eval flow.active” node to the input of the “if flow.active is true” and the second output to the countdown node.
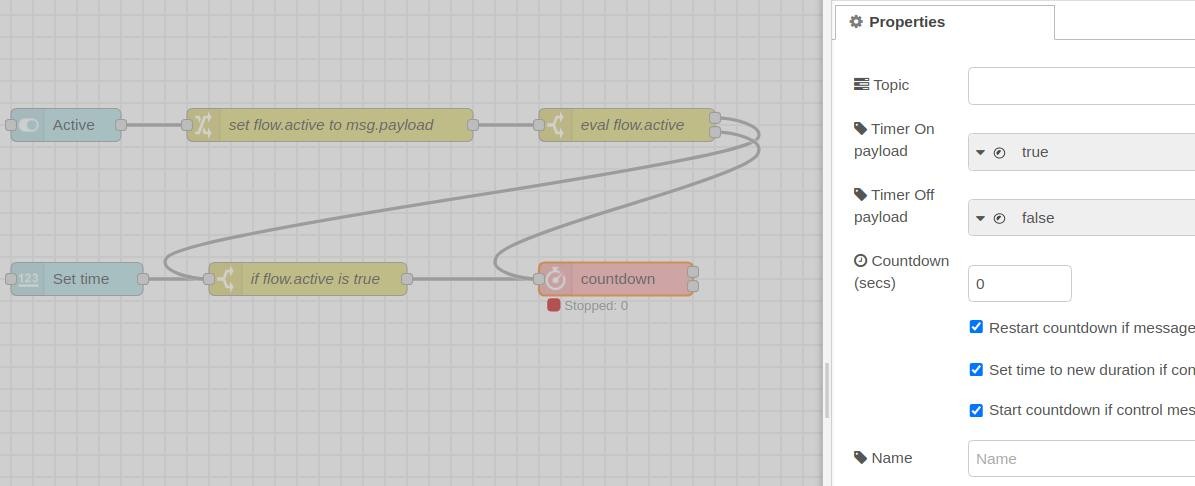
9. Finally, add a text dashboard node, to show, from the second output of the countdown node, each of the counter numbers.

Now, it is time to go to your Node-RED dashboard: YOUR-IP-ADDRESS:1880/ui and try it out.
Note that when you activate the switch button, there will be no countdown until you press any arrow to set the counter time.
Go to the Menu > Import > And paste this code below to paste it directly to the flow. > Click on Import and enjoy!
[{"id":"aed4ed95.51fd3","type":"tab","label":"Flow 1","disabled":false,"info":""},{"id":"36dab66.105b04a","type":"ui_numeric","z":"aed4ed95.51fd3","name":"","label":"Set time","tooltip":"","group":"2200bc67.e75214","order":2,"width":0,"height":0,"wrap":false,"passthru":true,"topic":"control","topicType":"str","format":"{{value}}","min":0,"max":"1000000","step":1,"x":120,"y":380,"wires":[["57e3fd14.c6faf4"]]},{"id":"54847c0b.8278a4","type":"ui_switch","z":"aed4ed95.51fd3","name":"","label":"Active","tooltip":"","group":"2200bc67.e75214","order":1,"width":0,"height":0,"passthru":true,"decouple":"false","topic":"","topicType":"str","style":"","onvalue":"true","onvalueType":"bool","onicon":"","oncolor":"","offvalue":"false","offvalueType":"bool","officon":"","offcolor":"","animate":false,"x":110,"y":240,"wires":[["2c4caab0.b6e2e6"]]},{"id":"e3726420.761328","type":"countdown","z":"aed4ed95.51fd3","name":"","topic":"","payloadTimerStart":"true","payloadTimerStartType":"bool","payloadTimerStop":"false","payloadTimerStopType":"bool","timer":"0","resetWhileRunning":true,"setTimeToNewWhileRunning":true,"startCountdownOnControlMessage":true,"x":550,"y":380,"wires":[["c5266af7.683928"],["cdb38e2b.3152d"]]},{"id":"cdb38e2b.3152d","type":"ui_text","z":"aed4ed95.51fd3","group":"2200bc67.e75214","order":3,"width":0,"height":0,"name":"","label":"Time remaining","format":"{{msg.payload}}","layout":"row-spread","x":1020,"y":260,"wires":[]},{"id":"57e3fd14.c6faf4","type":"switch","z":"aed4ed95.51fd3","name":"if flow.active is true","property":"active","propertyType":"flow","rules":[{"t":"true"}],"checkall":"true","repair":false,"outputs":1,"x":330,"y":380,"wires":[["6be8442b.afdf6c","e3726420.761328"]]},{"id":"2c4caab0.b6e2e6","type":"change","z":"aed4ed95.51fd3","name":"set flow.active to msg.payload","rules":[{"t":"set","p":"active","pt":"flow","to":"payload","tot":"msg"}],"action":"","property":"","from":"","to":"","reg":false,"x":490,"y":240,"wires":[["e99f47d5.17f628"]]},{"id":"e99f47d5.17f628","type":"switch","z":"aed4ed95.51fd3","name":"eval flow.active","property":"active","propertyType":"flow","rules":[{"t":"true"},{"t":"false"}],"checkall":"true","repair":false,"outputs":2,"x":760,"y":240,"wires":[["cdb38e2b.3152d","57e3fd14.c6faf4"],["e3726420.761328"]]},{"id":"c5266af7.683928","type":"switch","z":"aed4ed95.51fd3","name":"is msg.payload is false","property":"payload","propertyType":"msg","rules":[{"t":"false"}],"checkall":"true","repair":false,"outputs":1,"x":780,"y":400,"wires":[["3eab10e.ae300f"]]},{"id":"3eab10e.ae300f","type":"rpiplc-digital-write","z":"aed4ed95.51fd3","rpiplc":"d44e8434.83bc08","pin":"Q0.0","value":"0","name":"","x":1020,"y":400,"wires":[]},{"id":"6be8442b.afdf6c","type":"rpiplc-digital-write","z":"aed4ed95.51fd3","rpiplc":"d44e8434.83bc08","pin":"Q0.0","value":"1","name":"","x":550,"y":460,"wires":[]},{"id":"2200bc67.e75214","type":"ui_group","name":"Default","tab":"7e6b74f7.76b2ec","order":1,"disp":false,"width":"6","collapse":false},{"id":"d44e8434.83bc08","type":"rpiplc-config","model":"RPIPLC_57R","name":""},{"id":"7e6b74f7.76b2ec","type":"ui_tab","name":"Home","icon":"dashboard","disabled":false,"hidden":false}]
Node-RED Tutorial: How to set a countdown on Raspberry Pi PLC controller