Introduction
We could say that the industrial Raspberry PLC is a tiny and affordable computer adapted and manufactured for Industrial uses for its communications and all the allowed protocols that can be used.
As we can have Node-RED, which is a very powerful programming tool, we can create very professional flows for very complex applications.
In this blog, we are going to create QR code for free using a QR generator node in Node-RED!
What is a QR code and what is it used for?
QR code (abbreviated from Quick Response code) is a type of the matrix barcode (or two-dimensional barcode) invented in 1994 by the Japanese automotive company Denso Wave. A barcode is a machine-readable optical label that contains information about the item to which it is attached. In practice, QR codes often contain data for a locator, identifier, or tracker that points to a website or application. A QR code uses four standardized encoding modes (numeric, alphanumeric, byte/binary, and kanji) to store data efficiently; extensions may also be used.

Node-RED
First of all, we must have installed Node-RED in order to be able to develop an application.
So, make sure that everything is ready, and let's continue!
How to generate a QR code open source PLC Raspberry Pi from a website
2. Once the node is installed, add it to the flow, click on it once and go the documentation to see how the node works.
We can see that the node must be configured either by the editor conguration parameters or by an input msg.qrcodeinput.
3. If we double click on the QR code generator node, we will see that there are different QR code types:
- HTML-Link or Text
- WiFi
- Telephone
- SMS
- Map point
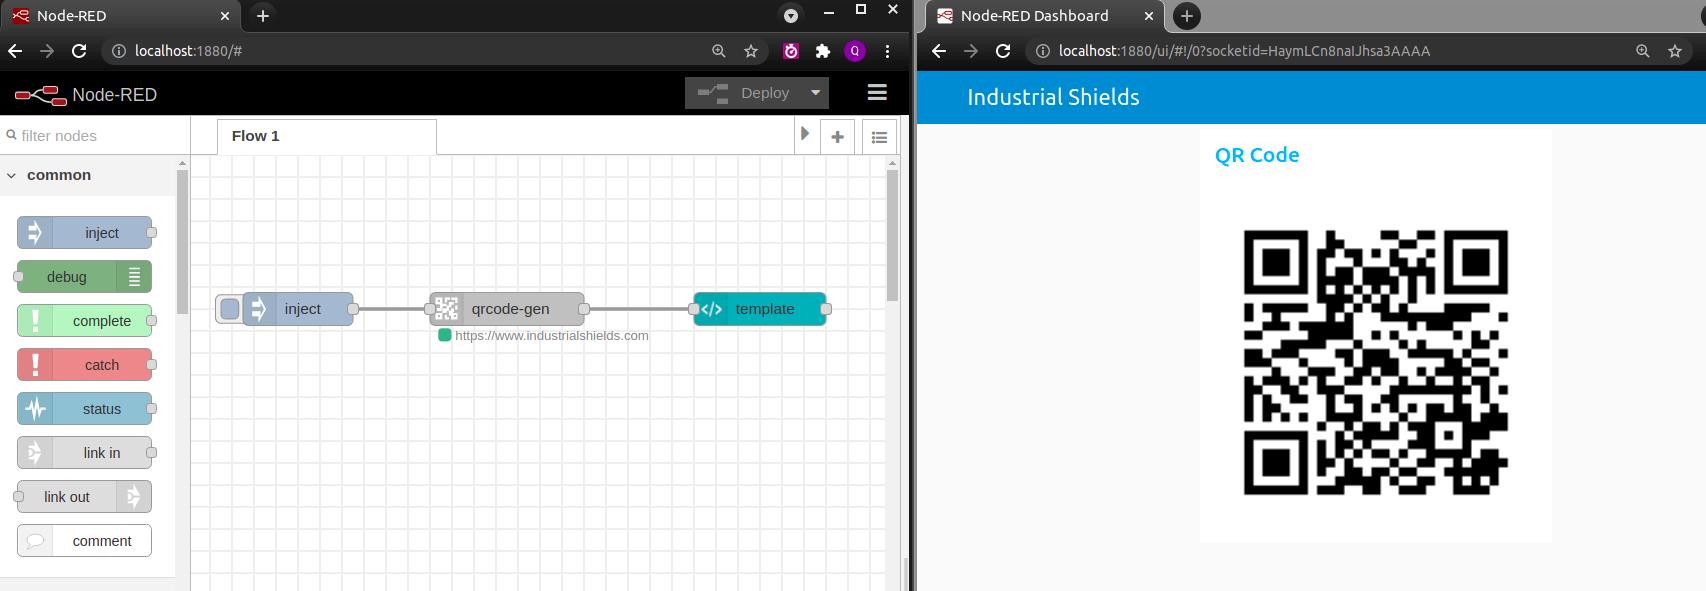
You can choose whatever you want to use, but in our case, we are going to inject a msg.qrcodeinput with the URL that we want the users to go to when they scan the QR code.
4. So, we will add an inject node with the msg.qrcodeinput = string "https://ww.industrialshields.com"
Note: It is important that you add https:// at the beggining of the URL so that it can be recognized as a website.
5. Finally, we are going to add a Dashboard template node with a group set and an img tag:
<img src={{msg.payload}}>Now, go to your Node-RED Dashboard and scan the QR code generated from a website!

Note: Import this Node-RED example to compare with yours!
[{"id":"b716fdc48724e610","type":"tab","label":"Flow 1","disabled":false,"info":""},{"id":"44193d2cebeda968","type":"ui_template","z":"b716fdc48724e610","group":"9eb19ca7ae6787ba","name":"","order":1,"width":"6","height":"6","format":"<img src={{msg.payload}}>\n","storeOutMessages":true,"fwdInMessages":true,"resendOnRefresh":true,"templateScope":"local","x":660,"y":140,"wires":[[]]},{"id":"95d86b5ab4a91766","type":"inject","z":"b716fdc48724e610","name":"","props":[{"p":"qrcodeinput","v":"https://www.industrialshields.com","vt":"str"},{"p":"topic","vt":"str"}],"repeat":"","crontab":"","once":false,"onceDelay":0.1,"topic":"","x":240,"y":140,"wires":[["7e3845373bd3bd76"]]},{"id":"7e3845373bd3bd76","type":"qrcode-generator","z":"b716fdc48724e610","name":"","qrtype":"text2qr","text2qrText":"","ssid":"ISHIELDS","hiddenssid":false,"wifitype":"WPA","phonenum":"","smsphonenum":"","smstext":"","mailto":"","mailsubject":"","mailbody":"","latitude":"","longitude":"","colorlight":"#ffffff","colordark":"#000000","printstatus":true,"x":430,"y":140,"wires":[["44193d2cebeda968"]]},{"id":"9eb19ca7ae6787ba","type":"ui_group","name":"QR Code","tab":"b0be4e53a8318c60","order":1,"disp":true,"width":"6","collapse":false},{"id":"b0be4e53a8318c60","type":"ui_tab","name":"Industrial Shields","icon":"dashboard","disabled":false,"hidden":false}]
Go to the Menu Import Paste this JSON code Click on Import.
Node-RED Tutorial: How to generate a QR code with Raspberry Pi PLC