
Introduction
Machine learning is an application of artificial intelligence (AI) that provides systems the ability to learn and improve automatically from experience without being explicitly programmed.
TensorFlow is an end-to-end open-source platform for machine learning. It has a comprehensive, flexible ecosystem of tools, libraries, and community resources that let developers easily build and deploy ML-powered applications.
In this post, you are going to learn how to develop open-source projects using open source platforms, such as Node-RED and TensorFlow! Let's get started!
Related links
Requirements
Technologies
Explanation
Nodes installation
By default, in the Raspberry Pi based family of products, Node-RED is already installed. You can connect to the industrial Raspberry PLC remotely by putting the IP address in the URL section of your browser. Connect an Ethernet cable to the Raspberry Ethernet port, and type the following:
http://10.10.10.20:1880/
The Node-RED flow library has several TensorFlow.js-enabled nodes. One of these if node-red-contrib-tensorflow, which contains the trained models.
To install the node, go to the top-right menu of the flow editor > click "Manage Palette" > select the Install tab > look for: node-red-contrib-tensorflow. > Click on install.

Once the installation is complete, go to the Analysis category, and you will see four node-red-contrib-tensorflow nodes. These are all image recognition nodes, but they can also generate image data with annotation and perform other functions like image recognition, or offline, which is necessary for edge analytics.
- Cocossd: A node that returns the name of the object in the image.
- Handpose: A node that estimates the positions of fingers and joints from a hand image.
- Mobilenet: The node that classifies images with MobileNet
- Posenet: A node that estimated the position of arms, head, and legs from the image of a person.
Creating a flow
In this post, you are going to use the cocossd, handpose and posenet nodes, because what our application will do, is to take a picture, to detect fingers in a hand and to estimate human pose. So, you will take a picture with our USB camera using the fswebcam command, our TensorFlow nodes will process the information, and you will get the data through our debug nodes.
Then, you are going to add an exec node to run the fswebcam command so that it takes a picture:
fswebcam -r 1270x720 --no-banner {absolute-path}You can just run the command like this: fswebcam myimage.jpg
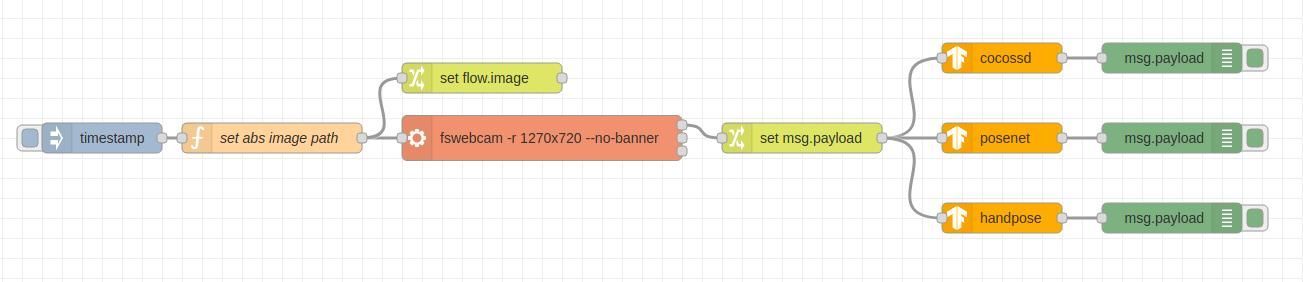
As you, we are going to name the pictures: image-{timestamp}.jpg, you are going to append the timestamp injecting it from an inject node as shown in the pictures below, and you are going to set that name to a flow variable called flow.image:


In the inject node, you can inject once every X seconds, and then repeat every X seconds so that the application works in a specified time interval.
Once the picture is taken, let's get the flow.image and set it to the msg.payload, so that you can send it to our TensorFlow nodes. Just connect a change node to the stdout of the exec node, set the msg.payload to flow.image, and connect the cocossd, posenet and handpose after the change node. Wire three debug nodes, each one next to the machine learning nodes. Your flow should look something like this:

Why Raspberry PLC for Machine Learning?
- Raspberry Pi OS with Debian (Linux).
- Python: The favorite programming language for machine learning.
- It has different Analog/Digital/Relay I/Os to receive and send the data from.
- Open solution: Open Source. No license fees.
- Equipment designed and manufactured for industrial use at a lower price than competitive products.
- Modular solution: Product specifications can be scalable in the future.