
Introduction
In this blog, you will learn how to configure the GPRS module in your industrial Raspberry PLC. We will go step by step to configure and run the GPRS module and hence get internet connectivity with our PLC.
Previous readings
We recommend you read the following posts to understand the program in this blog. They can also be useful to get you started with your brand new industrial Raspberry Pi PLC:
Requirements
In order to work with the GPRS module, you will need any of our industrial GPRS family Raspberry Pi based PLC for industrial automation. On this example, we will be working with the Raspberry Pi PLC & GPRS 21 IOs:
Hardware
The SIM800L module is the main component of the Adafruit FONA 800 cards so you can use the library made for these cards with the modules that assemble the SIM800L.
In this tutorial, we focus on setting up the environment for using the Industrial raspberry PLC GPRS module, but we will also show you how to test the module sending AT commands by the serial monitor.
Connections
The connections between Raspberry and the GPRS module can be seen in the following image. The serials are crossed for being able to send data properly.

GPRS Connection
Inserting the SIM card
The sim card needs to be inserted with the uncut side in it first. Take a look at the picture for a better understanding. The connectors of the sim are facing downwards.
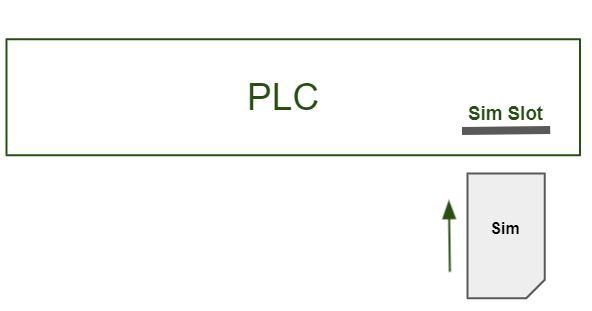
The SIM card inlet of the PLC is located on the top cover of the device. You will be able to see the SIM card symbol on the screen printing; the slot is just below it. You can use a forceps or a mini screwdriver to insert the card. It has a spring mechanism that will lock the sim to its place.


Configuration
We need to make some configuration settings to set up the GPRS connection. We will go through the steps now
Add "enable_uart = 1" (Without " ) to /boot/config.txt file and Remove "console0 = ... from /boot/cmdline.txt
Type "sudo raspi-config" in the console to open a gui for settings. Choose interfacing options and then P6 option (Serial port). Reject the "login shell to be accessible over serial" option and enable the "serial port hardware" option
If you have done the steps successfully, a message will be displayed saying that the serial login shell is disabled and the serial interface is enabled.
2) Install minicom terminal emulator and test the module with AT commands
This step is a pre-test to check the hardware connection to the SIM800L and can be skipped.
SIM800L works with the ttyS0 port and for this example, you will be using a 115200 baud rate. You will execute the following command to open the serial communication with the minicom:
$ sudo minicom -D /dev/ttyS0 -b 115200
Once inside, type AT and press enter and the GPRS module will return an OK message. AT is the simplest of the AT commands, used for testing the module
To make sure that you can see what's happening when you are using AT commands or running the scripts from the next step, you can run the following command on a new terminal or an instance of SSH serial communication to see the logged messages.
$ tail -f /var/log/messages
3) Check and install dependencies.
We will be using "ppp" (Point-to-Point) link layer protocol, which is by default there in the PLC. It is advised to install this package using apt-get install to avoid complications in the next step. Furthermore, this package requires libpcap0.8 (the version is 0.8 at the time of writing this document) and will install automatically with the "ppp" package. In case it does not, you can install it as well. ( You will need internet for this, so make sure you have either wifi or ethernet configured)
4) Create configuration files: a ppp-start file to initiate the connection process and a gprs-options file.
You should have a folder named "ppp" in /etc/ , if not, create one.
Create a file named "ppp-start" in /etc/ppp/ with the following contents :
/usr/sbin/pppd file /etc/ppp/gprs-options
ppp-start is a command file that launch the daemon program pppd passing as parameter the /etc/ppp/gprs-options that contains the PPP working options.
Create a file named "gprs-options" in /etc/ppp/ with the following contents :
/dev/ttyS0
9600 defaultroute user "YOUR-USERNAME-USED-IN-OTHER-FILES" connect "/usr/sbin/chat -v -f /etc/ppp/gprs-connect" disconnect "/usr/sbin/chat -v -f /etc/ppp/gprs-disconnect"
5) Download, unzip and copy these files to the location specified.
ppp-secrets: /etc/ppp/pap-secrets
gprs-connect: /etc/ppp/gprs-connect
gprs-disconnect: /etc/ppp/gprs-disconnect
gprs: /etc/ppp/peers/gprs
ppp0: /etc/network/interfaces.d/ppp0
In some of these files you must apply some changes to be able to work with the SIM. The files have some sections where you can find the option “YOUR-USER-HERE”, “YOUR-PASSWORD-HERE” or “YOUR-APN-HERE”, where the user must configure his username, password and the APN he is using. Some of the files will require modification with the sudo superuser option. The options you will need to modify are:
/etc/ppp/pap-secrets: User and Password
/etc/ppp/gprs-connect: APN
/etc/ppp/peers/gprs: Use
The files GPRS-connect and GPRS-disconnect will be tests used to do the basics of communications, getting an IP for future use. As you can see in them, on the left side of the lines there is the response that GPRS will send after getting the command specified on the right side of the line. For example, AT+CGDCONT=1,"IP","YOUR-APN-HERE","0.0.0.0",0,0 will expect an OK.
The file that would be running the whole process is the GPRS. On this example, the GPRS file is called the gprs-connect, if you want to implement different functions, you have to configure them there.
6) Edit the file "provider" in /etc/ppp/peers/
Make the following changes :
username "Your-UserName"
replace ********* with apn link or phone number of your provider
/dev/modem to /dev/ttyS0
After setting this configuration, do a reboot and the module should connect to the internet automatically.
$ sudo reboot
You can check if ppp0 appears when you run ifconfig. It should be there.
You can also test your connection with the following command as a superuser:
$ . /etc/ppp/ppp-startMake sure you are running the message log from step 2 to know what is happening in the background. If the module is already running and you run the above command, it will throw an error stating that the device ttyS0 is blocked with a PID no.
Troubleshooting
If there are any problems during the process, doing a manual reset to the GPRS module should solve the issue. To do the reboot, execute the following commands:
echo 16 > /sys/class/gpio/export
echo out > /sys/class/gpio/gpio16/direction
echo 1 > /sys/class/gpio/gpio16/value
echo 0 > /sys/class/gpio/gpio16/value
echo 1 > /sys/class/gpio/gpio16/value
echo 16 > /sys/class/gpio/unexport
sudo nano /etc/ssh/sshd_config
sudo service ssh restartAfter these steps you will be able to assign a psw to the root user doing:
sudo passwd root