
LoRaWAN
LoRaWAN (Long Range Wide Area Network) is a wireless communication protocol designed for low-power, long-range data transmission. It is used primarily in IoT (Internet of Things) applications where devices need to send small amounts of data over long distances.
LoRaWAN operates on unlicensed radio frequencies and can support a large number of devices with low data rates, making it ideal for applications like smart cities, agriculture, industrial monitoring, and environmental sensing. The protocol focuses on energy efficiency, enabling devices to operate on small batteries for years.
Hardware used
The goal of this blog is to demonstrate communication between two Raspberry Pi PLCs, each equipped with a LoRa module, and a LoRaWAN gateway. The setup involves sending data from one LoRa module to another and aggregating that data to send to the LoRaWAN network. We've used:
- Two Raspberry Pi PLC 21 V6 with LoRa expansion module.
- An analog sensor connected to I0.12 on both PLCs.
- The Things Indoor Gateway.
Gateway configuration
To configure the gateway we've followed this easy guide:
Python files
To be able to read data from an analog sensor we first need to install Industrial Shield's python library. Instructions on how to install it can be found here:
Next, you’ll need to download four Python files. The files lora.py and lorawan.py are libraries used to communicate with the LoRa module and LoRaWAN network. The files sendertest.py and receivertest.py handle the transmission and reception of data between the two Raspberry Pi PLCs and the LoRaWAN gateway.
Click on the icons to download the files, be sure to place them in the same folder:
Once downloaded, the files will not be ready for execution yet. Some variables must be configured to match your hardware setup.
The file sendertest.py is designed to send data from one Raspberry Pi PLC to another. It uses the expansor slot 1 (EXP1_RST) and communicates via serial port ttySC0. If your LoRa module is installed in expansor slot 2, you'll need to modify:
- Change ttySC0 to ttySC1 in line 16 of sendertest.py.
- Change EXP1_RST to EXP2_RST in lines 8 and 11 of sendertest.py.
Similarly, in the file receivertest.py, which receives data and sends it to the LoRaWAN gateway, you’ll need to:
- Change ttySC0 to ttySC1 in line 20 of receivertest.py.
- Change EXP1_RST to EXP2_RST in lines 17 and 30 of receivertest.py.
Expansor slot 1 is the one closest to the Ethernet port, in case you are not sure which expansor slot your LoRa module is using.
These files are also configured to use the European frequency by default. If you need to use a different frequency, you can modify it in sendertest.py at line 21 and in receivertest.py at line 60.
Creating the end device
To create the end device, you'll need to go to the Applications tab in The Things Stack Sandbox and add a new application. Then configure a new end device by clicking on "+ Register end device".
It's very important to set the following settings correctly.
- Input method: Select "Enter end device specifics manually".
- Frequency plan: If you are in Europe, select "Europe 863-870 MHz (SF9 for RX2 - recommended)".
- LoRaWAN version: 1.0.2.
- Regional Parameters version: 1.0.2 revision B.
- JoinEUI: This 64bit identifier must match the AppEUI in receivertest.py (line 23).
- DevEUI: This must match the DevEUI in receivertest.py (line 24).
- AppKey: This must match the AppKey in receivertest.py (line 22).
You can use the default values provided in the script or customize them, but they must match the configuration of your end device.
After setting up the end device, navigate to the "Payload formatters", select "Custom Javascript formatter", paste the following code and save the changes.
OTAA & ABP
OTAA (Over-the-Air Activation) and ABP (Activation by Personalization) are two methods for connecting LoRaWAN devices to a network:
- OTAA:
- Devices dynamically join the network by exchanging keys with the server.
- More secure, as keys are unique and can be refreshed periodically.
- Requires more initial communication (join requests).
- ABP:
- Devices are pre-configured with fixed keys and don’t need to join.
- Less secure, as keys are static and can be reused.
- Quicker startup since no join process is required.
The steps explained in the Creating an end device section are for OTAA by default. If you want to use ABP, after you set up the Regional Parameters version you'll want to click on Show advanced activation and switch to ABP.
If you've used OTAA with the same LoRa module before, you may have to go into Settings -> Network Layer and click on Reset session and Mac state to get it to work properly.
receivertestABP.py
Testing
Once everything is set up, you can begin testing by running the sendertest.py and receivertest.py files, each on a different PLC.
Navigate to the folder containing the Python files and execute them using:
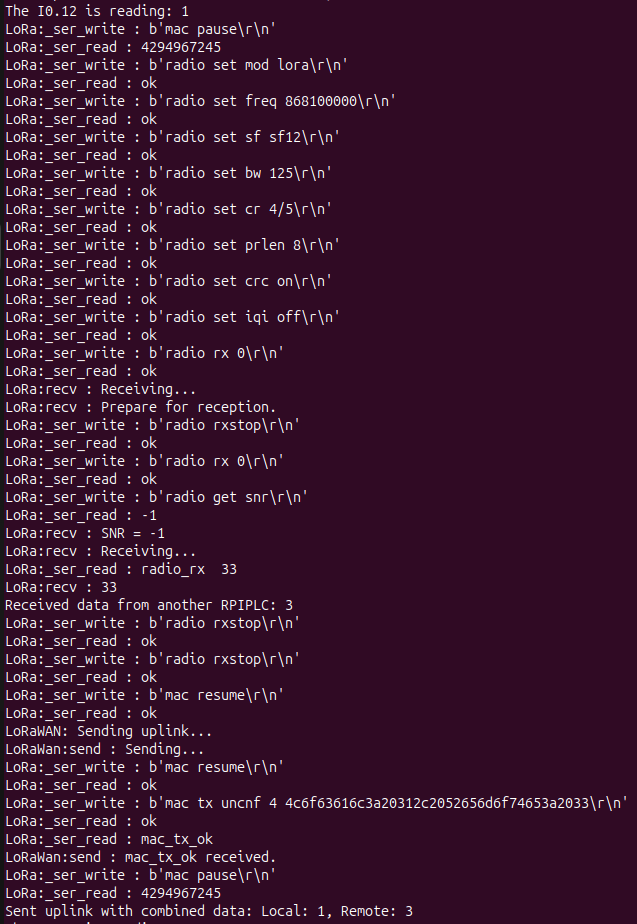
The sendertest.py script will transmit data from one LoRa module, while receivertest.py will receive this data, combine it with local sensor readings, and send the aggregated data to the LoRaWAN gateway.
It will take a few seconds to apply the configuration to the LoRa model, but after a short while it should start receiving and sending messages like this:
In the page of the end device you should start seeing the data that's being sent to LoRaWAN:

For more information about the individual functionalities of sending and receiving data using LoRa and LoRaWAN, you can refer to the following posts: