
Introduction
In this post, you will see how to install and configure an on-screen keyboard on the Industrial Shields Panel PC, which is useful for when the panel pc is being used in kiosk mode. In some cases, an onboard keyboard is not installed by default and you have to set it as it is very useful to take advantage of the industrial touch screen. The Kiosk software is a system and user interface software designed to enclose the system in a way that avoids user interaction and activities on the device outside the scope of execution of the software. It is very useful when you want to implement a configuration that should not be changed.
Requirements
- Panel PC
- Internet Connection
Onboard Keyboard Installation
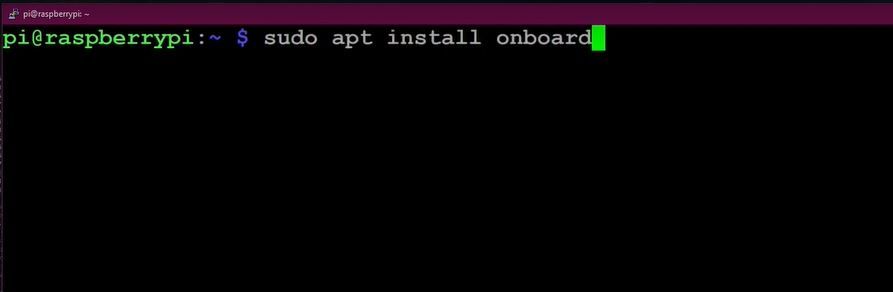
The first step is to open the Panel PC terminal in order to execute the installation command. To open the terminal press Ctrl+Alt+T or just click the terminal option on the upper left corner. Once opened, type the following commands in order to install the keyboard:
> sudo apt-get upgrade
> sudo apt-get install onboard
> sudo apt install at-spi2-core // This is a dependency
> sudo apt-get install onboard
Once you have entered the commands you will have to enter the Root password. By default, the password is always raspberry.
Note: you will not see how the password is typed but the characters will be entered.
In order to apply all the changes, reboot the system with the following command:
> sudo reboot
Once it is installed you can run it by clicking on the top left corner ( Rpi icon) and clicking on Universal Access ( Alternatively you can type "onboard" on the terminal). To change its settings, you can click on preferences on the same drop down menu and select "Onboard Preferences". In the preference ,check "Auto-show when editing text" to enable auto-pop up feature.
If there is not any internet connection available, do not hesitate to contact our technical support department.
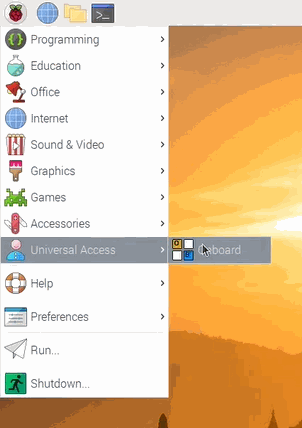 Menu → Universal Access→ Onboard
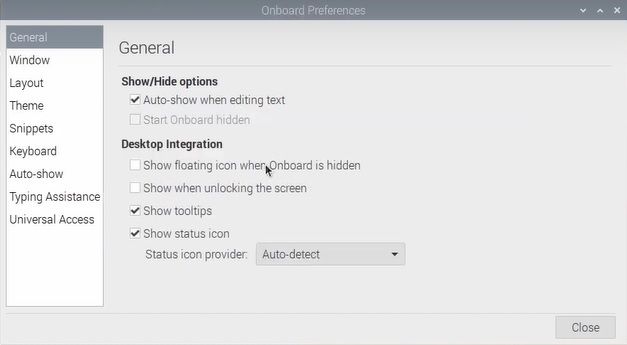 Menu → Preferences →Onboard Preferenceand selects the checkbox option on Auto-show.
Menu → Preferences →Onboard PreferenceConfiguration of the Kiosk mode
The kiosk mode lets you open an application interface when opening the Panel PC. In order to activate it, you will have to modify an internal file.
First of all, you will need to open the Raspbian terminal using Ctrl+Alt+T. Once the terminal is open, follow the steps below:
1. Locate the auto-start file to configure the startup of the Operating System; you can access it by entering the following path in the terminal:
> sudo nano /home/pi/.config/lxsession/LXDE-pi/autostart
Note: In the latest versions of Raspbian this file does not exist by default. Create it using the touch command followed by autostart function.
After the command is executed, a file will be opened in the current terminal. Any previous content must be deleted.
If you do not find the previous path, the file could be located in the following one:
> sudo nano /etc/xdg/lxsession/LXDE-pi/autostart
@chromium-browser --kiosk --app=[app path]
Note: In the application path, choose the one that you want to be used. In order to Save the file in the Nano editor, type Ctrl+X and then Y(yes)
Example:
@chromium-browser --kiosk --app=http://127.0.0.1:8000
3. Finally reboot the Panel PC (Raspbian). Once restarted, the applied changes will be displayed.

Note: Once you are in the Kiosk mode, if you want to return to normal desktop mode, you have to press ctrl+alt+F1, search the autostart file previously modified, edit it commenting the added line, save it and reboot the system.
Touch Screen Configuration: Kiosk mode + virtual keyboard setup