
Introduction
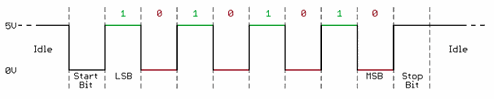
In this post we will talk about serial Transistor-Transistor Logic (TTL) of our Arduino-based industrial controller. Serial communication, also known as sequential communication, refers to the transmission of data one bit at a time over a communication channel or bus. In contrast, parallel communication sends all bits simultaneously, requiring as many lines of communication as there are bits.
Serial communication offers a distinct advantage in terms of efficiency, as it necessitates fewer transmission lines compared to parallel communication for transmitting equivalent data.
Requirements
Industrial Shields controllers:
Hardware
IMPORTANT: Make sure that your PLC is powered (12-24Vdc).
When discussing the pin configuration and switch settings for our
industrial PLC controller Arduino, it's essential to note that the
Ardbox family does not incorporate a dedicated Serial TTL interface;
instead, it relies exclusively on software-based communication. In
contrast, within the M-Duino family, Serial TTL connectivity is
facilitated through dedicated RX0 (receiver) and TX0 (transmitter) pins, and RX1 (receiver) and TX1 (transmitter)
pins.
For the following models, if we want to use Serial1, we need to configure the switches that we see in the image. We need to know that the switches need to be in the OFF position because the ON position is not connected.
- M-DUINO PLC Arduino 21 I/Os Analog/Digital PLUS
- M-DUINO PLC Arduino 19R I/Os Analog/Digital PLUS

For the next ones, we need to choose between RX1 , TX1 / I1.1 , I1.0.
- M-DUINO PLC Arduino 38R I/Os Analog/Digital PLUS
- M-DUINO PLC Arduino 57R I/Os Analog/Digital PLUS
- M-DUINO PLC Arduino 38AR I/O Analog/Digital PLUS
- M-DUINO PLC Arduino 53ARR I/Os Analog/Digital PLUS
- M-DUINO PLC Arduino 54ARA I/Os Analog/Digital PLUS
- M-DUINO PLC Arduino 50RRA I/Os Analog/Digital PLUS

For the next ones, we need to choose between RX1 , TX1 / I1.6 , I1.5.
- M-DUINO PLC Arduino 57AAR I/Os Analog/Digital PLUS
- M-DUINO PLC Arduino 42 I/Os Analog/Digital PLUS
- M-DUINO PLC Arduino 58 I/Os Analog/Digital PLUS

Software
IMPORTANT: Make sure to download the Arduino based PLC boardsfor Arduino IDE.
Software Configuration
Once the hardware configuration is done, it is possible to proceed with the software configuration and also its usage. You have to write all the initializations in the setup() function and the rest of the code in the loop() function.
Basic Serial TTL read example
To illustrate reading from a Serial TTL connection in the Arduino IDE,
you can use the following example code. This assumes you have a device
connected to the Arduino through a Serial1 interface, and you want to
read data from it.
void setup() {
  // Start the serial communication
  Serial1.begin(9600); // Adjust baud rate based on your device's specifications
}

void loop() {
  // Check if data is available to read
  if (Serial1.available() > 0) {
    // Read the incoming byte
    char incomingByte = Serial1.read();

    // Print the received byte to the Serial Monitor
    Serial.print("Received: ");
    Serial.println(incomingByte);
  }
}
Basic Serial TTL write example
Below is an example Arduino code for writing data over a Serial TTL
connection. This assumes you have a device connected to the Arduino
through a Serial TTL interface, and you want to send data to that
device.
void setup() {
  // Start the serial communication
  Serial1.begin(9600); // Adjust baud rate based on your device's specifications
}

void loop() {
  // Your data to be sent
  String dataToSend = "Hello, Serial TTL!";

  // Send the data over Serial
  Serial.print("Sending: ");
  Serial.println(dataToSend);

  // Send the data to the connected device
  Serial1.write(dataToSend.c_str());

  // Add a delay to avoid overwhelming the receiving device
  delay(1000);
}