
To upload a sketch to an Arduino PLC (M-Duino Arduino PLC or Ardbox Arduino PLC) from the Windows command line, you have two options. Arduino CLI compiles the .ino and uploads it in one command: arduino-cli compile --upload -p COM5 --fqbn industrialshields:avr:mduino:cpu=mduino42plus MySketch. avrdude only writes a .hex file that is already compiled: avrdude -C avrdude.conf -p atmega2560 -c wiring -P COM5 -b 115200 -D -U flash:w:MySketch.ino.hex:i. Both need the COM port of the PLC and, to run from any folder, the program folder in the Windows Path.
This guide shows the Windows steps with screenshots: add a folder to Path, find the COM port, upload with Arduino CLI and upload a .hex with the avrdude that the Arduino IDE 2 already installed.
Arduino CLI or avrdude: which one do you need?
| Arduino CLI | avrdude | |
|---|---|---|
| Input | The sketch (.ino) | A compiled file (.hex) |
| Compiles | Yes, with the Industrial Shields boards | No |
| Installs | Itself, the core, the compiler and avrdude | Comes with the Industrial Shields core |
| Typical use | Build and upload from scripts or without the IDE | Flash a .hex that someone sent you |
What you need
- An Arduino PLC from the M-Duino Arduino PLC or Ardbox Arduino PLC families and its USB cable.
- A PC with Windows 10 or 11.
- For avrdude: the Arduino IDE 2 with the Industrial Shields boards installed (see how to install Industrial Shields boards in the Arduino IDE), or Arduino CLI with the same boards.
How do you add a program to the Windows Path?
A terminal only finds a program without its full path if its folder is in the Path environment variable. Add the folder of arduino-cli.exe or, for avrdude, its bin folder:
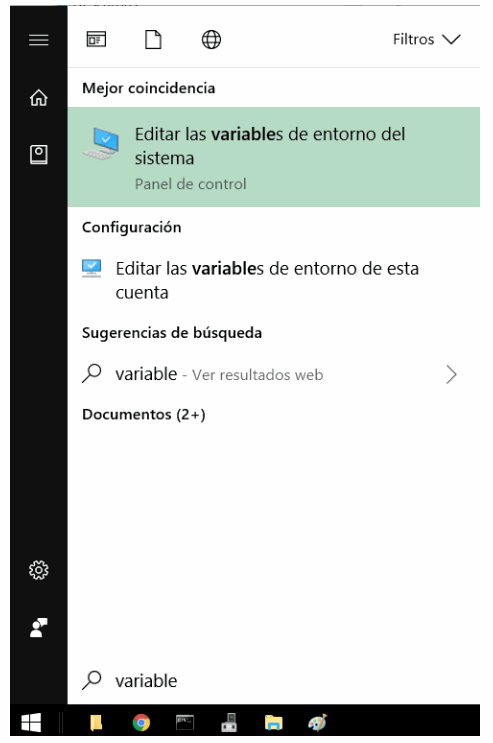
- Search "variable" in the Start menu and open Edit the system environment variables.
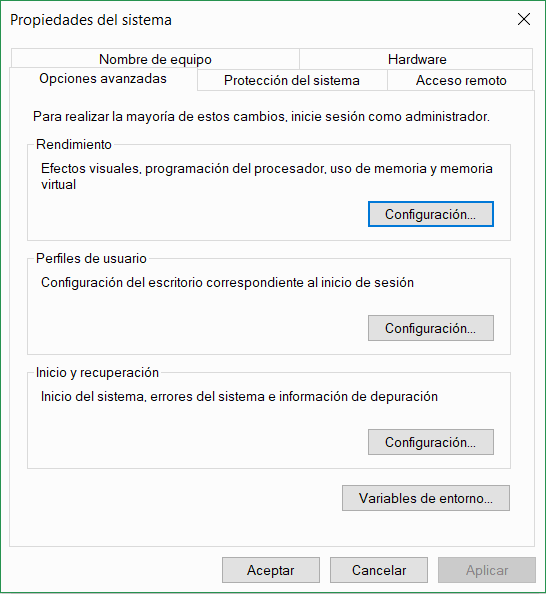
- In System Properties, click Environment Variables.
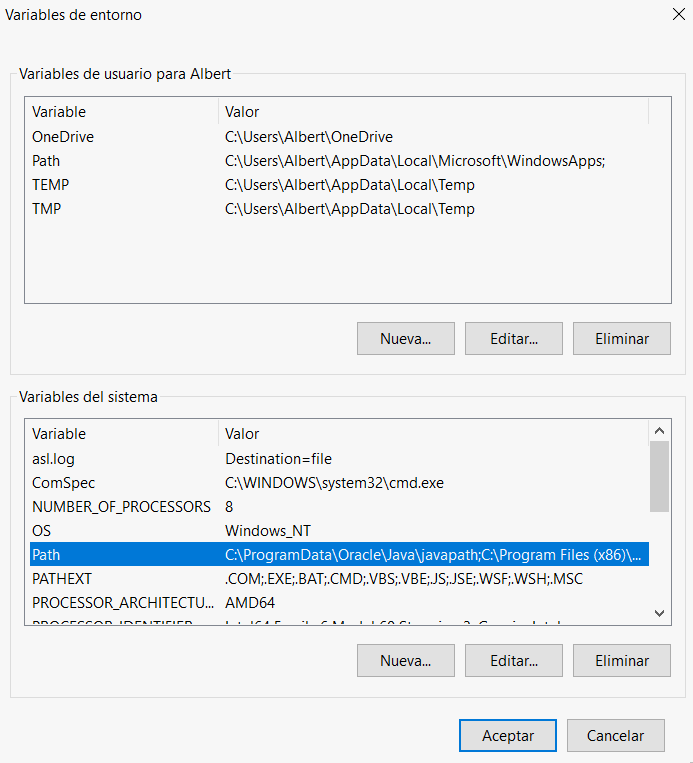
- Select Path (in your user variables, or in the system variables for every user) and click Edit.
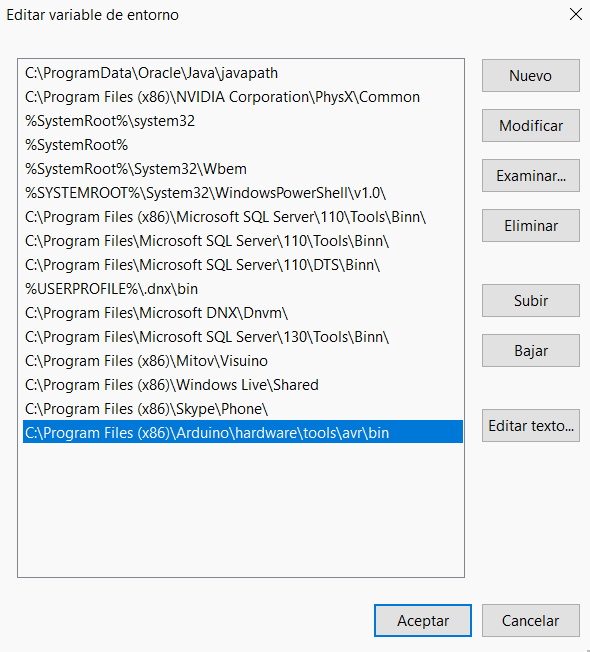
- Click New, paste the folder and accept all the windows.
- Open a new Command Prompt or PowerShell window. The terminals that were already open keep the old Path; you do not need to restart the PC.
How do you find the COM port of the PLC?
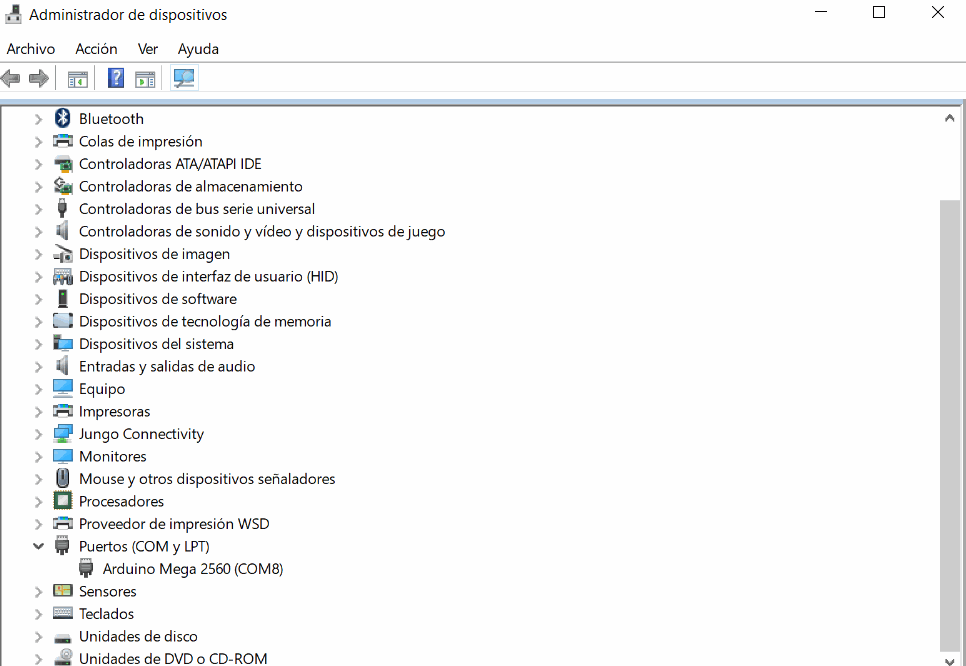
Connect the PLC by USB and open Device Manager > Ports (COM & LPT). The M-Duino Arduino PLC appears with the name of the Arduino board inside it (Arduino Mega 2560) and its port, COM8 in the screenshot. With Arduino CLI installed, arduino-cli board list shows the same list in the terminal.
Method 1: compile and upload with Arduino CLI
Once Arduino CLI and the Industrial Shields boards are installed (the guide below explains how), compile and upload with the FQBN of your model and your COM port:
arduino-cli compile --fqbn industrialshields:avr:mduino:cpu=mduino42plus MySketch
arduino-cli upload -p COM5 --fqbn industrialshields:avr:mduino:cpu=mduino42plus MySketch
Complete Arduino CLI guide. The full guide, with the example sketch, the FQBN of every model and the serial monitor, is in Arduino CLI for Arduino PLC: compile and upload on Windows and Linux.
Method 2: upload a .hex file with avrdude
First get the .hex. In the Arduino IDE 2, Sketch > Export Compiled Binary saves it in a build folder inside the sketch folder. With Arduino CLI, add -e to the compile command.
The Industrial Shields core installs avrdude and its configuration file here (the version folder depends on the core you installed):
%LOCALAPPDATA%\Arduino15\packages\industrialshields\tools\avrdude\6.3.0-arduino17\bin\avrdude.exe
%LOCALAPPDATA%\Arduino15\packages\industrialshields\tools\avrdude\6.3.0-arduino17\etc\avrdude.conf
Add the bin folder to Path, or write the full path in the command. With the old Arduino IDE 1.x, avrdude was in C:\Program Files (x86)\Arduino\hardware\tools\avr\bin and the configuration file in ...\avr\etc\avrdude.conf.
M-Duino Arduino PLC (ATmega2560, protocol wiring, 115200 baud):
avrdude -C "%LOCALAPPDATA%\Arduino15\packages\industrialshields\tools\avrdude\6.3.0-arduino17\etc\avrdude.conf" -p atmega2560 -c wiring -P COM5 -b 115200 -D -U flash:w:MySketch.ino.hex:iArdbox Arduino PLC (ATmega32u4, protocol avr109, 57600 baud): open the port at 1200 baud to start the bootloader, check the port again in Device Manager, and run avrdude within a few seconds:
mode COM5 BAUD=1200
avrdude -C "%LOCALAPPDATA%\Arduino15\packages\industrialshields\tools\avrdude\6.3.0-arduino17\etc\avrdude.conf" -p atmega32u4 -c avr109 -P COM6 -b 57600 -D -U flash:w:MySketch.ino.hex:i| Option | Meaning |
|---|---|
-C | avrdude configuration file. Use the one next to the avrdude that you run |
-p | Microcontroller: atmega2560 (or m2560) on M-Duino Arduino PLC, atmega32u4 on Ardbox Arduino PLC |
-c | Bootloader protocol: wiring on M-Duino Arduino PLC, avr109 on Ardbox Arduino PLC |
-P | COM port of the PLC |
-b | Speed: 115200 on M-Duino Arduino PLC, 57600 on Ardbox Arduino PLC |
-D | Skip the full chip erase before writing, as the Arduino IDE also does |
-U flash:w:file.hex:i | Write the file to the flash memory, in Intel HEX format |
Run avrdude with no options to see the full list.
How this guide was checked. The FQBN, microcontrollers, protocols, speeds and the avrdude folder come from the boards.txt and platform.txt files of the Industrial Shields AVR core 1.2.1, downloaded from the official boards URL on 27 October 2026, and a test sketch compiled for these FQBN with that core. The upload commands were not run on a PLC for this update.
Upload over Ethernet. With a binary file and a remote reset you can update an M-Duino Arduino PLC without a USB cable. The next guide shows how to get the .bin file from the sketch.

FAQ about uploading from the Windows command line
Why does Windows say that avrdude or arduino-cli is not recognized?
Its folder is not in Path, or the terminal was open before you edited Path. Open a new terminal, or write the full path of the program.
Why does avrdude stop with "not in sync" or "can't open device"?
The COM port is wrong or another program has it open, for example the serial monitor of the IDE. On Ardbox Arduino PLC, the port may have changed after the 1200 baud reset.
Can I upload an .ino file with avrdude?
No. avrdude only writes compiled files (.hex). To go from .ino to the PLC in one step, use Arduino CLI.
Which FQBN does my model use?
Run arduino-cli board listall industrialshields and arduino-cli board details -b with your family. It is the same choice as Tools > Board and Tools > Model in the IDE.
More about programming Arduino PLCs
- Upload a sketch to an M-Duino Arduino PLC or Ardbox Arduino PLC from the Linux shell
- How to install Industrial Shields boards in the Arduino IDE
- How to configure the serial port on industrial Arduino IDE
- Choosing an industrial controller
See the models in the Arduino PLC family, for example the M-Duino 42 or the Ardbox Analog.