INTRODUCTION
The Read Discrete Inputs Modbus RTU function (Modbus Function Code: 2), is used to read from 1 to 2000 contiguous status of discrete inputs in a remote device.
In this blog post, we will be reading discrete inputs between Arduino based PLC set as client - server >
MODBUS RTU
To know more about Modbus RTU and how the library works, please visit the following blog post:
HARDWARE REQUIREMENTS
- 2x M-Duino PLC >
- Power Supply >
- B type cable, to program the Arduino based PLC
- Two twisted pair cables, for RS485.
SOFTWARE REQUIREMENTS
CONNECTIONS
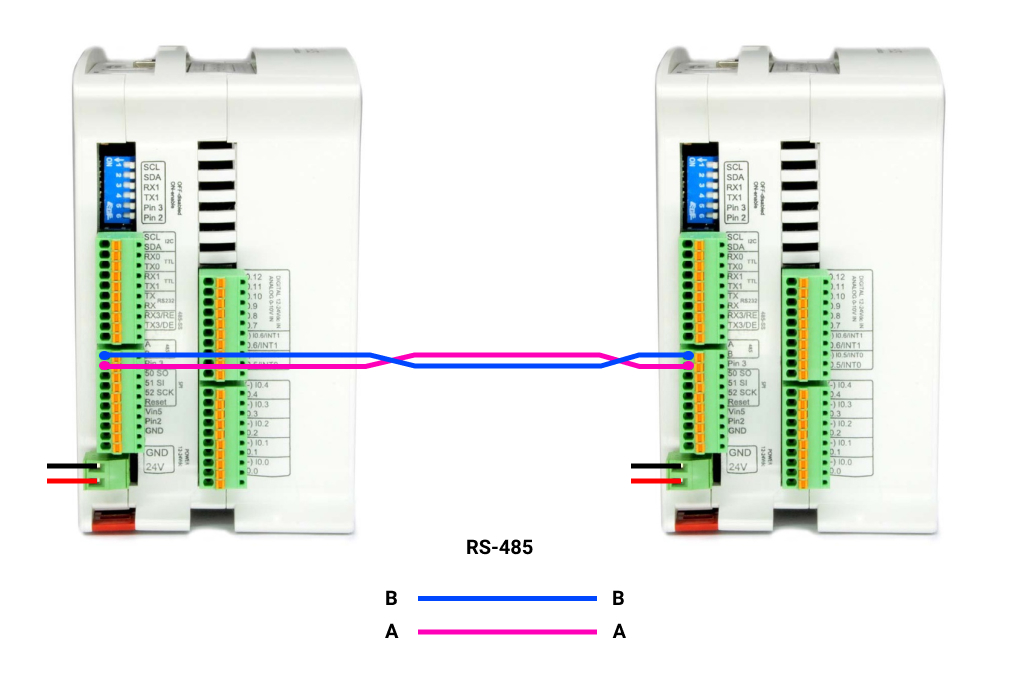
Now, in order to set a Modbus RTU communication, we are going to do the following:
1. Power the PLC between 12 and 24V.
2. Wire the cables through RS-485. This is based on a twisted pair cables, on cable from A+ to A+, and the other one from B- to B-.
3. Set the red switch to the Half-Duplex: HD

MODBUS RTU MASTER READ DISCRETE INPUTS
In order to set an M-Duino as a master and the other one as a slave, we will have to program both to execute each code. So, in order to program the master, open up a new file of Arduino IDE, and paste the code below:
 /*
   Copyright (c) 2018 Boot&Work Corp., S.L. All rights reserved

   This program is free software: you can redistribute it and/or modify
   it under the terms of the GNU Lesser General Public License as published by
   the Free Software Foundation, either version 3 of the License, or
   (at your option) any later version.

   This program is distributed in the hope that it will be useful,
   but WITHOUT ANY WARRANTY; without even the implied warranty of
   MERCHANTABILITY or FITNESS FOR A PARTICULAR PURPOSE.  See the
   GNU Lesser General Public License for more details.

   You should have received a copy of the GNU Lesser General Public License
   along with this program.  If not, see <http://www.gnu.org/licenses/>.
*/

#include <ModbusRTUMaster.h>

// Define the ModbusRTUMaster object, using the RS-485 or RS-232 port (depending on availability)
#if defined HAVE_RS485_HARD
#include <RS485.h>
ModbusRTUMaster master(RS485);

#elif defined HAVE_RS232_HARD
#include <RS232.h>
ModbusRTUMaster master(RS232);

#else
ModbusRTUMaster master(Serial1);
#endif

uint32_t lastSentTime = 0UL;
const uint32_t baudrate = 38400UL;

////////////////////////////////////////////////////////////////////////////////////////////////////
void setup() {
  Serial.begin(9600UL);

  // Start the serial port
#if defined HAVE_RS485_HARD
  RS485.begin(baudrate, HALFDUPLEX, SERIAL_8E1);
#elif defined HAVE_RS232_HARD
  RS232.begin(baudrate, SERIAL_8E1);
#else
  Serial1.begin(baudrate, SERIAL_8E1);
#endif

  // Start the modbus master object.
  // It is possible to define the port rate (default: 19200)
  master.begin(baudrate);
}

////////////////////////////////////////////////////////////////////////////////////////////////////
void loop() {
  // Send a request every 1000ms
  if (millis() - lastSentTime > 1000) {
    // Send a Read Discrete Input request to the slave with address 31
    // It requests for 7 discrete inputs starting at address 0
    // IMPORTANT: all read and write functions start a Modbus transmission, but they are not
    // blocking, so you can continue the program while the Modbus functions work. To check for
    // available responses, call master.available() function often.
    if (!master.readDiscreteInputs(31, 0, 7)) {
      // Failure treatment
    }

    lastSentTime = millis();
  }

  // Check available responses often
  if (master.isWaitingResponse()) {
    ModbusResponse response = master.available();
    if (response) {
      if (response.hasError()) {
        // Response failure treatment. You can use response.getErrorCode()
        // to get the error code.
        Serial.print("Error ");
        Serial.println(response.getErrorCode());
      } else {
        // Get the discrete inputs values from the response
        Serial.print("Discrete inputs values: ");
        for (int i = 0; i < 7; ++i) {
          Serial.print(response.isDiscreteInputSet(i));
          Serial.print(',');
        }
        Serial.println();
      }
    }
  }
}
1. Once the code is pasted, click on Tools > Board > Industrial Shields boards > And select the M-Duino family.
2. Then, select the PLC model by going to Tools > Model > And selecting the model. In our case: M-Duino 21+
3. Select the port by going to Tools > Port > And select the port of the Arduino board.
4. Finally, either click on the arrow to upload the sketch, or go to Sketch > Upload.
MODBUS RTU SLAVE
Once the master is already programmed, we are going to do the same as with the Master PLC, but choosing the ModbusRTUSlave sketch. So:
1. Change the B type cable and connect it to the other M-Duino PLC.
2. Go to the top bar, and click on: File > Examples > Modbus > and select the ModbusRTUSlave sketch.
3. Once the sketch is opened, click on Tools > Board > Industrial Shields boards > And select the M-Duino family.
4. Then, select the PLC model by going to Tools > Model > And selecting the model. In our case: M-Duino 21+
5. Select the port by going to Tools > Port > And select the port of the Arduino board.
6. Finally, either click on the arrow to upload the sketch, or go to Sketch > Upload.
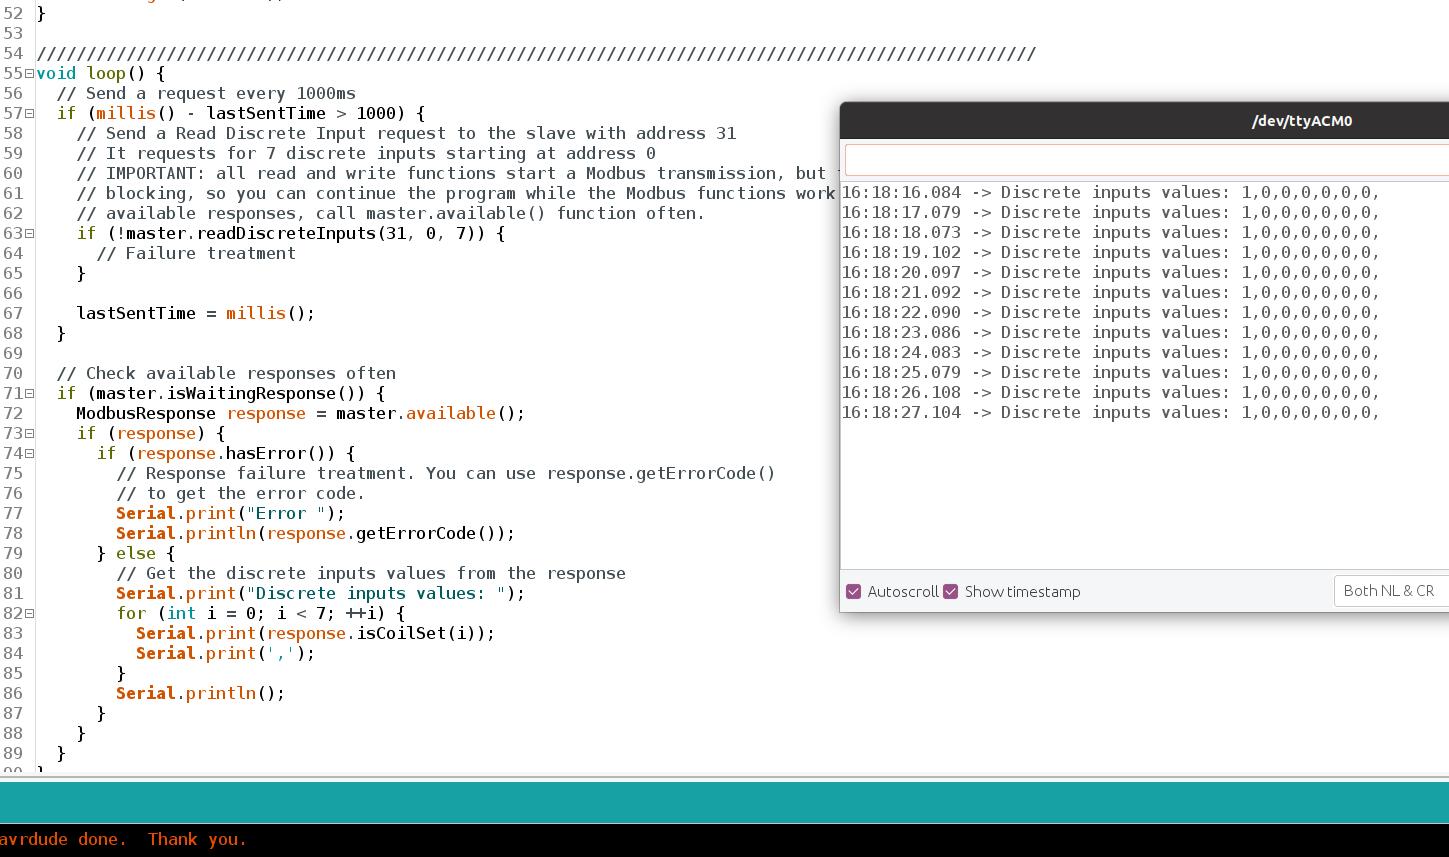
Tip: We wire a cable from the GND to the (-) I0.0, and another one from 24V to the I0.0 input to add some voltage to the inputs, not to receive all the values as 0.
Now, open the serial monitor from the Master, and read the discrete inputs of the Slave!

Modbus RTU Tutorial: How to Read Discrete Inputs with M-Duino PLC