1. Introduction
2. Meaning of Modbus
3. Requirements
4. Description
5. Characteristics
6. Connections and final connection
7. Related posts
Introduction
Modbus RTU Arduino PLC
The Modbus RTU protocol is a means of communication that allows the exchange of data between programmable logic controllers (PLCs) and computers. Electronic devices can exchange information through serial lines using the Modbus protocol.
It has been widely accepted and widely used in the construction of Building Management Systems (BMS) and Industrial Automation Systems (IAS). Its adoption has been driven by its ease of use, reliability, and the fact that it is open source and can be used without royalties on any device or application.
The Modbus protocol was developed and published by Modicon® in 1979 for use with its programmable logic controllers. It is built using a master/slave architecture and is compatible with serial devices that use the RS232 / RS485 / RS422 Arduino protocols. Modbus is often used in scenarios where multiple control and instrumentation devices transmit signals to a controller or central system to collect and analyze data. The automation and monitoring control and data acquisition (SCADA) systems often use the Modbus protocol.
.jpg?access_token=959a6808-7fb5-484d-99bc-26be82f11731)
What does Modbus RTU mean
Modbus RTU (Remote Terminal Unit) is one of the two transmission modes defined in the original Modbus specification. The two modes are Modbus RTU and ASCII and are designed to be used with serial devices that support the Modbus Arduino RS232, RS485 and RS422 protocols. A distinctive feature of Modbus RTU is its use of binary encoding and strong CRC error checking. Modbus RTU is the Modbus protocol implementation that is most frequently used in industrial applications and in automated production facilities.
Requirements | ||
| Ethernet PLC or 20 I/Os industrial Arduino automation | Ethernet PLC | 20 IOs PLC |
| Z-D-IN 5 Modbus RTU module | Visit website | |
| Industrial Shields boards | Mapping pins on our boards | |
| Modbus library installed | Modbus at GitHub |
Description
Z-D-In 5 Modbus RTU Module
Characteristics | |||||||||||
| Power Supply | 10..40 Vdc; 19..28 Vac (50-60 Hz) | ||||||||||
| Inputs | 5 CH (reed, proximity, pnp, npn, contact) with common negative, self powered 24 Vdc, isolated, protected from transient up to 600 W/ms | ||||||||||
| Counters | 4 @ 16 bit, max frequency 100 Hz; 1 @ 32 bit, max frequency 10 KHz | ||||||||||
| Anti rebounce filter | Settable from 5 to 250 ms | ||||||||||
| Communication | RS485 a 2 fili, ModBUS RTU slave protocol | ||||||||||
| Dimensions | 17,5 x 100 x 112 [mm] | ||||||||||
| Mounting | 35 mm guide DIN 46277 | ||||||||||
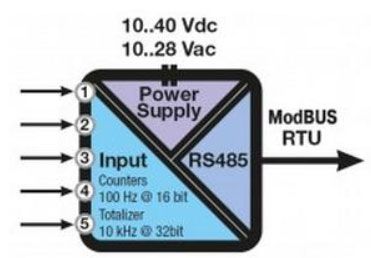
The following image shows the inputs and outputs of the Z-D-IN:
Connections
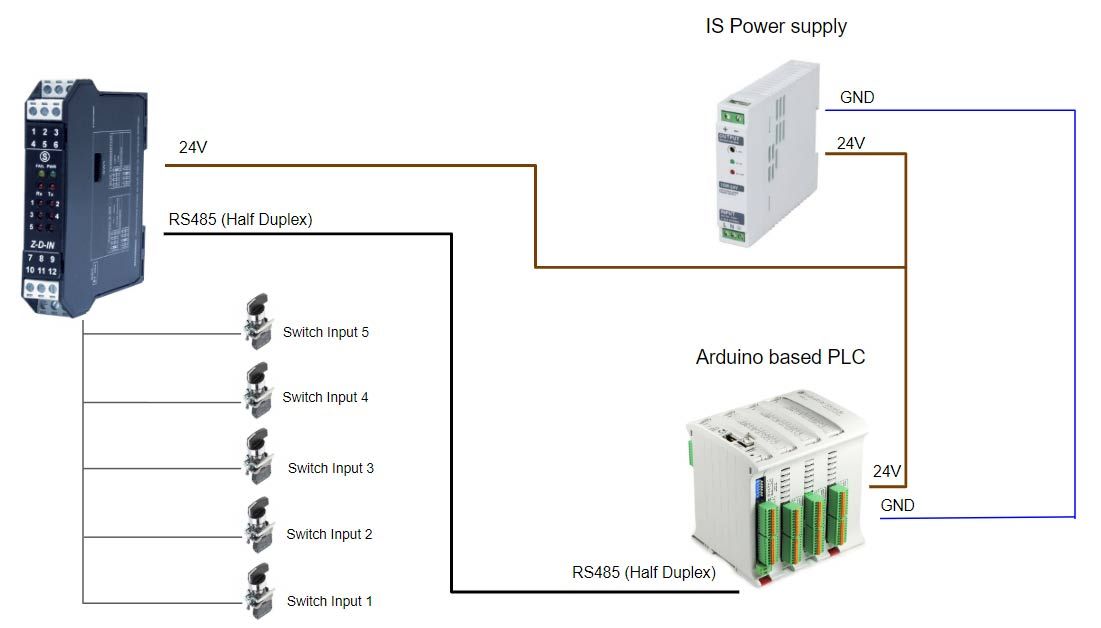
Final Connection

Software
In this sketch, we are controlling each input (5 in total) using digital switches. The communication between the Arduino PLC and the Z-D-in Modbus RTU module is by RS485 in Half Duplex, so it's very important that you download and use the RS485.h library as well as the ModbusRTUSlave.h (Modbus RTU Arduino library) library to work on this protocol.
The Z-D-in module acts as a slave and the Arduino controller will act as the master of the system.
In this sketch, requests for reading the entries are sent every second and the changes are shown on the screen. Each entry has associated a counter that will increment for each change that can be read in the entry.
The full sketch is shown below:
/*
   Copyright (c) 2019 Boot&Work Corp., S.L. All rights reserved
   This program is free software: you can redistribute it and/or modify
   it under the terms of the GNU Lesser General Public License as published by
   the Free Software Foundation, either version 3 of the License, or
   (at your option) any later version.
   This program is distributed in the hope that it will be useful,
   but WITHOUT ANY WARRANTY; without even the implied warranty of
   MERCHANTABILITY or FITNESS FOR A PARTICULAR PURPOSE.  See the
   GNU Lesser General Public License for more details.
   You should have received a copy of the GNU Lesser General Public License
   along with this program.  If not, see <http://www.gnu.org/licenses/>.
*/
#include <ModbusRTUMaster.h>
#include <RS485.h>
const uint8_t slaveAddress = 1;
const uint32_t serialRate = 38400UL;
const int serialConfig = SERIAL_8N1;
const uint32_t requestPeriod = 1000UL; // ms
const int numInputs = 5;
ModbusRTUMaster modbus(RS485);
uint8_t inputStates[numInputs];
uint16_t inputCounters[numInputs];
////////////////////////////////////////////////////////////////////////////////////////////////////
void setup() {
  Serial.begin(9600L);
  Serial.println("seneca-z-d-in-module started");
  RS485.begin(serialRate, HALFDUPLEX, serialConfig);
  modbus.begin(serialRate);
}
////////////////////////////////////////////////////////////////////////////////////////////////////
void loop() {
  static uint32_t lastRequestTime = millis();
  // Send a request every 1000ms
  if (!modbus.isWaitingResponse()) {
    if (millis() - lastRequestTime > requestPeriod) {
      // Send a Read Holding Registers request to the slave with address 1
      // IMPORTANT: all read and write functions start a Modbus transmission, but they are not
      // blocking, so you can continue the program while the Modbus functions work. To check for
      // available responses, call modbus.available() function often.
      if (!modbus.readHoldingRegisters(slaveAddress, 1, 6)) {
        // TODO Failure treatment
      }
      lastRequestTime = millis();
    }
  }
  // Check available responses often
  ModbusResponse response = modbus.available();
  if (response) {
    if (response.hasError()) {
      // TODO Response failure treatment. You can use response.getErrorCode()
      // to get the error code.
    } else {
      uint16_t states = response.getRegister(0);
      for (int i = 0; i < numInputs; ++i) {
        inputStates[i] = (states >> i) & 0x01;
        inputCounters[i] = response.getRegister(i + 1);
      }
      printInputs();
    }
  }
}
////////////////////////////////////////////////////////////////////////////////////////////////////
void printInputs() {
  Serial.println();
  Serial.print("Inputs: ");
  for (int i = 0; i < numInputs; ++i) {
    Serial.print(inputStates[i] ? "HIGH" : "LOW ");
    Serial.print(' ');
  }
  Serial.println();
  Serial.print("Counters: ");
  for (int i = 0; i < numInputs; ++i) {
    Serial.print(inputCounters[i]);
    Serial.print(' ');
  }
  Serial.println();
}
Related Posts about Modbus TCP, WiFi, HTTP Server, with Arduino
HTTP Server in an M-Duino (Enable/Disable outputs through a website)
How to connect Arduino based industrial controller using Modbus TCP/IP
How to use Modbus TCP Slave library with Arduino based industrial PLC

MODBUS RTU and RS485 Arduino (Seneca Z-D-in Module)