Can I use a Raspberry Pi to set up VPN server?
Yes, and this tutorial provides a detailed, step-by-step process for using a Raspberry Pi—a cost-effective and compact computing solution—to set up a corporate VPN server. In many applications with concerns about data security and privacy, setting up a dedicated VPN (Virtual Private Network) server is essential. This practical deployment not only enhances internet connections against potential threats but also facilitates secure remote access to corporate networks. In this step-by-step uses an OpenVPN.
What is Open VPN? OpenVPN is a versatile and widely adopted open-source software application designed for secure communication over the internet. As a robust VPN solution, OpenVPN facilitates the creation of encrypted connections in various configurations, whether point-to-point or site-to-site. Its notable features include a high degree of flexibility, compatibility with multiple operating systems, and strong security protocols. OpenVPN ensures data privacy and integrity by encrypting communication channels, making it a trusted choice for individuals and organizations seeking a reliable means of securing their online activities.
How to set up VPN server on Raspberry Pi: Requirements
The requirements for setting up a VPN server on a Raspberry Pi using OpenVPN typically include:
- Raspberry Pi. Any model with network capabilities, such as Raspberry Pi 3, 4 or a PLC Raspberry Pi with a suitable power supply.
- MicroSD card to host the Raspberry Pi's operating system and software.
- Reliable internet connection and access to your router for potential port forwarding configurations. Otherwise, the connection can also be done via ethernet.
How to turn a Raspberry Pi into a VPN Server?
Easy setup: Open VPN instalation and setup
In this tutorial there is used PiVPN, which is a software package designed to simplify the process of setting up a VPN on a Raspberry Pi. It provides a user-friendly interface and automation tools to configure and manage OpenVPN on the Raspberry Pi, making it more accessible for individuals without extensive networking or Linux expertise.
First, install PiVPN:
curl -L https://install.pivpn.io | bash
After some verifications you will see an interface which will be used to setup the OpenVPN server.
On PiVPN Automated Installer select <Ok>, this step is purely informative.
On Static IP Needed select <Ok>, this step is mainly informative too.
On IPv6 leak select <Ok>, this will prevent the client from bypassing the tunnel and leaking ts real IPv6 address to servers.
On DHCP Reservation select <Yes> to use the DHCP configuration from the router. If you prefer to use a static IP you can select <No>.
On Local Users select <Ok>, this step is mainly informative too.
On Choose A User select the user pi and click <Ok>, as you can see in the figure. This user is the default created in a raspberry, you can use another one if preferred.

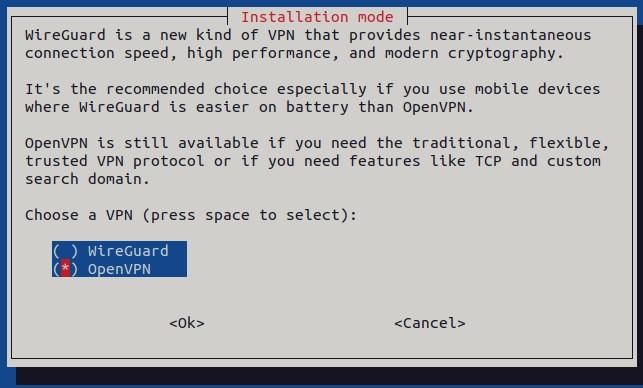
On Installation Mode(1) select OpenVPN and click <Ok>, as you can see in the figure, to use OpenVPN to create the VPN server as mentioned before.

On Installation Mode(2) select <No> to set UDP protocol as default.
On Default openvpn Port you can use the default openvpn port (1194) or you can use another one if preferred. Note that the port you select must not be in use.
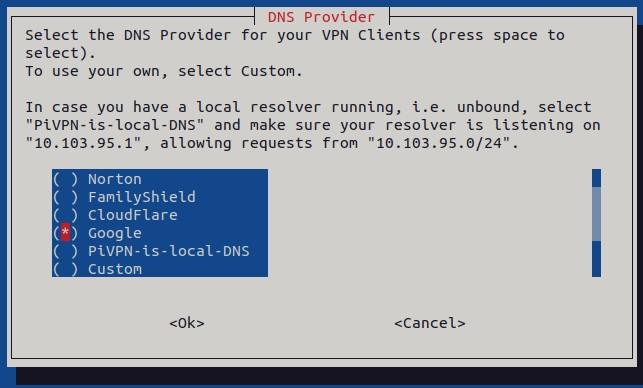
On DNS Provider select your preferred DNS provider, in this case there is used Google DNS Provider.

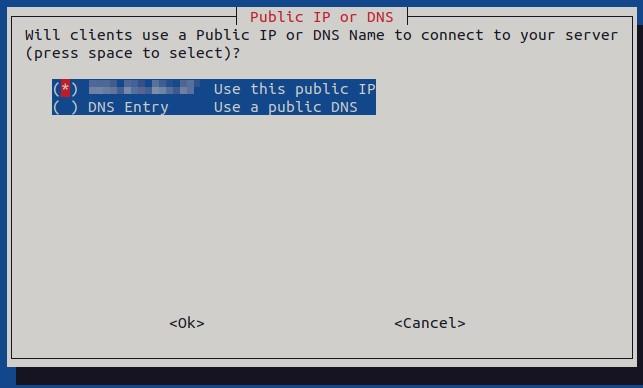
On Public IP or DNS select your fixed public IP if you have one. Otherwise, select DNS entry.

On Server information select <Ok>, this will generate the HMAC key, as for the OpenVPN it is needed a TLS authentication.
On Unattended Upgrades is convenient to select <Yes> to enable unattended upgrades of security patches for the VPN server.
With all these steps the installation and setup of the VPN server is completed. Now it is time to create client profiles that will connect to the server.
Next step:Add clients
After rebooting the RPi there can be created new clients using PiVPN with the command:
pivpn add
Give the client a name, a password and how many days should the certificate last, which you can let it with the default value (1080). Then you will see where are the key files stored with a message like this:
Certificate created at: /etc/openvpn/easy-rsa/pki/issued/client1.crt

Client's cert found: client1.crt
Client's Private Key found: client1.key
CA public Key found: ca.crt
tls Private Key found: ta.key


========================================================
Done! client1.ovpn successfully created!
client1.ovpn was copied to:
  /home/pi/ovpns
for easy transfer. Please use this profile only on one
device and create additional profiles for other devices.
========================================================
In this case the name of the client is client1, so the file created was client1.ovpn. You can get the file from /home/pi/ovpn and transfer it to the client's device, in this case a computer. To transfer the file you can do it via a pen drive, an email, SCP, etc. In this example it is done using SCP with the following command:
scp pi@<IP_ADDRESS>:/home/pi/ovpns/client1.ovpn <LOCAL_PATH>
Finally, connection to the VPN server
To connect to the server you will simply need to execute the following command:
openvpn --config PATH/client1.ovpn
After that, you can check the client file to make sure that the IP and Port are the same as your server. You must see a line like this:
remote <IP_ADDRESS> <PORT>
Where IP address is the one selected in Public IP or DNS step and the port is the one selected previously too (default is 1194). You can also check the configuration file of openvpn (/etc/openvpn/server.conf) to make sure that the port and other parameters are correct.
Conclusions of creating a VPN Server in a Raspberry Pi
In this guide, we have shown yo how to create a VPN Server in a Raspberry Pi. By following these steps, you can enjoy a secure and private browsing experience, protect your data from prying eyes... With a Raspberry Pi, you can create an affordable and powerful VPN server.
Creating a VPN server in a Raspberry PI