Index
Sometimes, when we use our openmote B board, we have the need to connect external sensors to our device.
In this blog post, we will learn the following:
First, how to connect a Dallas sensor to our openmote board.
Second, how to download the files needed to program our openmote b device.
And thirdly, how to visualize the temperatures that the Dallas sensor sends to the openmote b board.
Requirements
1. How to connect a DALLAS sensor to the Openmote B board
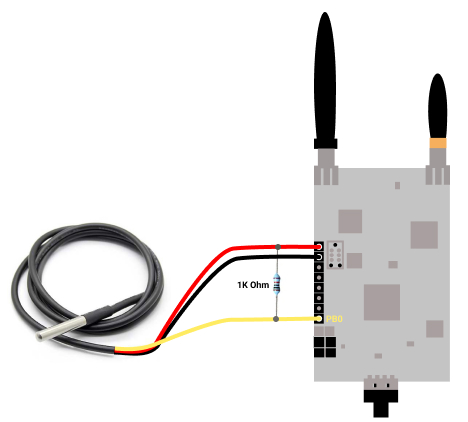
In order to get the temperature from our Dallas sensor, we first have to connect it as shown in the picture below.

2. How to download Openmote B files
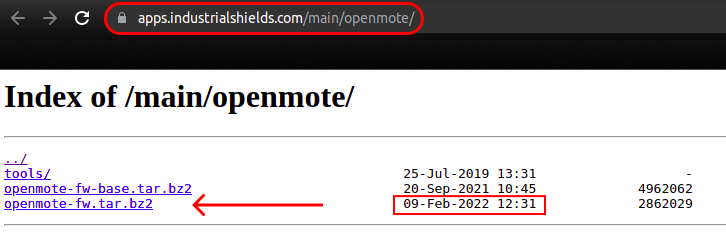
a. Now, click on the latest openmote-fw.tar.bz2 from here >>

b. Once downloaded, untar the package.
tar -xvf openmote-fw.tar.bz2
c. Go into the directory and list files to see the content:
cd openmote-fw/
ls
d. If you list the test files, you will see all the tests you can program to your Openmote B:

3. How to get the temperature from the Dallas sensor with the Openmote B board
In order to get the temperature from our sensor, we will first need to install docker-compose. Please, install it from here >>
Then, inside the test folder, there is the folder called test-ds18b20, which will be the project that we are going to execute.
So, from the openmote-fw/ folder, we will run the following command:
docker-compose run --rm openmote test-ds18b20
Finally, install screen if you do not have it:
sudo apt update
sudo apt install screen
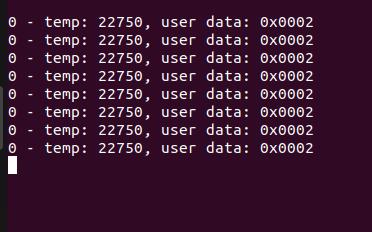
And check the temperature that you are getting from your Dallas sensor by running the following command:
screen /dev/ttyUSB1 115200

Exit screen by pressing Ctrl+a + \
Q&A
1. How can I inspect the code that it is running?
You can see it in the following path: openmote-fw/test/test-ds18b20/src/main.cpp
2. What if I get the following error: "ERROR: Timeout waiting for ACK/NACK after 'Synch (0x55 0x55)'" the first time that I try to upload it?
Upload it again. That sometimes happens when you do it for the first time. It should work the next time.
3. What is the output expected in the terminal?
Something like this:
Creating openmote-fw_openmote_run ... done
Running SCons with 8 threads.
Building project=test-ds18b20 for board=openmote-b using platform=cc2538 and toolchain=arm-none-eabi.
Parsing folder=board.
Parsing folder=drivers.
Parsing folder=freertos.
Parsing folder=sys.
Parsing folder=platform.
Parsing folder=test.
arm-none-eabi-size build/openmote-b/test/test-ds18b20/test-ds18b20.elf
OpenMoteCC2538_bootload(["build/openmote-b/test/test-ds18b20/test-ds18b20.phonyupload"], ["build/openmote-b/test/test-ds18b20/test-ds18b20.hex"])
Starting bootloading on /dev/ttyUSB1
   text	   data	    bss	    dec	    hex	filename
  29196	    468	   8192	  37856	   93e0	build/openmote-b/test/test-ds18b20/test-ds18b20.elf
Opening port /dev/ttyUSB1, baud 400000
Reading data from build/openmote-b/test/test-ds18b20/test-ds18b20.hex
Firmware file: Intel Hex
Connecting to target...
CC2538 PG2.0: 512KB Flash, 32KB SRAM, CCFG at 0x0027FFD4
Primary IEEE Address: 00:12:4B:00:19:35:68:7E
    Performing mass erase
Erasing 524288 bytes starting at address 0x00200000
    Erase done
Writing 524256 bytes starting at address 0x00200000
Write 232 bytes at 0x0027FEF88
    Write done
Done bootloading on /dev/ttyUSB1
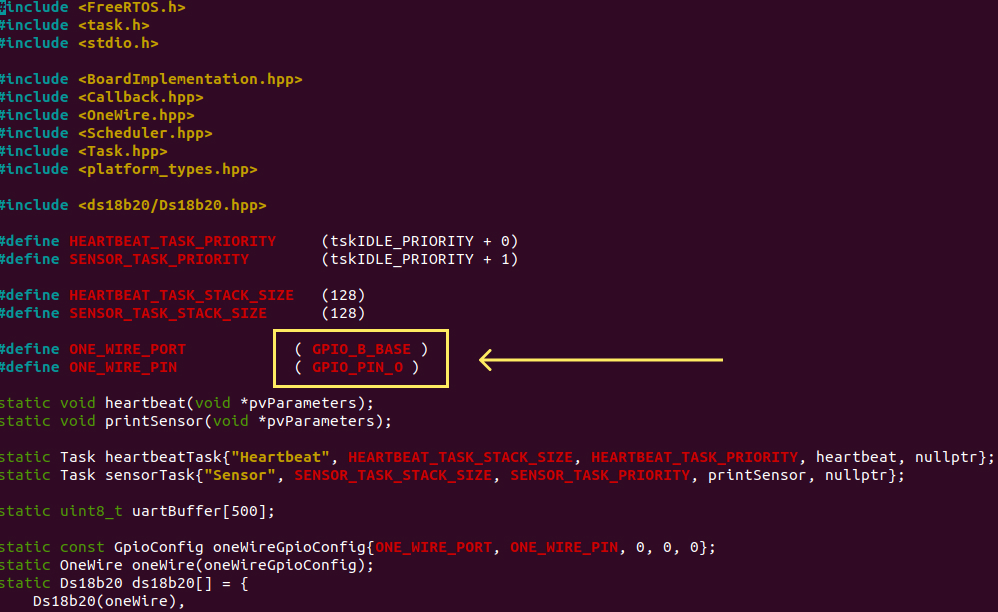
4. Why do we connect the yellow data cable from the Dallas temperature sensor to the PB0 pin from the openmote B?
Because we assign it in the code by default. As you can see in the picture below, the one wire port and pin are assigned to the GPIO B base and GPIO pin 0, respectively. If we change the number 0 for the number 1, you could program it anyway, and you could work with the PB1 port, and so.

How to connect a Dallas sensor to the OpenMote B board