Introduction
Industrial Raspberry PLC OS with desktop or panel PCs have a screen frame by default, which is the default black pixels that are displayed on each side of the screen.
In this blog post, we will show how to modify this frame and how to adjust the overscan of the Raspberry Pi PLC controller, as well as Panel PCs.
Latest Posts
How to change screen size
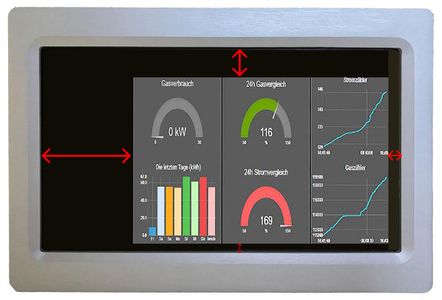
The first thing we must understand is to detect what an overscan is. Let's analyze the following picture of this Panel PC:

The overscan left, would be how many black pixels you want to display on the screen. So, if you want fewer pixels, the overscan should decrease. Be careful, because you could skip part of the display if the value is less than the visible area.
Therefore, the overscan top is the value of how many pixels there are on the black border. And so with the overscan right and overscan bottom.
Changing the values
1- So, in order to change these values, we will open the /boot/config.txt file, where we will be able to change this.
sudo nano /boot/config.txt

2- We will find these four values commented, just uncomment the one that you want to modify by removing the # at the beginning of the line.
For example, if you want to decrease the overscan left, just change the value 16 for the pixels you want to display.
3- Save changes and exit: Ctrl + X > Y > Enter.
4- Reboot and see the changes applied!
sudo reboot
How to Change Screen Size on Raspberry Pi based PLC & Panel PC