

Introduction
To get used to MQTT servers check Part 1.
In this Part 2, communication between Raspberry based PLC and M-Duino based PLC will be covered using the Raspberry as the MQTT broker.
Requirements
- Raspberry PLC
- Power Supply
- Node-RED environment
- M-Duino PLC
- Ethernet Switch
Connection of the System
In this post, an Ethernet switch will be used in order to connect the PC and both PLCs in the same subnetwork, so a total of 3 Ethernet wires will be needed. Connect the Ethernet switch to power, and use the 3 wires to the ports of the switch. Each wire also should go to the corresponding ports of the PC, Raspberry based PLC and M-Duino based PLC.
What you are going to build is something like this:

As this scheme shows, the Raspberry PLC will publish information to the MQTT broker, located inside the same Raspberry PLC. Then, the M-Duino PLC and the PC will subscribe to the topic "test/temp" and receive the corresponding data.
After connencting the 3 devices, let's get into the code to connect the client with both subscribers.
Client code
Let's first program the client. Enter the Raspberry PLC with the ssh tool, open Node-RED and go to https://10.10.10.20:1800.
There, drag a timestamp node and configure it to repeat each second. After that, connect it to an exec node with the command:
vcgencmd measure_temp | grep -Eo '[0-9]{1,3}.[0-9]'
This command will return the temperature of the CPU from the Raspberry based PLC, but any other command can be used, as the objective of this step is to make the flow generate values to then publish them to the MQTT broker.
Finally, attach to the exec node a mqtt out node. The server will be configured like this in order to publish data into the topic named "test/Temp":
- Server: "localhost"
- Port: 1883
- Protocol: MQTT V3.1.1
The flow should look like this:

[{"id":"3886266038c74eba","type":"inject","z":"3b697b58be0a0e02","name":"","props":[{"p":"payload"},{"p":"topic","vt":"str"}],"repeat":"","crontab":"","once":false,"onceDelay":0.1,"topic":"","payload":"","payloadType":"date","x":140,"y":180,"wires":[["2ba008db26e34c47"]]},{"id":"2ba008db26e34c47","type":"exec","z":"3b697b58be0a0e02","command":"vcgencmd measure_temp | grep -Eo '[0-9]{1,3}.[0-9]'","addpay":"","append":"","useSpawn":"false","timer":"","winHide":false,"oldrc":false,"name":"","x":420,"y":180,"wires":[["f38a12a1549e4c10"],[],[]]},{"id":"f38a12a1549e4c10","type":"mqtt out","z":"3b697b58be0a0e02","name":"","topic":"test/Temp","qos":"","retain":"","respTopic":"","contentType":"","userProps":"","correl":"","expiry":"","broker":"d46b95fdc1020a0c","x":700,"y":180,"wires":[]},{"id":"d46b95fdc1020a0c","type":"mqtt-broker","name":"","broker":"localhost","port":"1883","clientid":"","autoConnect":true,"usetls":false,"protocolVersion":"4","keepalive":"60","cleansession":true,"birthTopic":"","birthQos":"0","birthPayload":"","birthMsg":{},"closeTopic":"","closeQos":"0","closePayload":"","closeMsg":{},"willTopic":"","willQos":"0","willPayload":"","willMsg":{},"userProps":"","sessionExpiry":"","credentials":{}}]Subscribers code
To program the M-Duino based PLC, open Arduino IDE and paste this code:
#include <Ethernet.h>#include <PubSubClient.h>IPAddress ip(10, 10, 10, 22); // IP from the M-Duinobyte mac[] = {0xAA, 0xBB, 0xCC, 0xDD, 0xEE, 0xFF, 0xAA};EthernetClient ethClient;PubSubClient mqtt(ethClient);char *broker = "10.10.10.20";uint16_t port = 1883;char *id = "test";//////////////////////////////////////////////////////////void setup() {Serial.begin(9600);Ethernet.begin(mac, ip);delay(1500);mqtt.setServer(broker, port);mqtt.setCallback(callbackMQTT);}///////////////////////////////////////////////////////////void loop() {if (!mqtt.connected()) {connectMQTT();}mqtt.loop();}////////////////////////////////////////////////////////////void connectMQTT() {if (mqtt.connect(id)) {mqtt.subscribe("test/Temp");}else {delay(500);}}/////////////////////////////////////////////////////////////void callbackMQTT(char *topic, byte *payload, unsigned int length) {Serial.print("Received on ");Serial.print(topic);Serial.print(": ");String data = "";for (size_t i = 0; i < length; i++) {data.concat((char)payload[i]);}Serial.println(data);}
First, the IP address from the M-Duino PLC and the server are defined. Notice how both PLCs are in the same subnet with the netmask 255.255.255.0. After defining the MAC address it is time to create the EthernetClient and PubSubClient objects.
Then, the MQTT broker address is written. Here it is important to put the IP address from the Ethernet connection of the Raspberry based PLC, 10.10.10.20 by default. This is the address of the MQTT broker where the M-Duino PLC will look for data at the topic "test/Temp". The port is also defined, and so is the client name id.
In the setup function, Serial and Ethernet communication are started. Afterwards, the MQTT server and a callback function is set. The correspondent callback function will be called every time a message is published on any subscribed topic.
The loop function checks if the M-Duino is connected to the MQTT broker and, if it is, it loops over and over again. If the dispositive is not connected, it tries to subscribe to the topic "test/Temp".
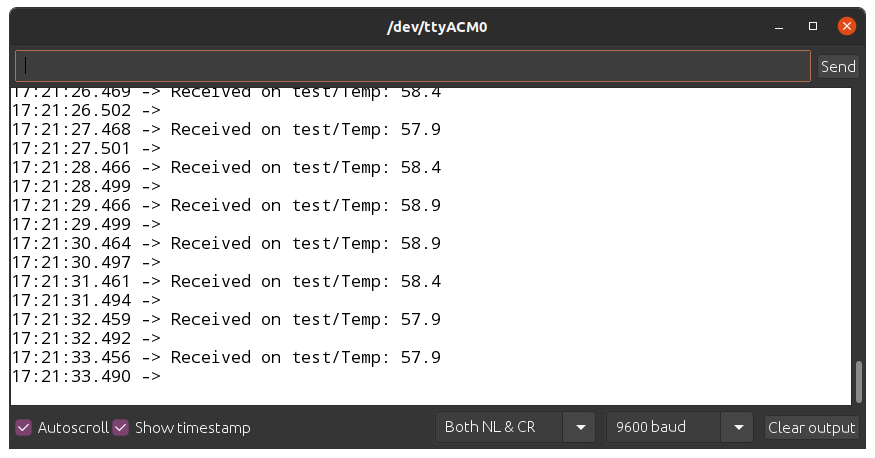
For every message it is received, a message like so will be printed in the Serial Monitor:
"Received on test/Temp: 56.2".
Results
After connecting and programming both PLCs, you are now ready to deploy the flow and upload the code to the M-Duino PLC. Open the Serial Monitor with Ctrl+Shift+M and check the temperature from the Raspberry PLCs CPU in real time!
Real case
As we have seen, MQTT clients can publish all kinds of messages, data or information in whatever topic they choose. This leads to the conclusion that MQTT is very useful in terms of sending the data a dispositive is receiving and processing from a couple of sensors.
Then, in another part of the world, another dispositive could be subscribed to all that topics and could classify all the data the first controller was publishing and save it or even display information in consequence.
Communication between Raspberry PLC and M-Duino PLC with MQTT