Connecting to Node-RED for a first SCADA-style dashboard
Modbus registers on their own are not a dashboard. Node-RED is the fastest way to turn the register map from lesson 3 into something an operator can look at, without writing a SCADA application from scratch.
What you will learn
- Place Node-RED in the data pipeline between the PLC and a browser.
- Build a flow that reads the tank level and pump state and shows them.
- Send a start command back to the PLC from a dashboard button.
You need: the Modbus TCP server from lesson 3 running on your PLC, and Node-RED with the Modbus and Dashboard nodes installed on a PC or on a Raspberry PLC.
Where Node-RED fits
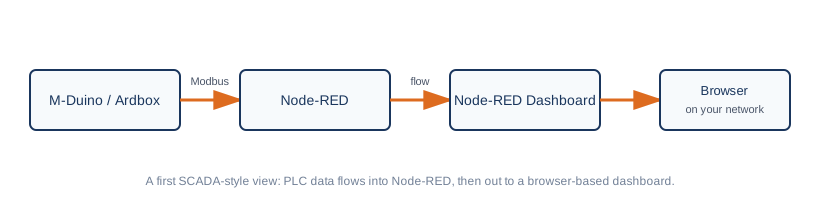
Node-RED polls your PLC over Modbus using the holding registers you exposed, and feeds a browser dashboard. Your Arduino code does not need to know Node-RED exists, it only has to keep answering Modbus requests.
Build the flow, step by step
- Add a Modbus client configuration with the PLC IP address, port 502 and unit id 1.
- Add a Modbus read node for holding registers 0 to 1, polling every second.
- Add a function node that converts the raw level to percent, using the scaling you learned in the foundations course.
- Connect a gauge node for the level and a text node for the state (0 IDLE, 1 RUNNING, 2 FAULT).
- Deploy and open the dashboard address in your browser.
Expected result: the gauge follows the tank level and the text changes when the machine moves between states.
Writing back to the PLC
Add a button node connected to a Modbus write node for holding register 2, sending the value 1. Pressing it asks the PLC to start. The state machine remains in charge: the PLC decides whether starting is allowed, and the dashboard only makes the request. Never let a dashboard be the only layer that protects a machine.
If the gauge shows nothing: check that the PLC answers a Modbus client from the same PC first, then the register index and the IP address in the node.
A starting point, not a finished SCADA
A Node-RED dashboard is a fast, real way to visualize and interact with a PLC, but it does not replace the alarm management, user access control and historian of a dedicated SCADA package on a larger installation. Treat it as the right tool for a first dashboard, a single machine or a proof of concept, and reassess as the project grows.
Go deeper
- Store data and display it on a Node-RED dashboard with Raspberry PLC
- Node-RED: how to make a custom design gauge for your dashboard
- Node-RED vs CODESYS vs Arduino IDE: which to pick
- Raspberry PLC
Next lesson: debugging on the shop floor. Take the quiz below first.
No hay comentarios por ahora.
para ser el primero en comentar.