Requirements and setup
If the client wishes it, our Raspberry Pi PLCs can be installed with a GPS module that uses the L80-M39 chip from Quectel. But to be able to work with the GPS module, we must first fulfill certain requirements.
First, install Industrial Shield's librpiplc library to be able to interact with the PLC's IO operations. Follow the instructions that you'll find in the repository. When cloning the repository, make sure you use v3.0.0 for the <tagname>.
Next, make sure that the boot configuration is set up correctly. Open /boot/config.txt with your preferred text editor, in this case we use nano:
Reach the bottom of the file and make sure you have these lines set up like this:
You can now close the text editor. If you opened the file using nano, you can close it by pressing Ctrl+X. If nano asks you for confirmation before closing, type Y to confirm and then press Enter to keep the same filename.
Testing the GPS module
Now we can begin testing the GPS module. Depending on where the module was installed, the steps to follow will differ a bit. The module can either be installed in slot 1 or slot 2, with slot 1 being the one just besides the ethernet port. Be sure to follow the steps according to the slot:
We first enable GPS module by activating the reset pin. To do this, you'll need the model and version of your RPIPLC to replace [RPIPLC_Version] and [RPIPLC_Model].
Next, we open the port with a baudrate of 9600:Now we can listen to what the GPS module is sending to the port:
This will display the output of the GPS, you'll see something like this:
The GPS outputs NMEA sentences, which are not particularily user-friendly. What we can extract from the output above is that the GPS module still hasn't connected to any satellites, and thus is not providing us with any coordinates. The GPS module cant take around 2-5 minutes to start connecting to satellites.
Here you can find documentation on NMEA sentences:
NMEA Documentation
If we want an easier to read output we can opt for using a parser. We will use this public repository for the parser:
NMEA-GPS Repository
We first go to our home directory with:
And then clone it with:
Then go inside of the cloned repository:
We now have to edit the gps.c file to point it to our ttySC0 port. To do this, open gps.c with your preferred text editor:
And then go to line 25 and replace ttyUSB0 with ttySC0. After that, you can close the text editor and compile the C file. If you are using librpiplc v3.0.0, you can compile the gps.c file with this command, (you once again need your RPIPLC model and version):
You may see some warnings when it compiles, but you can just ignore them. You can now execute the file with:
While it's executing, you'll see something like this:
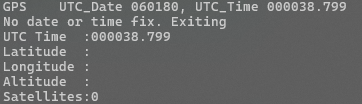
This means it's still looking for satellites. When it finally connects to them, you'll see this:

It will display your coordinates in latitude and longitude, and it will also display the correct date in "ddmmyy" format and the time in "hhmmss" format. The latitude will be in "ddmm.mmmm" format, and the longitude will be in "dddmm.mmmm" format. With that taken into account, we can extract these coordinates from the image above:
41º 44.4091', 1º 51.2546'
Which coincide with Industrial Shields' location.
We first enable GPS module by activating the reset pin. To do this,
you'll need the model and version of your RPIPLC to replace [RPIPLC_Version] and [RPIPLC_Model].
If you are using a librpiplc version older than v3.0.0, EXP2_RST will instead be named EXP1_RST_2.
Now we can listen to what the GPS module is sending to the port:
This will display the output of the GPS, you'll see something like this:
The GPS outputs NMEA sentences, which are not particularily user-friendly. What we can extract from the output above is that the GPS module still hasn't connected to any satellites, and thus is not providing us with any coordinates. The GPS module cant take around 2-5 minutes to start connecting to satellites.
Here you can find documentation on NMEA sentences:
NMEA Documentation
If we want an easier to read output we can opt for using a parser. We will use this public repository for the parser:
NMEA-GPS Repository
We first go to our home directory with:
And then clone it with:
Then go inside of the cloned repository:
We now have to edit the gps.c file to point it to our ttySC1 port. To do this, open gps.c with your preferred text editor:
And then go to line 25 and replace ttyUSB0 with ttySC1. After that, you can close the text editor and compile the C file. If you are using librpiplc v3.0.0, you can compile the gps.c file with this command (you once again need your RPIPLC model and version):
You may see some warnings when it compiles, but you can just ignore them. You can now execute the file with:
While it's executing, you'll see something like this:
This means it's still looking for satellites. When it finally connects to them, you'll see this:
It will display your coordinates in latitude and longitude, and it will also display the correct date in "ddmmyy" format and the time in "hhmmss" format. The latitude will be in "ddmm.mmmm" format, and the longitude will be in "dddmm.mmmm" format. With that taken into account, we can extract these coordinates from the image above:
41º 44.4091', 1º 51.2546'
Which coincide with Industrial Shields' location.