
Introduction
OPC UA (OPC Unified Architecture) is an evolution of OPC that addresses the limitations of previous versions. It was developed to provide a unified architecture and open standards for communication in industrial automation and other environments.
Among its features are:
- Platform Independent: OPC UA is not tied to a specific platform and can run on various operating systems.
- Security: Provides a robust set of security features, including authentication, authorization, integrity, and confidentiality.
- Scalability: OPC UA is highly scalable and can be used in small and large systems, from embedded devices to enterprise environments.
- Unified Information Model: Offers a unified information model that facilitates interoperability between different systems and devices.
Requirements
- Have a Raspberry Pi PLC
- Having the Raspberry PLC dependencies installed, we strongly recommend seeing this post first:
First steps using Raspberry Pi PLC
- Install the Node Red libraries, which provide us with the additional necessary blocks for creating the server.
These libraries are: node-red-contrib-iiot-opcua and node-red-contrib-opcua
- (Recommended) Install a client for OPC UA servers, this will help us see if the server structure is correct, and the values that each node has. We recommend the OTC client called UaExpert, which is free and cross-platform.
Examples of use
Below we are going to see a series of examples with which to understand the basic concepts of creating this type of OPC UA servers and their use, informing that it is possible to do the same using high-level languages such as python and programming languages. low level with C. We have decided to use Node-Red, basically, for its simplicity and easy understanding.
Basic examples
Create the OPC server
The blocks seen below are responsible for generating the server, its system of folders and nodes, while initially giving them a default value. Keep in mind that when doing the "Deploy" it will take a few moments to be assembled and deployed.

The blocks we have used are:
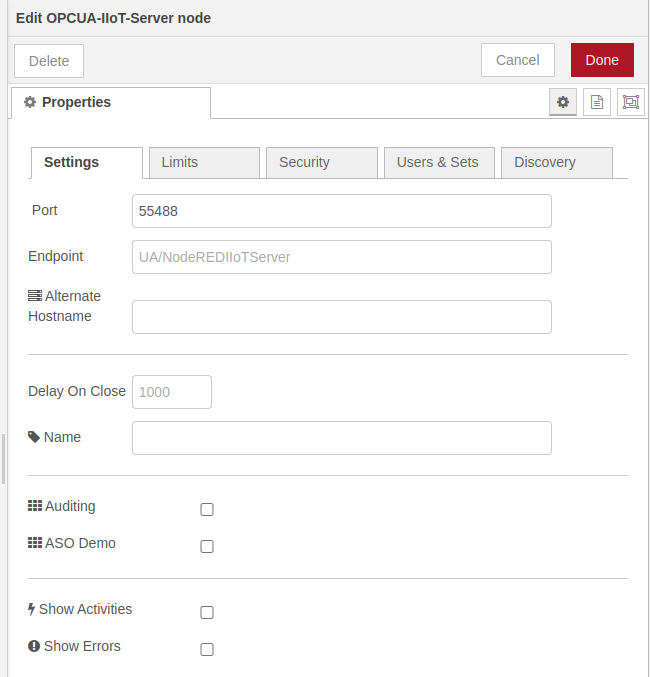
- The OPCUA-IIoT-Inject block is used to inject a value, we specify that it is of type INJECT.
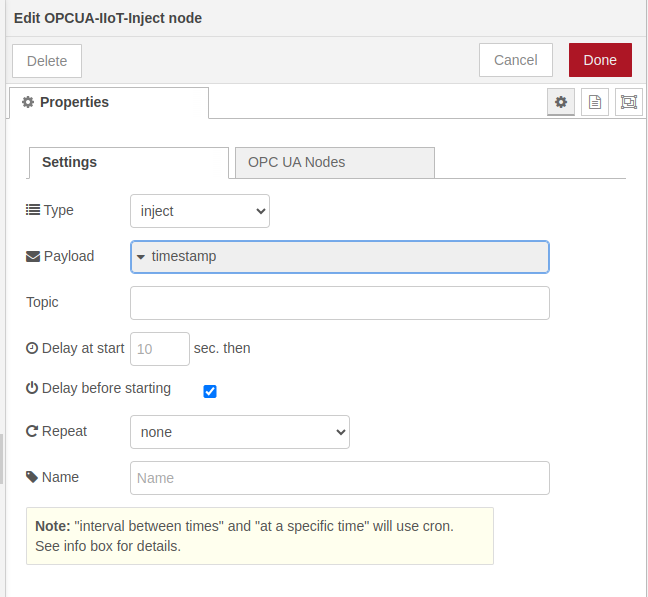
- The OPCUA-IIoT-Server-ASO block is used to assign the value to a route to a Node, we generate the id of the node and the type in this case is FolderType, but in the case of variables we will see that it is BaseDataVariableType.
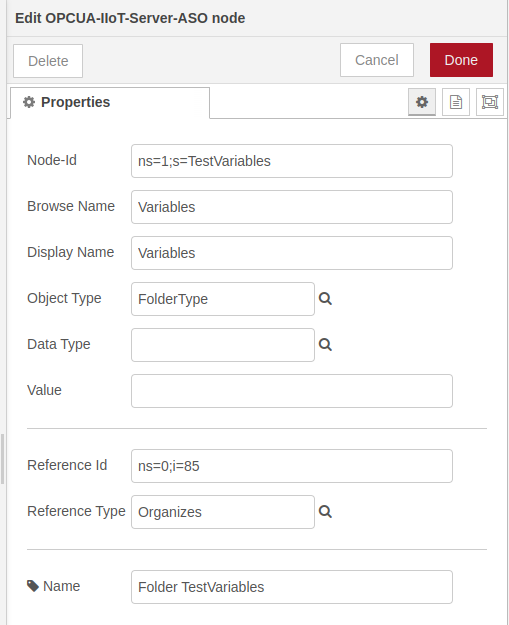
- The OPCUA-IIoT-Server block, to mount and provide a URL to the server, we specify the port where the server will be listening (then the endpoint will be found at: opc.tcp://Device_IP:55488/ ) and other settings such as limit, security, etc.
Here is the code, which corresponds to the previous set of blocks:
[ { "id": "526638e31bd911fe", "type": "tab", "label": "Flow 1", "disabled": false, "info": "", "env": [] }, { "id": "75df2f23680c144e", "type": "OPCUA-IIoT-Server", "z": "526638e31bd911fe", "port": "55488", "endpoint": "", "acceptExternalCommands": true, "maxAllowedSessionNumber": "", "maxConnectionsPerEndpoint": "", "maxAllowedSubscriptionNumber": "", "alternateHostname": "", "name": "", "showStatusActivities": false, "showErrors": false, "asoDemo": false, "allowAnonymous": true, "individualCerts": false, "isAuditing": false, "serverDiscovery": true, "users": [], "xmlsets": [], "publicCertificateFile": "", "privateCertificateFile": "", "registerServerMethod": "1", "discoveryServerEndpointUrl": "", "capabilitiesForMDNS": "", "maxNodesPerRead": "", "maxNodesPerBrowse": "", "delayToClose": "", "x": 1034.3000183105469, "y": 389.9999694824219, "wires": [ [ "1b7404249f5bac6e" ] ] }, { "id": "1b7404249f5bac6e", "type": "debug", "z": "526638e31bd911fe", "name": "", "active": true, "tosidebar": true, "console": false, "tostatus": false, "complete": "true", "targetType": "full", "statusVal": "", "statusType": "auto", "x": 1214.3000183105469, "y": 389.9999694824219, "wires": [] }, { "id": "a94182acacad6858", "type": "OPCUA-IIoT-Server-ASO", "z": "526638e31bd911fe", "nodeId": "ns=1;s=TestVariables", "browsename": "Variables", "displayname": "Variables", "objecttype": "FolderType", "datatype": "", "value": "", "referenceNodeId": "ns=0;i=85", "referencetype": "Organizes", "name": "Folder TestVariables", "x": 540, "y": 340, "wires": [ [ "2c72a02e95e2e53a" ] ] }, { "id": "57a7deb0b12064d7", "type": "OPCUA-IIoT-Inject", "z": "526638e31bd911fe", "injectType": "inject", "payload": "", "payloadType": "date", "topic": "", "repeat": "", "crontab": "", "once": true, "startDelay": "", "name": "", "addressSpaceItems": [], "x": 250, "y": 340, "wires": [ [ "a94182acacad6858" ] ] }, { "id": "09ed80c457c3501a", "type": "OPCUA-IIoT-Server-ASO", "z": "526638e31bd911fe", "nodeId": "ns=1;s=TestDateTime", "browsename": "TestDateTime", "displayname": "Test DateTime", "objecttype": "BaseDataVariableType", "datatype": "DateTime", "value": "", "referenceNodeId": "ns=1;s=TestVariables", "referencetype": "Organizes", "name": "DateTime", "x": 580, "y": 380, "wires": [ [ "2c72a02e95e2e53a" ] ] }, { "id": "f824a67fc665769f", "type": "OPCUA-IIoT-Inject", "z": "526638e31bd911fe", "injectType": "inject", "payload": "", "payloadType": "date", "topic": "", "repeat": "", "crontab": "", "once": true, "startDelay": "15", "name": "", "addressSpaceItems": [], "x": 250, "y": 380, "wires": [ [ "09ed80c457c3501a" ] ] }, { "id": "2c72a02e95e2e53a", "type": "function", "z": "526638e31bd911fe", "name": "thru", "func": "\nreturn msg;", "outputs": 1, "timeout": "", "noerr": 0, "initialize": "", "finalize": "", "libs": [], "x": 854.3000183105469, "y": 389.9999694824219, "wires": [ [ "75df2f23680c144e" ] ] }, { "id": "9b7c6cf023d4b643", "type": "OPCUA-IIoT-Server-ASO", "z": "526638e31bd911fe", "nodeId": "ns=1;s=Variable1", "browsename": "Variable1", "displayname": "Variable1", "objecttype": "BaseDataVariableType", "datatype": "Int16", "value": "", "referenceNodeId": "ns=1;s=TestVariables", "referencetype": "Organizes", "name": "Variable1Int16", "x": 560, "y": 420, "wires": [ [ "2c72a02e95e2e53a" ] ] }, { "id": "9f0e92a8743be1eb", "type": "OPCUA-IIoT-Inject", "z": "526638e31bd911fe", "injectType": "inject", "payload": "125", "payloadType": "num", "topic": "", "repeat": "", "crontab": "", "once": true, "startDelay": "15", "name": "", "addressSpaceItems": [], "x": 270, "y": 420, "wires": [ [ "9b7c6cf023d4b643" ] ] }]
Send data to the server
What this sequence of blocks does is, every second it reads the value I0.10 from the Raspberry PLC, on the one hand it shows the result on the dashboard and, on the other hand, it injects the value into a specified node or variable, writing the read value.

The blocks we have used are:
- In the OPCUA-IIoT-Node block, or WRITE type node, we specify the veriable to which you want to send the data and what type of data it is.
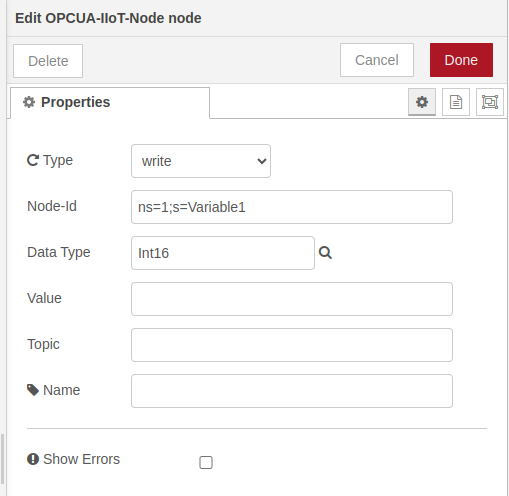
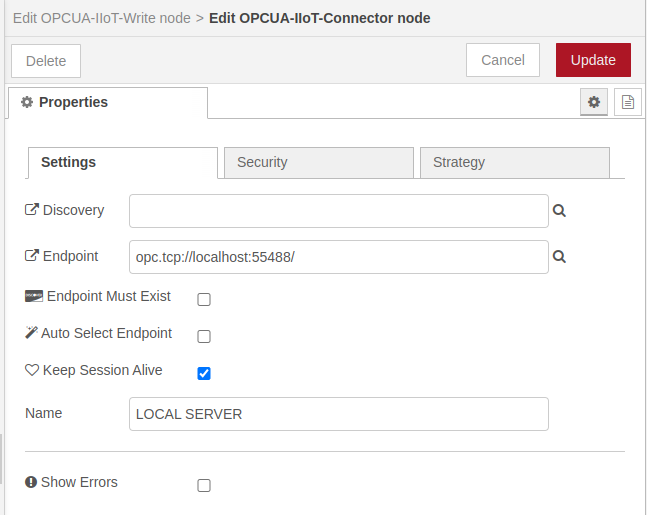
- The OPC UA-IoT-Write block is responsible for connecting to the server that we specify.
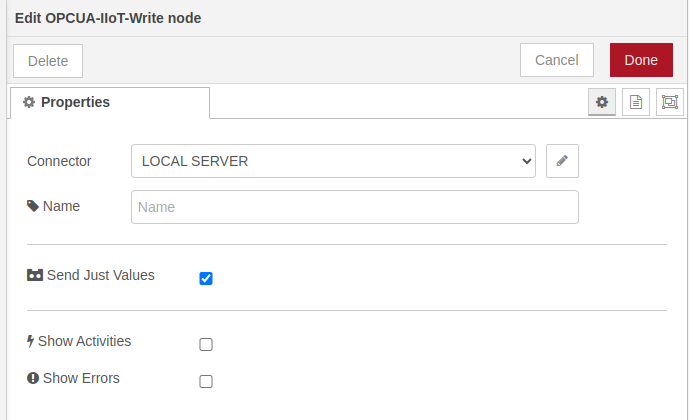
Here we can configure the endpoint of our server where to send the data to the specified variable or node.
Here is the code, which corresponds to the previous set of blocks:
[ { "id": "63f010ebc6ec597c", "type": "tab", "label": "Flow 2", "disabled": false, "info": "", "env": [] }, { "id": "272bd91f019aaa4a", "type": "rpiplc-analog-read", "z": "63f010ebc6ec597c", "rpiplc": "9440adac8659dc1d", "pin": "I0.10", "name": "", "x": 540, "y": 340, "wires": [ [ "72bb01129893f1ae", "27654d48016fa1bf" ] ] }, { "id": "4591787bbefbd0b3", "type": "OPCUA-IIoT-Write", "z": "63f010ebc6ec597c", "connector": "875fa40fca5ccc47", "name": "", "justValue": true, "showStatusActivities": false, "showErrors": false, "x": 850, "y": 340, "wires": [ [ "e4d285975b908c13" ] ] }, { "id": "e4d285975b908c13", "type": "debug", "z": "63f010ebc6ec597c", "name": "debug-set", "active": false, "tosidebar": true, "console": false, "tostatus": false, "complete": "payload", "targetType": "msg", "statusVal": "", "statusType": "auto", "x": 1040, "y": 340, "wires": [] }, { "id": "62aeb4828a504caa", "type": "inject", "z": "63f010ebc6ec597c", "name": "", "props": [ { "p": "payload" }, { "p": "topic", "vt": "str" } ], "repeat": "1", "crontab": "", "once": false, "onceDelay": 0.1, "topic": "", "payload": "", "payloadType": "date", "x": 370, "y": 340, "wires": [ [ "272bd91f019aaa4a" ] ] }, { "id": "72bb01129893f1ae", "type": "OPCUA-IIoT-Node", "z": "63f010ebc6ec597c", "injectType": "write", "nodeId": "ns=1;s=Variable1", "datatype": "Int16", "value": "", "name": "", "topic": "", "showErrors": false, "x": 690, "y": 340, "wires": [ [ "4591787bbefbd0b3" ] ] }, { "id": "27654d48016fa1bf", "type": "ui_gauge", "z": "63f010ebc6ec597c", "name": "", "group": "0cfb93c85cf539c8", "order": 0, "width": 0, "height": 0, "gtype": "gage", "title": "IO.10", "label": "Volts", "format": "{{value}}", "min": 0, "max": "2000", "colors": [ "#00b500", "#e6e600", "#ca3838" ], "seg1": "", "seg2": "", "diff": false, "className": "", "x": 690, "y": 280, "wires": [] }, { "id": "9440adac8659dc1d", "type": "rpiplc-config", "model": "RPIPLC_21", "name": "" }, { "id": "875fa40fca5ccc47", "type": "OPCUA-IIoT-Connector", "discoveryUrl": "", "endpoint": "opc.tcp://localhost:55488/", "endpointMustExist": false, "keepSessionAlive": true, "loginEnabled": false, "name": "LOCAL SERVER", "showErrors": false, "securityPolicy": "None", "securityMode": "None", "individualCerts": false, "publicCertificateFile": "", "privateKeyFile": "", "defaultSecureTokenLifetime": "", "autoSelectRightEndpoint": false, "strategyMaxRetry": "", "strategyInitialDelay": "", "strategyMaxDelay": "", "strategyRandomisationFactor": "", "requestedSessionTimeout": "", "connectionStartDelay": "", "reconnectDelay": "", "maxBadSessionRequests": "10" }, { "id": "0cfb93c85cf539c8", "type": "ui_group", "name": "Default", "tab": "39450c9e599a8dde", "order": 1, "disp": true, "width": "6", "collapse": false, "className": "" }, { "id": "39450c9e599a8dde", "type": "ui_tab", "name": "Home", "icon": "dashboard", "disabled": false, "hidden": false }]
Request data from the server
In this case we want to read the value of a node, for that we must make a request to the OPC UA server, for this we will use these blocks, belonging to the other library. What this example does is simple, every second it makes the request to the variable that we specify and displays it, both as a message in the debug panel and in the dashboard.

The blocks we have used are:
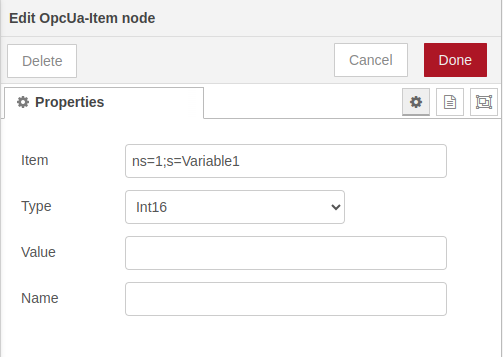
- The OpcUa-Item block, in this block the type of data to be collected is specified.
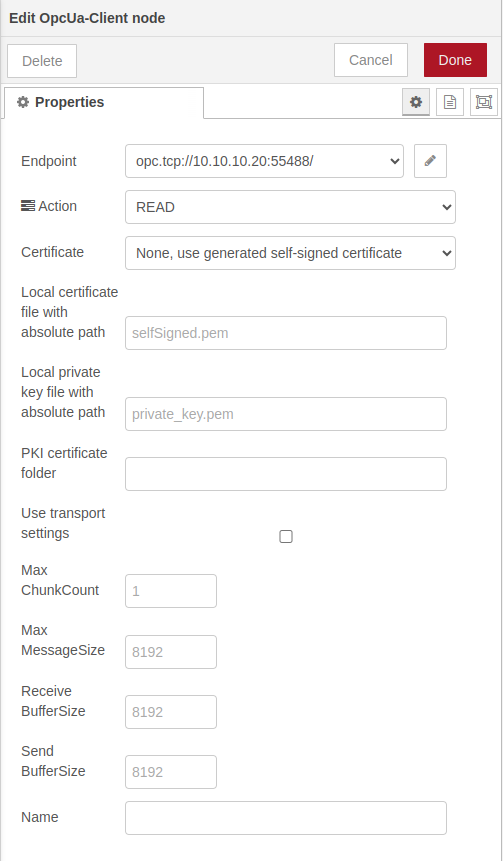
- The OpcUa-Client block will be in charge of pointing to the endpoint, performing the action that we will specify as READ.
Here is the code, which corresponds to the previous set of blocks:
[ { "id": "e0635bf35b9bc5c7", "type": "tab", "label": "Flow 3", "disabled": false, "info": "", "env": [] }, { "id": "f7aab83e0a06b0ba", "type": "OpcUa-Item", "z": "e0635bf35b9bc5c7", "item": "ns=1;s=Variable1", "datatype": "Int16", "value": "", "name": "", "x": 480, "y": 280, "wires": [ [ "c9cbb2df0b559691" ] ], "icon": "font-awesome/fa-tag" }, { "id": "c9cbb2df0b559691", "type": "OpcUa-Client", "z": "e0635bf35b9bc5c7", "endpoint": "9911d4815d3e3bdd", "action": "read", "deadbandtype": "a", "deadbandvalue": 1, "time": 10, "timeUnit": "s", "certificate": "n", "localfile": "", "localkeyfile": "", "folderName4PKI": "", "useTransport": false, "maxChunkCount": "", "maxMessageSize": "", "receiveBufferSize": "", "sendBufferSize": "", "name": "", "x": 680, "y": 280, "wires": [ [ "95de452cad37e33f", "4faa4ea77b213280" ], [] ], "icon": "font-awesome/fa-tasks" }, { "id": "9e76fd28ede4da39", "type": "inject", "z": "e0635bf35b9bc5c7", "name": "", "props": [ { "p": "payload" }, { "p": "topic", "vt": "str" } ], "repeat": "1", "crontab": "", "once": true, "onceDelay": "15", "topic": "", "payload": "1", "payloadType": "num", "x": 270, "y": 280, "wires": [ [ "f7aab83e0a06b0ba" ] ] }, { "id": "95de452cad37e33f", "type": "debug", "z": "e0635bf35b9bc5c7", "name": "debug-get", "active": true, "tosidebar": true, "console": false, "tostatus": false, "complete": "payload", "targetType": "msg", "statusVal": "", "statusType": "auto", "x": 900, "y": 300, "wires": [] }, { "id": "4faa4ea77b213280", "type": "ui_gauge", "z": "e0635bf35b9bc5c7", "name": "", "group": "0cfb93c85cf539c8", "order": 2, "width": 0, "height": 0, "gtype": "gage", "title": "Server Read", "label": "Volts", "format": "{{value}}", "min": 0, "max": "2000", "colors": [ "#00b500", "#e6e600", "#ca3838" ], "seg1": "", "seg2": "", "diff": false, "className": "", "x": 910, "y": 260, "wires": [] }, { "id": "9911d4815d3e3bdd", "type": "OpcUa-Endpoint", "endpoint": "opc.tcp://10.10.10.20:55488/", "secpol": "None", "secmode": "None", "none": true, "login": false, "usercert": false, "usercertificate": "", "userprivatekey": "" }, { "id": "0cfb93c85cf539c8", "type": "ui_group", "name": "Default", "tab": "39450c9e599a8dde", "order": 1, "disp": true, "width": "6", "collapse": false, "className": "" }, { "id": "39450c9e599a8dde", "type": "ui_tab", "name": "Home", "icon": "dashboard", "disabled": false, "hidden": false }]
Ver también
Cómo instalar y utilizar Rapid SCADA en Touchberry Pi
Here I leave the link to the libraries used in case you want to go even deeper into this technology.
- node-red-contrib-iiot-opcua: GITHUB, Package-NPM
- node-red-contrib-opcua: Package-NPM
- OPC: Wikipedia
- OPC UA: Wikipedia