Introducción
En este post aprenderás a probar la comunicación Ethernet en los PLCs basados en Arduino/ESP32.
Requisitos
PLC basado en Arduino: Familia de productos Arduino PLC
PLC basado en ESP32: Familia de productos ESP32 PLC
Librería Ethernet: Librería Arduino Ethernet.h
Cableado
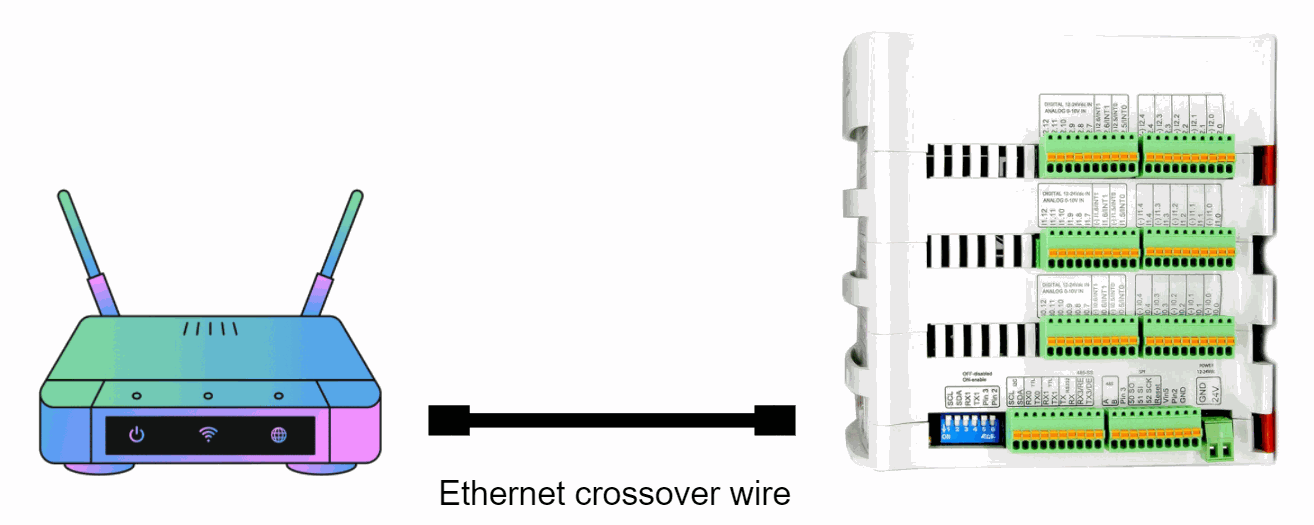
Tu PLC debe estar conectado al router con un cable cruzado de Ethernet:
RECUERDA también que tu PLC debe estar conectado a la fuente de alimentación externa de 12/24Vdc.
Software
La biblioteca Ethernet.h soporta DHCP. Usando Ethernet.begin(mac) con la configuración de red apropiada, el dispositivo Ethernet obtendrá automáticamente una dirección IP. Esto aumenta el tamaño del sketch significativamente. Para asegurarse de que el arrendamiento DHCP se renueva correctamente cuando sea necesario, asegúrate de llamar a Ethernet.maintain() regularmente.
De este modo, tienes la versión DHCP de la prueba:
/*
   Copyright (c) 2017 Boot&Work Corp., S.L. All rights reserved

   This program is free software: you can redistribute it and/or modify
   it under the terms of the GNU Lesser General Public License as published by
   the Free Software Foundation, either version 3 of the License, or
   (at your option) any later version.

   This program is distributed in the hope that it will be useful,
   but WITHOUT ANY WARRANTY; without even the implied warranty of
   MERCHANTABILITY or FITNESS FOR A PARTICULAR PURPOSE.  See the
   GNU Lesser General Public License for more details.

   You should have received a copy of the GNU Lesser General Public License
   along with this program.  If not, see <http://www.gnu.org/licenses/>.
 */

#include <Ethernet.h>

#define REMOTE "www.google.com"

const uint16_t port = 80;
uint8_t mac[] = {0xAA, 0xBB, 0xCC, 0xDD, 0xEE, 0x01};

EthernetClient c;

////////////////////////////////////////////////////////////////////////////////////////////////////
void setup() {
  Serial.begin(9600L);
  Serial.println("ethernet started");

  test();
}

////////////////////////////////////////////////////////////////////////////////////////////////////
void loop() {
  if (!c.connected()) {
    Serial.println("Disconnected");
    test();
  }
  delay(1000);
}

////////////////////////////////////////////////////////////////////////////////////////////////////
void test() {
  //if you need a DHCP IP use this configuration:
  Ethernet.begin(mac);

  switch (Ethernet.hardwareStatus()) {
    case EthernetW5100:
      Serial.println("W5100 found");
      break;

    case EthernetW5200:
      Serial.println("W5200 found");
      break;

    case EthernetW5500:
      Serial.println("W5500 found");
      break;

    default:
      Serial.println("Unknown hardware");
      break;
  }

  uint8_t MAC[6];
  Ethernet.MACAddress(MAC);
  for (int i = 0; i < 6; ++i) {
    if (i > 0) {
      Serial.print(':');
    }
    Serial.print(MAC[i], HEX);
  }
  Serial.println();

  //use this block with DHCP IP:
  Serial.println(Ethernet.localIP());
  if (Ethernet.localIP() == IPAddress({0,0,0,0})) {
    Serial.println("Local IP FAIL");
  } else {
    Serial.println("Local IP OK");
    if (c.connect(REMOTE, port)) {
      Serial.println("Remote connection OK");
    } else {
      Serial.println("Remote connection FAIL");
    }
   }
}/*
Copyright (c) 2017 Boot&Work Corp., S.L. All rights reserved
This program is free software: you can redistribute it and/or modify
it under the terms of the GNU Lesser General Public License as published by
the Free Software Foundation, either version 3 of the License, or
(at your option) any later version.
This program is distributed in the hope that it will be useful,
but WITHOUT ANY WARRANTY; without even the implied warranty of
MERCHANTABILITY or FITNESS FOR A PARTICULAR PURPOSE. See the
GNU Lesser General Public License for more details.
You should have received a copy of the GNU Lesser General Public License
along with this program. If not, see <http://www.gnu.org/licenses/>.
*/
#include <Ethernet.h>
#define REMOTE "www.google.com"
uint8_t mac[] = {0xAA, 0xBB, 0xCC, 0xDD, 0xEE, 0x01};
uint8_t ip[] = {192, 168, 1, 110};
uint8_t dns[] = {192, 168, 1, 1};
uint8_t gateway[] = {192, 168, 1, 1};
uint8_t subnet[] = {255, 255, 0, 0};
uint8_t names[] = {8, 8, 8, 8};
const uint16_t port = 80;
EthernetClient c;
////////////////////////////////////////////////////////////////////////////////////////////////////
void setup() {
Serial.begin(9600L);
Serial.println("ethernet started");
test();
}
////////////////////////////////////////////////////////////////////////////////////////////////////
void loop() {
if (!c.connected()) {
Serial.println("Disconnected");
test();
}
delay(1000);
}
////////////////////////////////////////////////////////////////////////////////////////////////////
void test() {
//if you need an static IP use this configuration (be carefuful with IP conflicts):
Ethernet.begin(mac, ip, dns, gateway, subnet);
switch (Ethernet.hardwareStatus()) {
case EthernetW5100:
Serial.println("W5100 found");
break;
case EthernetW5200:
Serial.println("W5200 found");
break;
case EthernetW5500:
Serial.println("W5500 found");
break;
default:
Serial.println("Unknown hardware");
break;
}
uint8_t MAC[6];
Ethernet.MACAddress(MAC);
for (int i = 0; i < 6; ++i) {
if (i > 0) {
Serial.print(':');
}
Serial.print(MAC[i], HEX);
}
Serial.println();
//use this block with static IP:
Serial.println(Ethernet.localIP());
if (Ethernet.localIP() != IPAddress(ip)) {
Serial.println("Local IP FAIL");
} else {
Serial.println("Local IP OK");
if (c.connect(REMOTE, port)) {
Serial.println("Remote connection OK");
} else {
Serial.println("Remote connection FAIL");
}
}
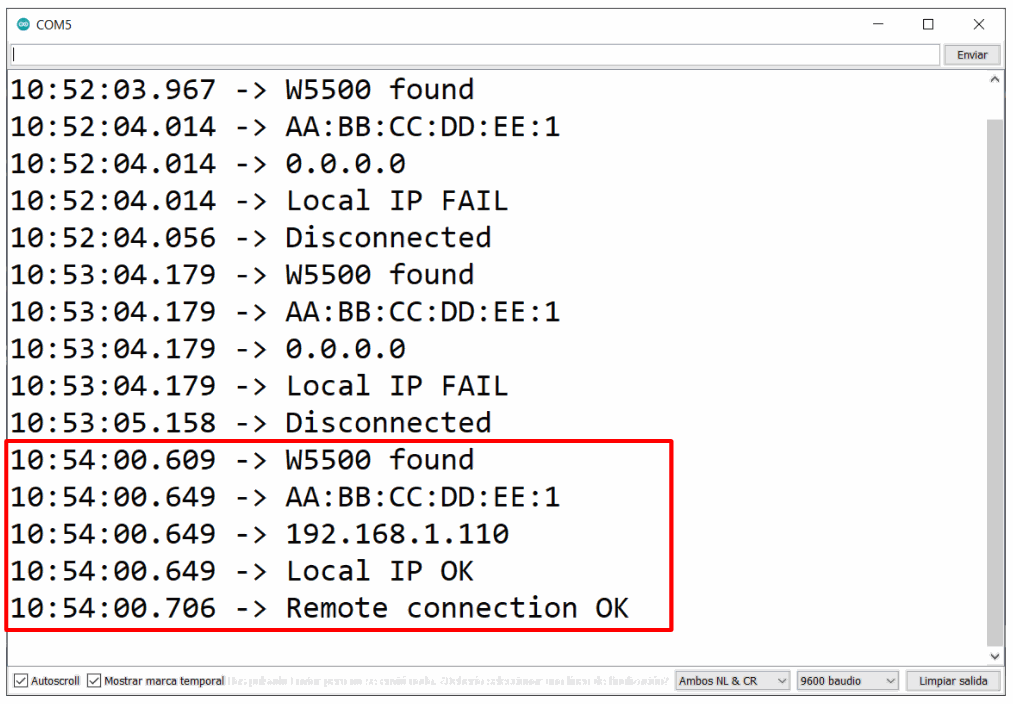
En ambas pruebas debe ver los mensajes de éxito en el Monitor Serial como un resultado de prueba aprobado:
Más información:
Carga de un sketch a un PLC usando ethernet (Parte 2): See more >>
Carga de un sketch a un PLC usando ethernet (Parte 3): See more >>


Test ethernet en Arduino o ESP32 PLC