Introducción
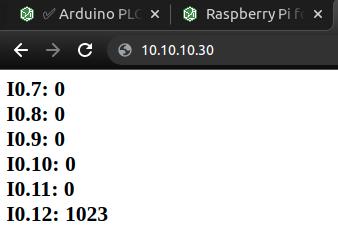
En este tutorial, vamos a usar el M-Duino 21+ PLCpara crear un simple Servidor Web. Usando la Librería Ethernet y gracias a la automatización industrial y la automatización de Arduino, seremos capaces de responder a una petición HTTP. Después de abrir un navegador y navegar a su PLC basado en Arduino con la dirección IP de Ethernet, su Arduino responderá con el HTML suficiente para que un navegador muestre los valores de entrada de los seis pines analógicos.
Últimas publicaciones
Programación
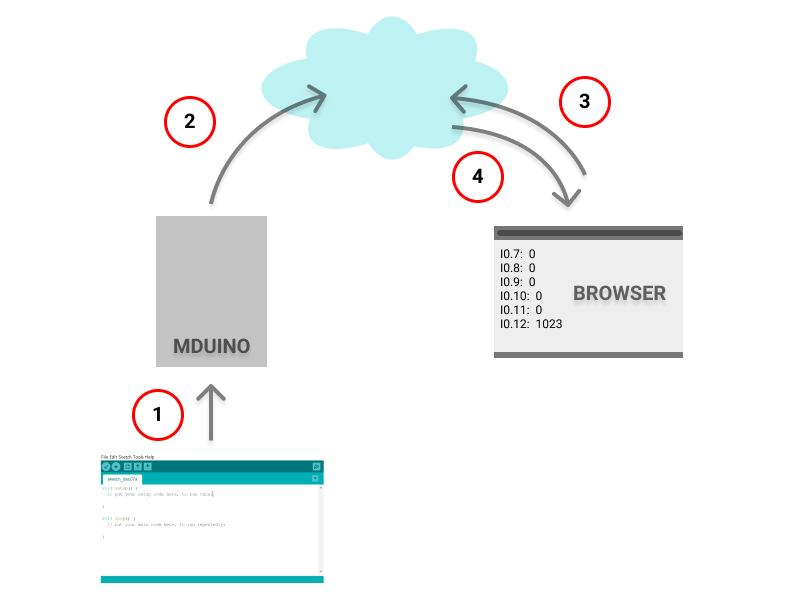
Estos son los pasos que va a seguir nuestra aplicación:

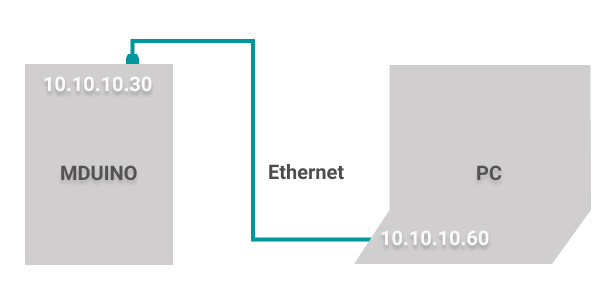
Vamos a programar el PLC M-Duino 21+ con un sketch de Arduino. Por lo tanto, el controlador del PLC industrial Arduino se va a conectar al portátil a través de un cable Ethernet.
- Dirección IP del portátil: 10.10.10.60
- Dirección IP del PLC M-Duino: 10.10.10.30

Cuando el cliente o navegador haga la petición por HTTP, nuestro PLC servirá los datos y se podrán ver en el mismo navegador.
Código Arduino
Para programar nuestro PLC industrial basado en Arduino: M-Duino 21+ PLC, vamos a hacer lo siguiente:
1. Descargar e instalar Arduino IDE >
2. Copia este código de abajo:
/*
  Web Server
 A simple web server that shows the value of the analog input pins.
 using an Arduino Wiznet Ethernet shield.
 Circuit:
 * Ethernet shield attached to pins 10, 11, 12, 13
 * Analog inputs attached to pins A0 through A5 (optional)
 created 18 Dec 2009
 by David A. Mellis
 modified 9 Apr 2012
 by Tom Igoe
 modified 02 Sept 2015
 by Arturo Guadalupi

 */
#include <SPI.h>
#include <Ethernet.h>
// Enter a MAC address and IP address for your controller below.
// The IP address will be dependent on your local network:
byte mac[] = {
  0xDE, 0xAD, 0xBE, 0xEF, 0xFE, 0xED
};
IPAddress ip(10, 10, 10, 30);
// Initialize the Ethernet server library
// with the IP address and port you want to use
// (port 80 is default for HTTP):
EthernetServer server(80);
void setup() {
  // You can use Ethernet.init(pin) to configure the CS pin
  Ethernet.init(10);  // Most Arduino shields
  //Ethernet.init(5);   // MKR ETH shield
  //Ethernet.init(0);   // Teensy 2.0
  //Ethernet.init(20);  // Teensy++ 2.0
  //Ethernet.init(15);  // ESP8266 with Adafruit Featherwing Ethernet
  //Ethernet.init(33);  // ESP32 with Adafruit Featherwing Ethernet
  // Open serial communications and wait for port to open:
  Serial.begin(9600);
  while (!Serial) {
    ; // wait for serial port to connect. Needed for native USB port only
  }
  Serial.println("Ethernet WebServer Example");
  // start the Ethernet connection and the server:
  Ethernet.begin(mac, ip);
  // Check for Ethernet hardware present
  if (Ethernet.hardwareStatus() == EthernetNoHardware) {
    Serial.println("Ethernet shield was not found.  Sorry, can't run without hardware. :(");
    while (true) {
      delay(1); // do nothing, no point running without Ethernet hardware
    }
  }
  if (Ethernet.linkStatus() == LinkOFF) {
    Serial.println("Ethernet cable is not connected.");
  }
  // start the server
  server.begin();
  Serial.print("server is at ");
  Serial.println(Ethernet.localIP());
}
void loop() {
  // listen for incoming clients
  EthernetClient client = server.available();
  if (client) {
    Serial.println("new client");
    // an http request ends with a blank line
    boolean currentLineIsBlank = true;
    while (client.connected()) {
      if (client.available()) {
        char c = client.read();
        Serial.write(c);
        // if you've gotten to the end of the line (received a newline
        // character) and the line is blank, the http request has ended,
        // so you can send a reply
        if (c == '\n' && currentLineIsBlank) {
          // send a standard http response header
          client.println("HTTP/1.1 200 OK");
          client.println("Content-Type: text/html");
          client.println("Connection: close");  // the connection will be closed after completion of the response
          client.println("Refresh: 5");  // refresh the page automatically every 5 sec
          client.println();
          client.println("<!DOCTYPE HTML>");
          client.println("<html>");
          // output the value of each analog input pin
          for (int analogChannel = 0; analogChannel < 6; analogChannel++) {
            int sensorReading = analogRead(analogChannel);
            client.print("I0.");
            client.print(analogChannel+7);
            client.print(": ");
            client.print(sensorReading);
            client.println("<br />");
          }
          client.println("</html>");
          break;
        }
        if (c == '\n') {
          // you're starting a new line
          currentLineIsBlank = true;
        } else if (c != '\r') {
          // you've gotten a character on the current line
          currentLineIsBlank = false;
        }
      }
    }
    // give the web browser time to receive the data
    delay(1);
    // close the connection:
    client.stop();
    Serial.println("client disconnected");
  }
}
3. Verás que en el código, la dirección IP asignada al Controlador Lógico Programable, es 10.10.10.30, ya que la dirección IP de la interfaz Ethernet de nuestro portátil de pruebas, es 10.10.10.60. Por lo tanto, utilice una dirección IP en el mismo rango que su PC.
4. Asegúrate de que tienes las Industrial Shields boards > correctamente instaladas. Selecciona la placa, el modelo y el puerto, y sube el código.
5. Añade algún voltaje a cualquier entrada analógica para ver algún valor real en pantalla.
6. Por último, ve al navegador, donde podrás obtener los datos almacenados de tu servidor web Arduino!

Tutorial de servidor web Arduino