
INTRODUCTION
Many of you are being introduced to the PLC world. Others already know how to use Industrial Shields PLC in order to create great applications like SCADA systems.
In this blog post, we will focus on how to communicate with Modbus RTU by using two Arduino based PLC: M-Duino PLCs.
If you want to learn about Modbus RTU >, and how to communicate two PLCs, or if you already communicated two Arduino based PLCs and you got some issues, you are in the right place!
REQUIREMENTS
- 2x M-Duino PLC >
- Power Supply >
- B type cable, to program the Arduino based PLC.
- Two twisted pair cables
MODBUS RTU
Would you like to know what is Modbus RTU and how does it work? Please, take a look at this blog post, and learn the basics Read >
In this blog post, we will learn how to blink the Q0.0 output from the slave PLC by setting a coil with the PLC master..
CONNECTIONS
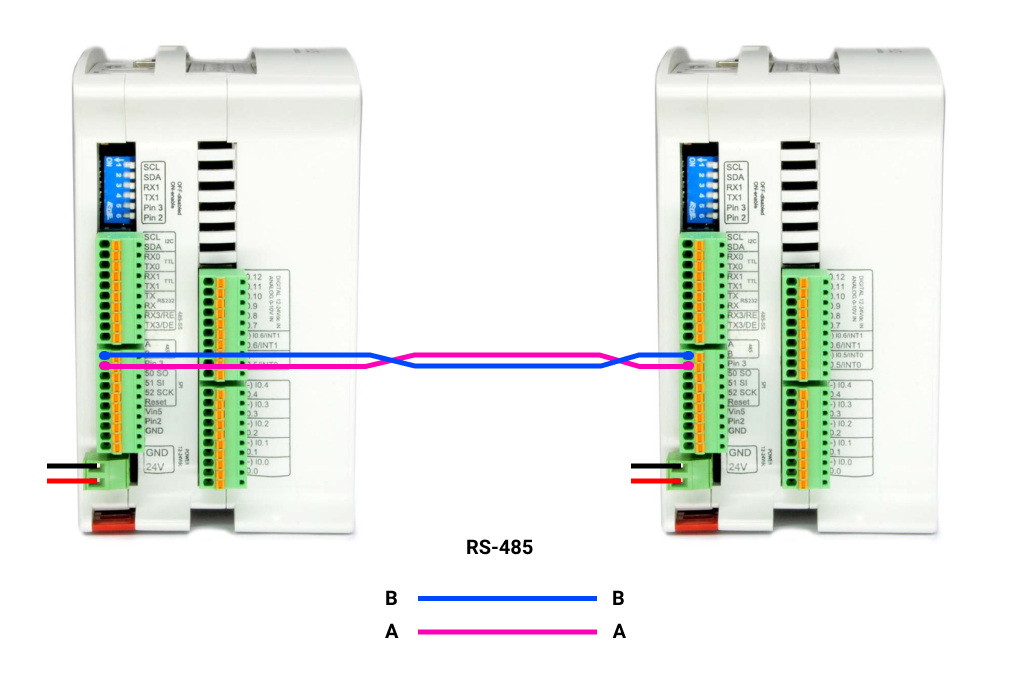
So, in order to set a Modbus RTU connection through RS-485 between the two M-Duino PLC, wire the twisted pair cables, one cable from A+ to A+, and the other one, from B- to B- like in the picture below:
ARDUINO IDE
1. Now, download and install the Arduino IDE >
2. Once the Arduino IDE is ready, install the Industrial Shields boards > to be able to work with the Industrial Shields PLC.
3. Download the Modbus library > and add it to the Arduino IDE.
With this, the programming environment will be ready to program our PLCs!
MODBUS RTU MASTER WRITE COILS
In order to set an M-Duino as a master and the other one as a slave, we will have to program both to execute each code. So, let's follow these steps:
1. Connect the B type cable to one of the M-Duino PLC.
2. Go to the top bar, and click on: File > Examples > Modbus > and select the ModbusRTUMasterWriteCoils sketch.
3. Once the sketch is opened, click on Tools > Board > Industrial Shields boards > And select the M-Duino family.
4. Then, select the PLC model by going to Tools > Model > And selecting the model. In our case: M-Duino 21+
5. Select the port by going to Tools > Port > And select the port of the Arduino board.
6. Finally, either click on the arrow to upload the sketch, or go to Sketch > Upload.
MODBUS RTU SLAVE
Once the master is already programmed, we are going to do the same as with the Master PLC, but choosing the ModbusRTUSlave sketch in the Slave PLC. So:
1. Change the B type cable and connect it to the other M-Duino PLC.
2. Go to the top bar, and click on: File > Examples > Modbus > and select the ModbusRTUSlave sketch.
3. Once the sketch is opened, click on Tools > Board > Industrial Shields boards > And select the M-Duino family.
4. Then, select the PLC model by going to Tools > Model > And selecting the model. In our case: M-Duino 21+
5. Select the port by going to Tools > Port > And select the port of the Arduino board.
6. Finally, either click on the arrow to upload the sketch, or go to Sketch > Upload.
If everything went fine, you will be able to see the Q0.0 output blinking every second!
Troubleshooting
If the PLC set as a slave, does not blink the output, do some checkings:
1. The RS-485 switch must be in Half-Duplex: HD
2. One cable connects A pins. The other one, connects B pins.
3. The PLC is powered between 12 and 24 V.
4. The slaves are the same in both Arduino sketches.
5. The RS-485.begin() function, has the same parameters in both sketches.
Modbus RTU Tutorial: How to Write Single Coil with MDuino PLC