Introduction
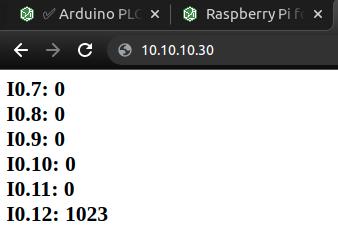
In this tutorial, we will use the M-Duino 21+ PLC to create a simple Web Server. Using the Ethernet Library and thanks to industrial automation and Arduino automation, we will be able to answer an HTTP request with the Ethernet shield. After opening a browser and navigating to your Arduino-based PLC with Ethernet's IP address, your Arduino will respond with just enough HTML for a browser to display the input values from all six analog pins.
Latest Posts
Requirements
Program
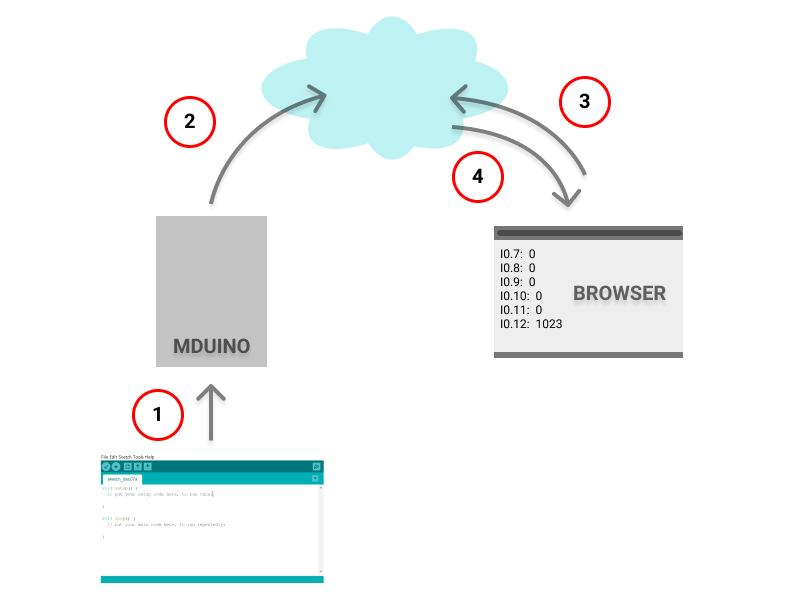
These are the steps that our application is going to follow:

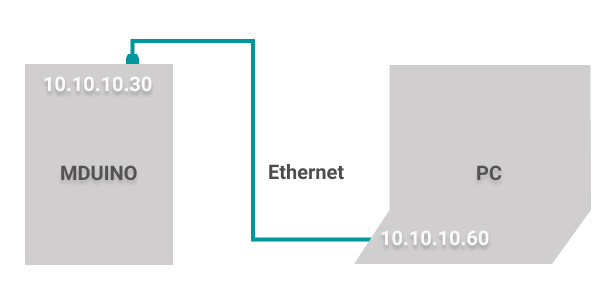
We are going to program the M-Duino 21+ PLC with an Arduino sketch. So, the industrial PLC controller Arduino is going to be connected to the laptop through an Ethernet cable.
- IP address from laptop: 10.10.10.60
- IP address from M-Duino PLC: 10.10.10.30

Then, when the client or browser makes the request by HTTP, our PLC will serve the data and it can be seen in the same browser.
Arduino Code
In order to program our industrial Arduino-based PLC: M-Duino 21+ PLC, we are going to do the following:
1. Download and install the Arduino IDE >
2. Copy this code below:
/*
  Web Server
 A simple web server that shows the value of the analog input pins.
 using an Arduino Wiznet Ethernet shield.
 Circuit:
 * Ethernet shield attached to pins 10, 11, 12, 13
 * Analog inputs attached to pins A0 through A5 (optional)
 created 18 Dec 2009
 by David A. Mellis
 modified 9 Apr 2012
 by Tom Igoe
 modified 02 Sept 2015
 by Arturo Guadalupi

 */
#include <SPI.h>
#include <Ethernet.h>
// Enter a MAC address and IP address for your controller below.
// The IP address will be dependent on your local network:
byte mac[] = {
  0xDE, 0xAD, 0xBE, 0xEF, 0xFE, 0xED
};
IPAddress ip(10, 10, 10, 30);
// Initialize the Ethernet server library
// with the IP address and port you want to use
// (port 80 is default for HTTP):
EthernetServer server(80);
void setup() {
  // You can use Ethernet.init(pin) to configure the CS pin
  Ethernet.init(10);  // Most Arduino shields
  //Ethernet.init(5);   // MKR ETH shield
  //Ethernet.init(0);   // Teensy 2.0
  //Ethernet.init(20);  // Teensy++ 2.0
  //Ethernet.init(15);  // ESP8266 with Adafruit Featherwing Ethernet
  //Ethernet.init(33);  // ESP32 with Adafruit Featherwing Ethernet
  // Open serial communications and wait for port to open:
  Serial.begin(9600);
  while (!Serial) {
    ; // wait for serial port to connect. Needed for native USB port only
  }
  Serial.println("Ethernet WebServer Example");
  // start the Ethernet connection and the server:
  Ethernet.begin(mac, ip);
  // Check for Ethernet hardware present
  if (Ethernet.hardwareStatus() == EthernetNoHardware) {
    Serial.println("Ethernet shield was not found.  Sorry, can't run without hardware. :(");
    while (true) {
      delay(1); // do nothing, no point running without Ethernet hardware
    }
  }
  if (Ethernet.linkStatus() == LinkOFF) {
    Serial.println("Ethernet cable is not connected.");
  }
  // start the server
  server.begin();
  Serial.print("server is at ");
  Serial.println(Ethernet.localIP());
}
void loop() {
  // listen for incoming clients
  EthernetClient client = server.available();
  if (client) {
    Serial.println("new client");
    // an http request ends with a blank line
    boolean currentLineIsBlank = true;
    while (client.connected()) {
      if (client.available()) {
        char c = client.read();
        Serial.write(c);
        // if you've gotten to the end of the line (received a newline
        // character) and the line is blank, the http request has ended,
        // so you can send a reply
        if (c == '\n' && currentLineIsBlank) {
          // send a standard http response header
          client.println("HTTP/1.1 200 OK");
          client.println("Content-Type: text/html");
          client.println("Connection: close");  // the connection will be closed after completion of the response
          client.println("Refresh: 5");  // refresh the page automatically every 5 sec
          client.println();
          client.println("<!DOCTYPE HTML>");
          client.println("<html>");
          // output the value of each analog input pin
          for (int analogChannel = 0; analogChannel < 6; analogChannel++) {
            int sensorReading = analogRead(analogChannel);
            client.print("I0.");
            client.print(analogChannel+7);
            client.print(": ");
            client.print(sensorReading);
            client.println("<br />");
          }
          client.println("</html>");
          break;
        }
        if (c == '\n') {
          // you're starting a new line
          currentLineIsBlank = true;
        } else if (c != '\r') {
          // you've gotten a character on the current line
          currentLineIsBlank = false;
        }
      }
    }
    // give the web browser time to receive the data
    delay(1);
    // close the connection:
    client.stop();
    Serial.println("client disconnected");
  }
}
3. You will see that in the code, the IP address assigned to the Programmable Logic Controller, is 10.10.10.30, since the IP address for the Ethernet interface from our testing laptop, is 10.10.10.60. So, use an IP address in the same range as your PC.
4. Make sure that you have the Industrial Shields boards > correctly installed. Select the board, model and port. And upload the code!
5. Add some voltage to any analog input to see some real value displayed.
6. Finally, go to the browser, where you will be able to get the data stored from your Arduino Web Server!

Arduino Web Server Tutorial