Introduction
In this post, it will be seen how to upload a sketch using the command line instead of using the Arduino IDE. We will show how to upload remotely a sketch using the command line. Without further delay, we will see how this process can be achieved.
Requirements
Installation
First of all we need to know that for uploading a sketch using the command line it is necessary to use the program Avrdude. This program is part of the Arduino IDE tools, as it is the tool that uses Arduino IDE to upload the sketch. This avrdude is found inside the Arduino directory.
For run an executable in the terminal prompt, it is necessary to be in that directory, or call all the path to tell to the terminal that the program you want to execute is found in that directory. A better solution in order to run a program without being in that directory is to add to the variable path, the path where the program is. The path is actually a variable, this variable contains all the paths that the system specifies. So if we want to execute avrdude being in another directory, it is needed to have the avrdude.exe path on the variable path. This way it will automatically search for the program.
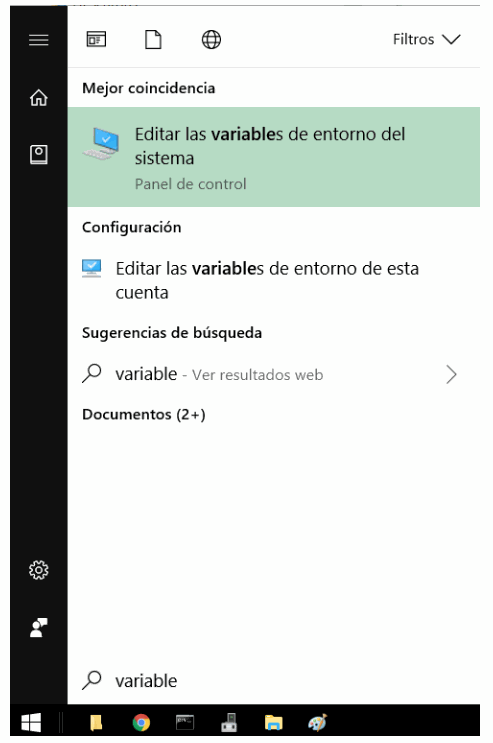
So the first step will be to add the avrdude to the variable path. To get into the Variable Path, you need to search the word “variable” on the start button. This will get you directly to the correct window, jumping some little steps to get into there.
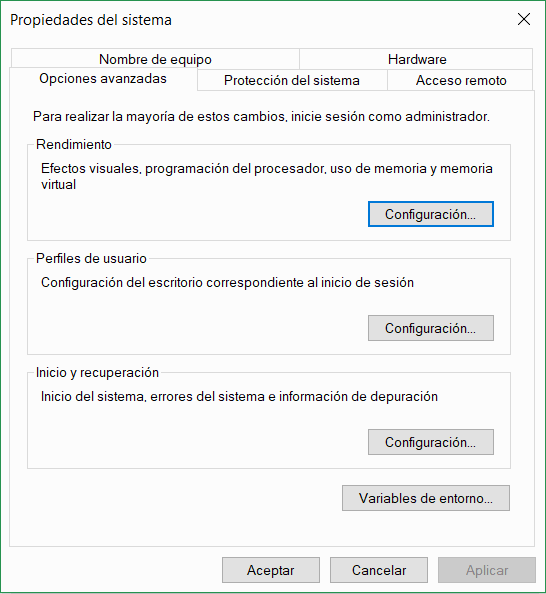
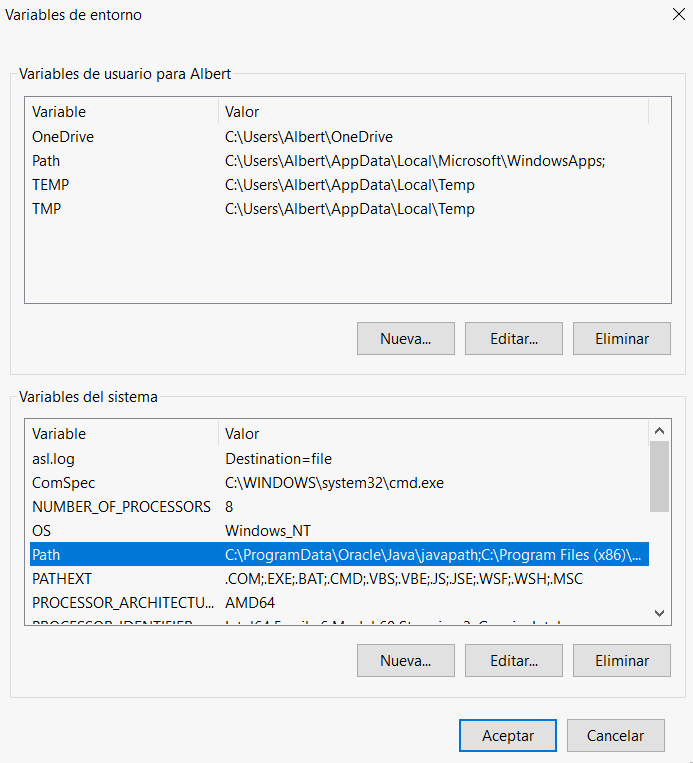
The second thing is to select the Environment variables, where it actually is the variable path.
The third step is to edit the Path variable, adding the path of the Avrdude.
In our case, avrdude is in: C:\Program Files (x86)\Arduino\hardware\tools\avr\bin. The avrdude in our computer is found inside the bin directory.
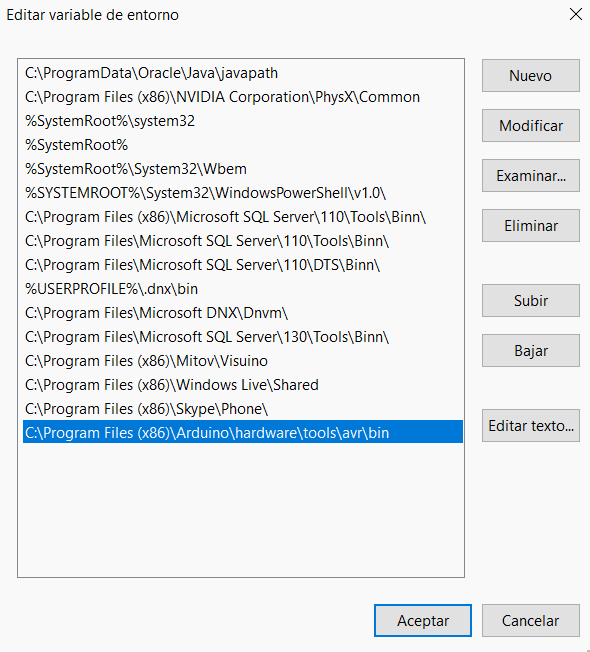
Once it is added, the last thing to do to set the path is to reboot the computer in order to save the changes. Maybe it is already added to the path, but in our case we have needed to do that, so for ensuring the process better do a reboot.
Once it is in the path, we are ready to send the sketch to the PLC. Avrdude works with files with the extensions of .hex. So, a file with the extension .ino (typical sketch) can’t be sent directly to the PLC. So we actually need to have the .hex file. This file is created by the time we compile using the Arduino IDE software. In the future, we will post how to compile a sketch .ino into a .hex to use the terminal for all the process. By now we will focus on just the avrdude. In order to search the .hex, take a look at this post, where we explain how to take the binary file from an .hex file:
Upload an sketch to a PLC using Ethernet Step 2 - Binary File
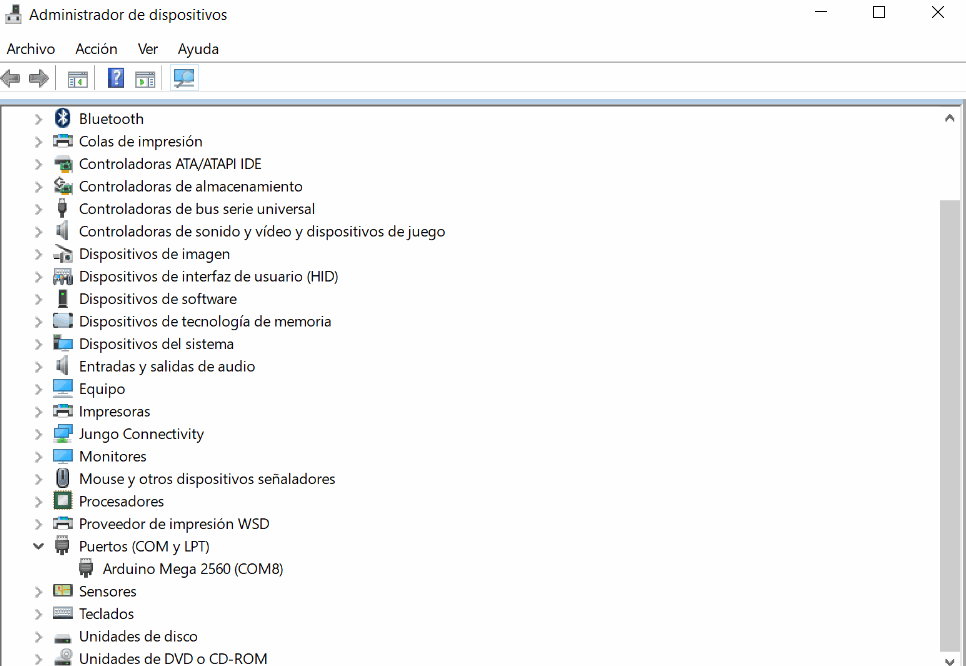
Now, everything is set up, we just need to write the command line in order to upload the sketch. Before that, we need to know which USB port is using the PLC. We need to know it because we need to tell the avrdude where has to send the .hex file. This information is found in the device administrator. So you need to go to the start button and search for the device administrator. After that, you have to go to the Ports, which is one of the options more at the bottom.
Example
Now it is time to upload the sketch using the avrdude command. The command it is:
avrdude -p m2560 -c wiring -P COM9 -b 115200 -U flash:w:example.hex -D -C "C:\Program Files (x86)\Arduino\hardware\tools\avr\etc\avrdude.conf"
To end with this post, we will explain a bit this command. All this options can be displayed if we just write avrdude on the command line, and we press enter. It will automatically show what does it do these options.
-p  -> board. In this case I am uploading the sketch to an M-Duino (Ethernet PLC), which has an Arduino Mega 2560. For Ardbox it is the m32U4
-c  -> type connection. Wiring. We actually do this uploading using the USB wire. Other options are the USBtiny or the avrasp.
-P -> Port. It actually tells to the avrdude where it has to send the .hex file
-b -> Baudrate. Transmission speed.
-U -> :r|w|v:[:format]. As tipycal the memory type used is the flash memory, we want to write(w) and we will write the .hex file
-D -> Disables the auto erase for flash memory.
-C -> Config file. It loads the avrdude configurations. THIS ONE IS REALLY IMPORTANT. It can be also added to the path to ease the calling.
How to upload a sketch to an Arduino PLC using the Command Line