Introduction
Would you like to control a stepper motor with a Node-RED Dashboard from a Raspberry Pi based PLC?
This is just what we are going to do in this post! Thanks to this Node-RED tutorial, you will learn to run a Python script from Node-RED to be able to control the stepper motor connected to a Raspberry PLC by using a Node-RED dashboard.
Node-RED Dashboard
Once here, you have already made sure that the Microstep driver and the stepper motor are rightly connected to the Raspberry PLC.
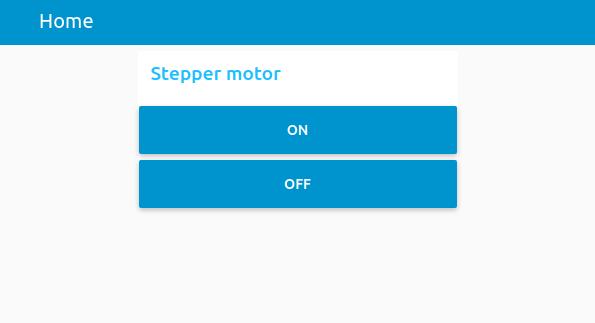
What we are going to do now is to create a Node-RED dashboard to better make the stepper motor run.
So, this is what we are going to do now:
- We are going to add a Dashboard button in order to start running the python script.
- Then, we will take the PID of the process, as when you run this python script, there is a “while True” in the code, so it is always executing.
- Finally, we will stop the execution by adding a dashboard button which will kill the process of the running python script.
Steps to program with Python script and Node-RED
1. First of all, make sure that Node-RED is installed in your Raspberry Pi PLC controller >
2. Check that the Node-RED dashboard nodes are installed >
3. Make sure that your script works when you execute it in your Raspberry PLC and get the path of the file.
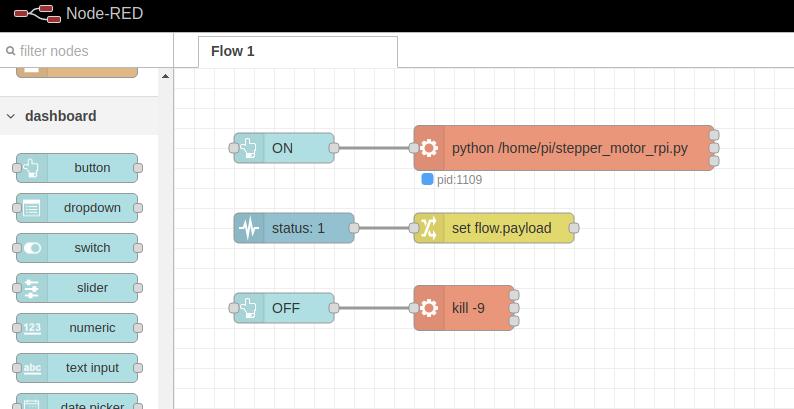
4. Now, go to Node-RED and add a dashboard button. Edit it and just change the label to show it in the Dashboard, in our case: ON.
5. Wire an exec node and type the command, in our case it is in the /home/pi path, and it is called stepper_motor_rpi.py, so:
python /home/pi/stepper_motor_rpi.py

6. Add a status node, and get the status only of the selected node: exec.
7. From the status node, we can get the pid in the msg.status.text field like: pid:XXXX. What we are going to do now is to make a flow variable only with the number value of the pid in order to be able to kill it.
So, add a change node, and set flow.payload to $substringAfter(status.text, ":"). By doing this, we will only take the value after ':', so the PID number.
8. Finally, add another dashboard button, configure that when clicked, send: payload: flow.payload
9. The SIGKILL signal is sent to a process to cause it to terminate immediately, and its syntax is:
kill SIGKILL pid
So, wire the Node-RED dashboard button to an exec node with the command:
kill -9
and append the msg.payload.

Node-RED Dashboard
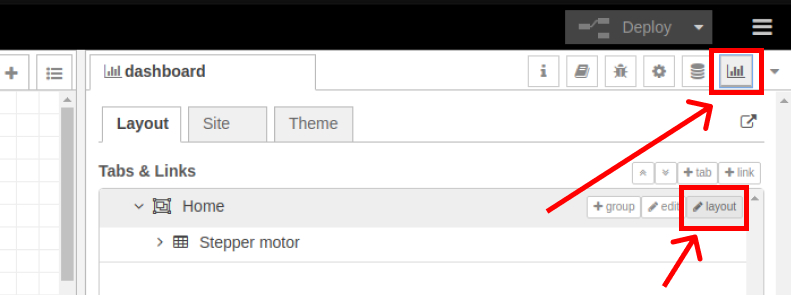
Finally, click on the dashboard icon, click on layout, and move the buttons as you want.
Tip: If you see that you cannot resize the button on the layout editor, go back to the flow, edit the button node and set any size, like 4x3. Go back to the layout, and you will be able to resize the button and display it as you prefer.

If you could not manage to make the application work, copy the flows.json below, go to Node-RED > Menu > Import > Paste it there > Click on Import.
[{"id":"d757dbb1.993928","type":"tab","label":"Flow 1","disabled":false,"info":""},{"id":"a2c7ba39.575c38","type":"exec","z":"d757dbb1.993928","command":"python /home/pi/stepper_motor_rpi.py","addpay":"","append":"","useSpawn":"false","timer":"","oldrc":false,"name":"","x":390,"y":80,"wires":[[],[],[]]},{"id":"bc77eb35.bb6118","type":"status","z":"d757dbb1.993928","name":"","scope":["a2c7ba39.575c38"],"x":120,"y":160,"wires":[["969b13f5.41742"]]},{"id":"969b13f5.41742","type":"change","z":"d757dbb1.993928","name":"","rules":[{"t":"set","p":"payload","pt":"flow","to":"$substringAfter(status.text, \":\")","tot":"jsonata"}],"action":"","property":"","from":"","to":"","reg":false,"x":320,"y":160,"wires":[[]]},{"id":"78de6689.486298","type":"ui_button","z":"d757dbb1.993928","name":"","group":"52b8bacf.7a0fc4","order":1,"width":0,"height":0,"passthru":false,"label":"ON","tooltip":"","color":"","bgcolor":"","icon":"","payload":"","payloadType":"str","topic":"topic","topicType":"msg","x":110,"y":80,"wires":[["a2c7ba39.575c38"]]},{"id":"70ee6d08.a33754","type":"ui_button","z":"d757dbb1.993928","name":"","group":"52b8bacf.7a0fc4","order":2,"width":0,"height":0,"passthru":false,"label":"OFF","tooltip":"","color":"","bgcolor":"","icon":"","payload":"payload","payloadType":"flow","topic":"","topicType":"str","x":110,"y":240,"wires":[["56890f7c.b3568"]]},{"id":"56890f7c.b3568","type":"exec","z":"d757dbb1.993928","command":"kill -9 ","addpay":"payload","append":"","useSpawn":"false","timer":"","oldrc":false,"name":"","x":290,"y":240,"wires":[[],[],[]]},{"id":"52b8bacf.7a0fc4","type":"ui_group","name":"Stepper motor","tab":"beab2351.33bf7","order":1,"disp":true,"width":"6","collapse":false},{"id":"beab2351.33bf7","type":"ui_tab","name":"Home","icon":"dashboard","disabled":false,"hidden":false}]
And enjoy your Node-RED dashboard by controlling the stepper motor visually with your open source PLC Raspberry Pi!

Node-RED & Raspberry Pi automation tutorial: How to run a stepper motor