Introduction
MQTT (or Message Queuing Telemetry Transport) is a lightweight, publish-subscribe network protocol that transports messages between devices.
MQTT is a publishing/subscribe protocol that allows edge-of-network devices to publish to a broker. Clients connect to this broker, which then mediates communication among the devices. When another client publishes a message on a subscribed topic, the broker forwards the message to any client that has been subscribed.
In this post, we will see how we read the temperature from a Dallas DS18B20 temperature sensor connected to a Raspberry Pi industrial PLC. If the value is lower than 25ºC, the message will be sent to an MQTT topic, otherwise it will be sent to another MQTT topic which will activate an output from a second Raspberry Pi based PLC.
Related Links
Requirements
- 2x industrial Raspberry PLC
- 1x Dallas DS18B20 Sensor
- 1x Power Supply
- Either Ethernet or HDMI cable with an external screen to connect to your industrial Raspberry Pi PLC.
Explanation
1. First of all, we are going to connect our Dallas sensor to the first Raspberry Pi PLC controller, which will be our MQTT-Broker. See how >
2. Connect the open source PLC Raspberry Pi to the power supply and turn it on. Then, configure it as MQTT-Broker and install Mosquitto >>>
3. Open Node-RED and make sure you can get the temperature from your Raspberry PLC. >>>
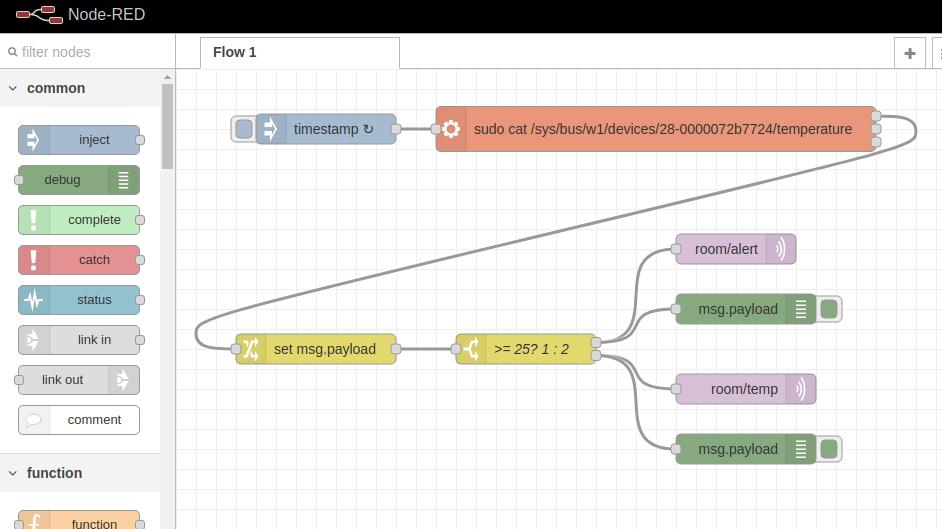
4. Add a change node and set msg.payload to $number($trim(payload))/1000 to get the value as a float number.
5. With a switch node, we will switch the value depending on what it is. If it is higher or equal to 25, it will go to the first output. Otherwise, it will go to the second output.
6. Now, we will add two mqtt-out nodes, with the server as localhost. If the temperature value is equal or higher than 25, we will add a mqtt-nodes with the topic: room/alert. Otherwise, we will wire the second mqtt-out node to the second output with the topic room/temp.
At the moment, your flow should look something like this:
[{"id":"f5e89d62.2ca78","type":"tab","label":"Flow 1","disabled":false,"info":""},{"id":"c9ecc9ac.009798","type":"mqtt-broker","name":"","broker":"localhost","port":"1883","clientid":"","usetls":false,"protocolVersion":"4","keepalive":"60","cleansession":true,"birthTopic":"","birthQos":"0","birthPayload":"","birthMsg":{},"closeTopic":"","closeQos":"0","closePayload":"","closeMsg":{},"willTopic":"","willQos":"0","willPayload":"","willMsg":{},"sessionExpiry":""},{"id":"d69df81e.392788","type":"exec","z":"f5e89d62.2ca78","command":"sudo cat /sys/bus/w1/devices/28-0000072b7724/temperature","addpay":"","append":"","useSpawn":"false","timer":"","oldrc":false,"name":"","x":480,"y":60,"wires":[["e1579f20.1edb1"],[],[]]},{"id":"b26300b2.c2a8b","type":"inject","z":"f5e89d62.2ca78","name":"","props":[{"p":"payload"},{"p":"topic","vt":"str"}],"repeat":"","crontab":"","once":false,"onceDelay":0.1,"topic":"","payload":"","payloadType":"date","x":140,"y":60,"wires":[["d69df81e.392788"]]},{"id":"e1579f20.1edb1","type":"change","z":"f5e89d62.2ca78","name":"","rules":[{"t":"set","p":"payload","pt":"msg","to":"$number($trim(payload))/1000","tot":"jsonata"}],"action":"","property":"","from":"","to":"","reg":false,"x":140,"y":280,"wires":[["75f0962f.1f1808"]]},{"id":"58c5589c.439da8","type":"debug","z":"f5e89d62.2ca78","name":"","active":true,"tosidebar":true,"console":false,"tostatus":false,"complete":"false","statusVal":"","statusType":"auto","x":570,"y":240,"wires":[]},{"id":"11ed5da7.c7b502","type":"mqtt out","z":"f5e89d62.2ca78","name":"","topic":"room/temp","qos":"","retain":"","respTopic":"","contentType":"","userProps":"","correl":"","expiry":"","broker":"c9ecc9ac.009798","x":570,"y":320,"wires":[]},{"id":"75f0962f.1f1808","type":"switch","z":"f5e89d62.2ca78","name":">= 24? 1 : 2","property":"payload","propertyType":"msg","rules":[{"t":"gte","v":"24","vt":"num"},{"t":"else"}],"checkall":"true","repair":false,"outputs":2,"x":350,"y":280,"wires":[["d5cffb1b.6c3d98","58c5589c.439da8"],["11ed5da7.c7b502","1892cf07.c2ea91"]]},{"id":"d5cffb1b.6c3d98","type":"mqtt out","z":"f5e89d62.2ca78","name":"","topic":"room/alert","qos":"","retain":"","respTopic":"","contentType":"","userProps":"","correl":"","expiry":"","broker":"c9ecc9ac.009798","x":560,"y":180,"wires":[]},{"id":"1892cf07.c2ea91","type":"debug","z":"f5e89d62.2ca78","name":"","active":true,"tosidebar":true,"console":false,"tostatus":false,"complete":"false","statusVal":"","statusType":"auto","x":570,"y":380,"wires":[]}]

7. Take the second Raspberry PLC and turn it on, connecting it to the power supply. Also, install Mosquitto.
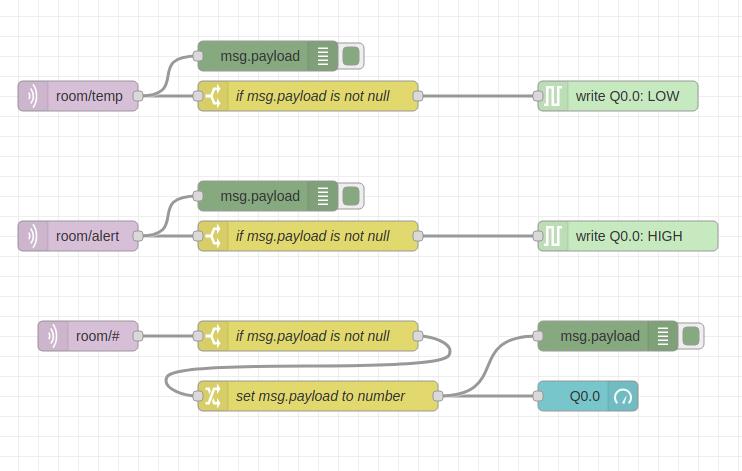
8. Go to Node-RED, add three MQTT-in nodes, and set the server to the IP address of the first Raspberry PLC, which is the MQTT-Broker.
9. After the first mqtt-in node with the topic: room/temp, wire a switch node just to make sure the msg.payload you receive is not null.
10. Then, wire a digital write Industrial Shields node, and select your Raspberry PLC model, output and set the value to LOW.
11. In the second mqtt-in node, set the topic to room/alert to subscribe to the messages. Also, wire a switch node to make sure the msg.payload we get is not null.
12. Finally, add a digital write Industrial Shields node, select your Raspberry PLC model, the same output as in step number 10 and set the value to HIGH.
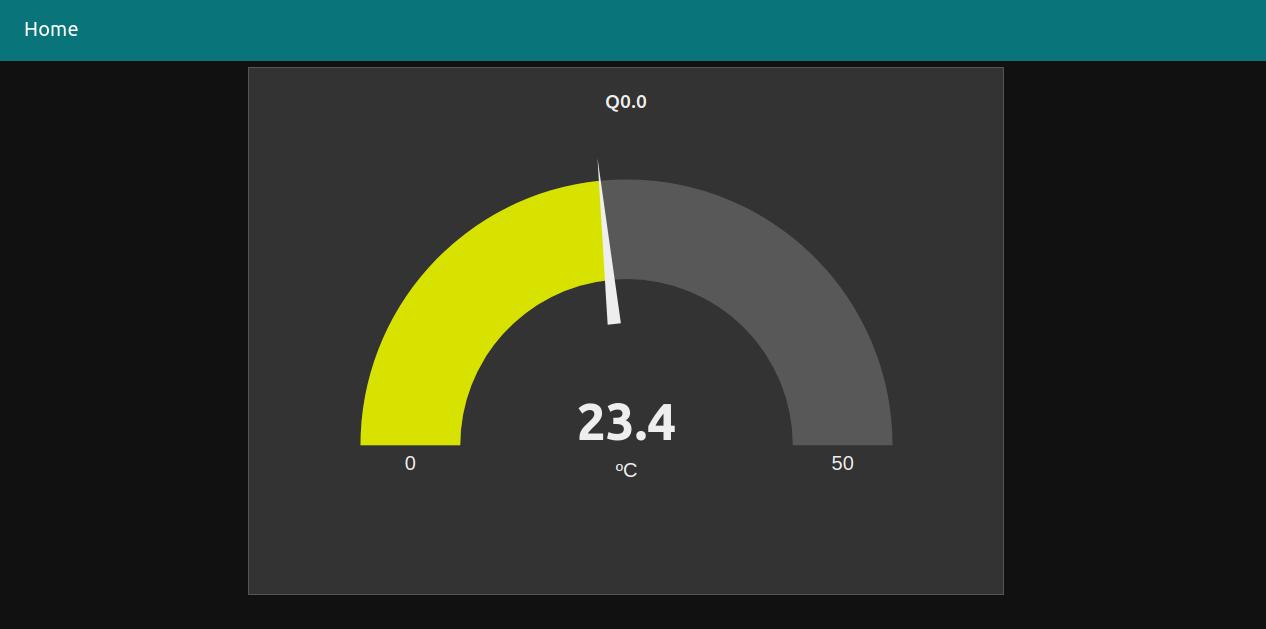
Finally, your flow on your second Raspberry PLC should look something like this:
[{"id":"f5e89d62.2ca78","type":"tab","label":"Flow 1","disabled":false,"info":""},{"id":"2abd1e97.1e3de2","type":"ui_base","theme":{"name":"theme-light","lightTheme":{"default":"#0094CE","baseColor":"#0094CE","baseFont":"-apple-system,BlinkMacSystemFont,Segoe UI,Roboto,Oxygen-Sans,Ubuntu,Cantarell,Helvetica Neue,sans-serif","edited":true,"reset":false},"darkTheme":{"default":"#097479","baseColor":"#097479","baseFont":"-apple-system,BlinkMacSystemFont,Segoe UI,Roboto,Oxygen-Sans,Ubuntu,Cantarell,Helvetica Neue,sans-serif","edited":false},"customTheme":{"name":"Untitled Theme 1","default":"#4B7930","baseColor":"#4B7930","baseFont":"-apple-system,BlinkMacSystemFont,Segoe UI,Roboto,Oxygen-Sans,Ubuntu,Cantarell,Helvetica Neue,sans-serif"},"themeState":{"base-color":{"default":"#0094CE","value":"#0094CE","edited":false},"page-titlebar-backgroundColor":{"value":"#0094CE","edited":false},"page-backgroundColor":{"value":"#fafafa","edited":false},"page-sidebar-backgroundColor":{"value":"#ffffff","edited":false},"group-textColor":{"value":"#1bbfff","edited":false},"group-borderColor":{"value":"#ffffff","edited":false},"group-backgroundColor":{"value":"#ffffff","edited":false},"widget-textColor":{"value":"#111111","edited":false},"widget-backgroundColor":{"value":"#0094ce","edited":false},"widget-borderColor":{"value":"#ffffff","edited":false},"base-font":{"value":"-apple-system,BlinkMacSystemFont,Segoe UI,Roboto,Oxygen-Sans,Ubuntu,Cantarell,Helvetica Neue,sans-serif"}},"angularTheme":{"primary":"indigo","accents":"blue","warn":"red","background":"grey","palette":"light"}},"site":{"name":"Node-RED Dashboard","hideToolbar":"false","allowSwipe":"false","lockMenu":"false","allowTempTheme":"true","dateFormat":"DD/MM/YYYY","sizes":{"sx":48,"sy":48,"gx":6,"gy":6,"cx":6,"cy":6,"px":0,"py":0}}},{"id":"370a3367.6410fc","type":"ui_tab","name":"Home","icon":"dashboard","disabled":false,"hidden":false},{"id":"df66a3f1.c107","type":"ui_group","name":"Default","tab":"370a3367.6410fc","order":1,"disp":false,"width":"6","collapse":false},{"id":"bb36aa61.597e38","type":"mqtt-broker","name":"","broker":"192.168.1.206","port":"1883","clientid":"","usetls":false,"protocolVersion":"4","keepalive":"60","cleansession":true,"birthTopic":"","birthQos":"0","birthPayload":"","birthMsg":{},"closeTopic":"","closeQos":"0","closePayload":"","closeMsg":{},"willTopic":"","willQos":"0","willPayload":"","willMsg":{},"sessionExpiry":""},{"id":"47c3bdde.cc7cf4","type":"rpiplc-config","model":"RPIPLC_57R","name":""},{"id":"4732b096.00a9d","type":"ui_gauge","z":"f5e89d62.2ca78","name":"","group":"df66a3f1.c107","order":1,"width":"6","height":"6","gtype":"gage","title":"Q0.0","label":"units","format":"{{value}}","min":"0","max":"50","colors":["#00b500","#e6e600","#ca3838"],"seg1":"","seg2":"","x":610,"y":400,"wires":[]},{"id":"6950738a.41f41c","type":"mqtt in","z":"f5e89d62.2ca78","name":"","topic":"room/temp","qos":"2","datatype":"auto","broker":"bb36aa61.597e38","nl":false,"rap":true,"rh":0,"x":100,"y":100,"wires":[["cd8a743c.2d6668","149042d1.e6fd8d"]]},{"id":"c3e5d6be.ca1878","type":"mqtt in","z":"f5e89d62.2ca78","name":"","topic":"room/alert","qos":"2","datatype":"auto","broker":"bb36aa61.597e38","nl":false,"rap":true,"rh":0,"x":100,"y":240,"wires":[["19d046ab.66fa69","ef036036.18be"]]},{"id":"de985da3.5608a","type":"mqtt in","z":"f5e89d62.2ca78","name":"","topic":"room/#","qos":"2","datatype":"auto","broker":"bb36aa61.597e38","nl":false,"rap":true,"rh":0,"x":110,"y":340,"wires":[["8a0835b2.7f2258"]]},{"id":"1cb1497a.3de287","type":"rpiplc-digital-write","z":"f5e89d62.2ca78","rpiplc":"47c3bdde.cc7cf4","pin":"Q0.0","value":"1","name":"","x":650,"y":240,"wires":[]},{"id":"6b24e566.f74a5c","type":"rpiplc-digital-write","z":"f5e89d62.2ca78","rpiplc":"47c3bdde.cc7cf4","pin":"Q0.0","value":"0","name":"","x":640,"y":100,"wires":[]},{"id":"cd8a743c.2d6668","type":"switch","z":"f5e89d62.2ca78","name":"if msg.payload is not null","property":"payload","propertyType":"msg","rules":[{"t":"nnull"}],"checkall":"true","repair":false,"outputs":1,"x":330,"y":100,"wires":[["6b24e566.f74a5c"]]},{"id":"19d046ab.66fa69","type":"switch","z":"f5e89d62.2ca78","name":"if msg.payload is not null","property":"payload","propertyType":"msg","rules":[{"t":"nnull"}],"checkall":"true","repair":false,"outputs":1,"x":330,"y":240,"wires":[["1cb1497a.3de287"]]},{"id":"149042d1.e6fd8d","type":"debug","z":"f5e89d62.2ca78","name":"","active":true,"tosidebar":true,"console":false,"tostatus":false,"complete":"false","statusVal":"","statusType":"auto","x":290,"y":60,"wires":[]},{"id":"ef036036.18be","type":"debug","z":"f5e89d62.2ca78","name":"","active":true,"tosidebar":true,"console":false,"tostatus":false,"complete":"false","statusVal":"","statusType":"auto","x":290,"y":200,"wires":[]},{"id":"bc0fe967.7c5da8","type":"debug","z":"f5e89d62.2ca78","name":"","active":true,"tosidebar":true,"console":false,"tostatus":false,"complete":"false","statusVal":"","statusType":"auto","x":630,"y":340,"wires":[]},{"id":"8a0835b2.7f2258","type":"switch","z":"f5e89d62.2ca78","name":"if msg.payload is not null","property":"payload","propertyType":"msg","rules":[{"t":"nnull"}],"checkall":"true","repair":false,"outputs":1,"x":330,"y":340,"wires":[["f025681e.e3cf68"]]},{"id":"f025681e.e3cf68","type":"change","z":"f5e89d62.2ca78","name":"set msg.payload to number","rules":[{"t":"set","p":"payload","pt":"msg","to":"$number(payload)\t","tot":"jsonata"}],"action":"","property":"","from":"","to":"","reg":false,"x":340,"y":400,"wires":[["4732b096.00a9d","bc0fe967.7c5da8"]]}]


By doing this, you will be able to publish different kinds of MQTT messages like temperature values, humidity, etc. to any topic, and subscribe to them from any Raspberry PLC.
Node-RED Tutorial: How to work with MQTT and Raspberry PLC