
Introduction
Interrupts, as their name suggests, are a method of stopping the process being executed by the processor in order to execute a smaller subroutine. This method has a lot of real-world applications and is an important part of automation. These interrupts can be generated externally with the help of hardware such as a switch or a sensor or can be generated by software when a particular condition is met or a set of instructions has been executed.
In this tutorial, you will learn how to use hardware interrupts on an Industrial Shields PLC controller Arduino. It is a general overview with an example code to demonstrate the capabilities regarding interrupt handling and execution for boards that support this feature. For ease of understanding and demonstration, we will loop a text string on the serial monitor and interrupt it with some hardware buttons.
Requirements
Setting up Arduino IDE with Industrial Shield libraries and your specific board. You can find the link to the tutorial here
Hardware
For this tutorial, the industrial controller being used is an M-DUINO PLC Arduino Ethernet 58 IOs Analog/Digital PLUS
If you are using a different board, make sure that your interrupt inputs are enabled and check the DIP switch status. You can go to the technical details page of your specific product and check the hardware section to ensure that the interrupts are enabled.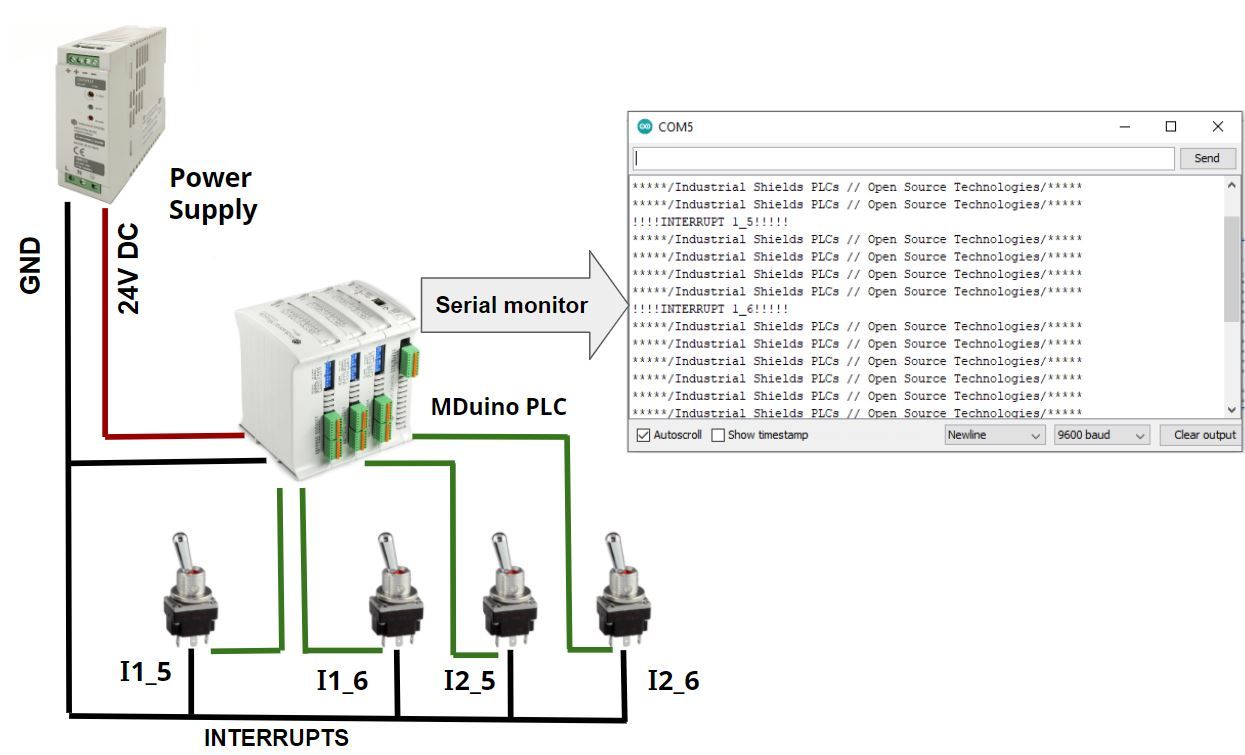
If you are using a different board, make sure that your interrupt inputs are enabled and check the DIP switch status. You can go to the technical details page of your specific product and check the hardware section to ensure that the interrupts are enabled.
Syntax
To initialize the interrupt input on the board, you must use the attachInterrupt() function with the following parameters:
attachInterrupt(digitalPinToInterrupt(pin), ISR, mode)
digitalPinToInterrupt(pin) --> This is to initialize the given pin and assign it as the interrupt.
pin --> In this case, you will not be using the Arduino pin number, but the ones written on your respective boards. For example, "I1_5" for the board that you are using.
ISR --> This stands for Interrupt Service Routine, it is a function that is called when the interrupt is triggered. This should not take any parameters and returns nothing, however, it can pass global variables.
mode --> It specifies when an interrupt should be triggered.
LOW to trigger the interrupt whenever the pin is low
CHANGE to trigger the interrupt whenever the pin changes the value
RISING to trigger when the pin goes from low to high
FALLING for when the pin goes from high to low
The Due, Zero and MKR1000 boards allow also:
HIGH to trigger the interrupt whenever the pin is high.
ATTENTION: The Leonardo board DOES NOT ALLOW:
LOW to trigger the interrupt whenever the pin is low
Code
// Interrupt Example. Industrial Shields PLCs.
// Board used M-DUINO PLC Arduino Ethernet 58 IOs Analog/Digital PLUS
///////Setting up the board and the pins
void setup() {
  Serial.begin(9600L);

  //Initalizing interrupt I1_5
  attachInterrupt(digitalPinToInterrupt(I1_5), isrI1_5, LOW);

  //Initalizing interrupt I1_6
  attachInterrupt(digitalPinToInterrupt(I1_6), isrI1_6, CHANGE);

  //Initalizing interrupt I2_6
    attachInterrupt(digitalPinToInterrupt(I2_5), isrI2_5, RISING);

  //Initalizing interrupt I2_6
  attachInterrupt(digitalPinToInterrupt(I2_6), isrI2_6, FALLING);
}
/////// Printing a String every seconds in a loop continuously to interrupt
void loop() {
 Serial.println("*****/Industrial Shields PLCs // Open Source Technologies/*****");
 delay(1000);
}
///////Interrupt Service Routines
void isrI1_5(){
  Serial.println("!!!!INTERRUPT 1_5!!!!!"); //ISR for I1_5
  }
void isrI1_6 (){
  Serial.println("!!!!INTERRUPT 1_6!!!!!"); //ISR for I1_6
  }
void isrI2_5(){
  Serial.println("!!!!INTERRUPT 2_5!!!!!"); //ISR for I2_5
  }
void isrI2_6 (){
  Serial.println("!!!!INTERRUPT 2_6!!!!!"); //ISR for I2_6
  }
/////////////End//////////////
How to use Interrupt Inputs with industrial Arduino boards