
Modbus and Raspberry PLC
This is the third post of the Modbus and Raspberry PLC collection.
This
post will be focused on Python, and we will create a simple program as an introduction to Modbus RTU and Python.
Requirements
- Raspberry PLC
- Modbus RTU slave device or Industrial Shields PLC
First steps
We will use pyModbus as the main library, as its usage is very easy to understand and it has plenty of useful functionalities.
To install it, run this command in the terminal:
$ pip install pymodbus
Simple Python code
Then, copy this code in a file with a name such as rtu.py:
from pymodbus.client import ModbusSerialClient

serial_port = '/dev/ttySC0'
baud_rate = 38400
unit_id = 31

coil_address = 0
value_to_write = 1

def write_coil(client, address, value):

    result = client.write_coil(address, value, unit_id)

    if not result.isError():
        print(f"Successfully wrote value {value} to coil address {address}")
    else:
        print(f"Failed to write value to coil address {address}")

client = ModbusSerialClient(method='rtu', port=serial_port, baudrate=baud_rate, stopbits=1, bytesize=8, parity='N')

if client.connect():
    write_coil(client, coil_address, value_to_write)

    client.close()
else:
    print(f"Failed to connect to Modbus RTU on {serial_port}")
This code does the following:
- We include the ModbusSerialClient library, needed for the subsequent code.
- We define the parameters of the Modbus RTU communication, such as the port /dev/ttySC0 (pins A+ and B- of the Raspberry PI PLC), the baudrate and Unit-Id. Remember to check your slave device characteristics to adapt the values if needed.
- After that, the coil address and the value to write are defined. To send a 0 to the coil, set the variable value_to_write to 0.
- Next, we define the function that will send the Modbus message. In it, multiple parameters are needed, such as the client object which will be created later on the code, the address to write and the value to write.
- Then, we create the client object. As seen, the ModbusSerialClient is configured as RTU, with the serial_port defined previously, with the correct baudrate and the specific configuration of the port. Again, check the specifications of the slave device to match this parameters.
- Finally, we execute the write_coil function previously defined and the code ends.
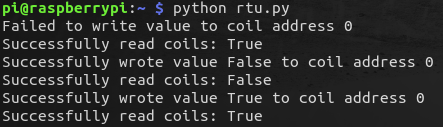
To run the script, use python rtu.py to send a "write coil" message to the slave!

Complex Python code
We have only seen how to write, but how about reading? By modifying the existing code, we can create a loop to keep reading and writing to see how the values change over time:
from pymodbus.client import ModbusSerialClient
import time

serial_port = '/dev/ttySC0'
baud_rate = 38400
unit_id = 31

coil_address = 0
value_to_write = True
num_to_read = 1

def write_coil(client, address, value):
    result = client.write_coil(address, value, unit_id)

    if not result.isError():
        print(f"Successfully wrote value {value} to coil address {address}")
    else:
        print(f"Failed to write value to coil address {address}")

def read_coil(client, address, quantity):
    result = client.read_coils(address, quantity, unit_id)

    if not result.isError():
        print(f"Successfully read coils: %s" % result.bits)
    else:
        print(f"Failed to read coils from address {address}")

client = ModbusSerialClient(method='rtu', port=serial_port, baudrate=baud_rate, stopbits=1, bytesize=8, parity='N')

if __name__=='__main__':
    try:
        while True:
            if client.connect():
                write_coil(client, coil_address, value_to_write)
                value_to_write = not value_to_write

                read_coil(client, coil_address, num_to_read)

                client.close()
            else:
                print(f"Failed to connect to Modbus RTU on {serial_port}")

            time.sleep(1)
    except KeyboardInterrupt:
        pass
In this Python script, we do a couple more things:
- We create the function read_coil, which works almost the same as the write_coil but instead of writing, it reads from the address. As reading 1 coil returns a list of 8 bits, we can just take the first one (the one we are modifying in the write function) by changing the result.bits to result.bits[0].
- By adding an infinite loop, we can do the following:
- Writing a 1 to the coil
- Reading the coil (returns 1)
- Writing a 0 to the coil
- Reading the coil (returns 0)
- ...
- The loops repeats every second, writing 1 and 0 over and over.
Want to know more about Modbus?
Check out the other posts from the collection here:
Part 1: Modbus RTU and Node-RED
Introduction to Modbus and Raspberry PLC. Part 3